IPTC presets can be created or edited on the camera and embedded in new photographs
as described below.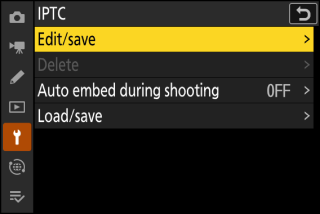
-
You can also load IPTC presets created on a computer.
-
To create IPTC presets and save them to memory cards for later import, use IPTC Preset Manager (IPTC Preset Manager).
- Creating, Renaming, Editing, and Copying Presets
- Deleting Presets
- Embedding Presets
- Copying Presets to a Memory Card
- Copying Presets to the Camera
Creating, Renaming, Editing, and Copying Presets
Highlight [] and press 2 to display the [] list of existing presets.
-
To edit or rename a preset, highlight it and press 2. To create a new preset, highlight “Unused” and press 2.
-
[]: Rename the preset.
-
[]: Display the selected preset (Cautions: IPTC Information). Selected fields can be edited as desired.
-
-
To copy a preset, highlight it and press X. Highlight the destination, press J, and name the copy.
Deleting Presets
To delete presets, highlight [] and press 2.
Embedding Presets
Highlighting [] and pressing 2 displays a list of presets. Highlight a preset and press J; the selected preset will be embedded in all subsequent photographs. To disable embedding,
select [].
-
Embedded presets can be viewed on the [] page in the photo information display.
-
To display the [] page, select (M) both [] and [] for [] in the playback menu.
Copying Presets to a Memory Card
To copy IPTC presets from the camera to a memory card, select [] > [] or [], then highlight [] and press 2. Select the desired preset and destination (1–99) and press J to copy the preset to the card.
Copying Presets to the Camera
The camera can store up to ten presets; to copy IPTC presets from a memory card to
a selected destination on the camera, select [] > [] or [], then highlight [] and press 2.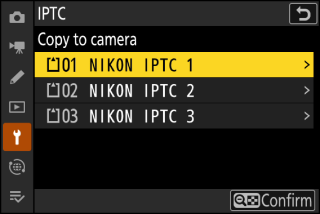
-
Highlight a preset and press J to proceed to the [] list. To preview the highlighted preset, press W (Q) instead of pressing J. After previewing the preset, press J to proceed to the [] list.
-
Highlight a destination and press J to display a dialog where you can name the preset. Name the preset as desired and press X to copy the preset to the camera.
-
In addition to the ten presets mentioned above, the camera can store up to three XMP/IPTC presets created on a computer and saved in XMP format. XMP/IPTC presets are not displayed during playback. Nor can they be copied from the camera to a memory card.
-
The camera supports standard roman alphanumeric characters only. Other characters will not display correctly except on a computer.
-
Preset names (Creating, Renaming, Editing, and Copying Presets) may be up to 18 characters long. If a preset with a longer name is created using a computer, all characters after the eighteenth will be deleted.
-
The number of characters that may appear in each field is given below. Any characters over the limit will be deleted.
|
Field |
Max. length |
|---|---|
|
Caption |
2000 |
|
Event ID |
64 |
|
Headline |
256 |
|
Object name |
256 |
|
City |
256 |
|
State |
256 |
|
Country |
256 |
|
Category |
3 |
|
Supp. Cat. (supplemental categories) |
256 |
|
Byline |
256 |
|
Byline title |
256 |
|
Writer/editor |
256 |
|
Credit |
256 |
|
Source |
256 |
IPTC is a standard established by the International Press Telecommunications Council (IPTC) with the intent of clarifying and simplifying the information required when photographs are shared with a variety of publications.
IPTC presets can be created on a computer and saved to memory cards using IPTC Preset Manager software. IPTC Preset Manager can be downloaded free of charge from the URL below. Instructions on use are available via online help.