“NEF (RAW) processing” is used to save NEF (RAW) pictures in other formats, such as JPEG. JPEG copies of NEF (RAW) pictures can be created on the camera as described below.
-
Select [] in the retouch menu.
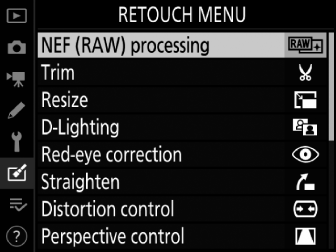
Highlight [] and press 2.
-
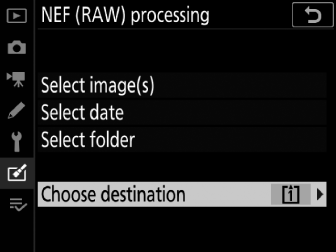
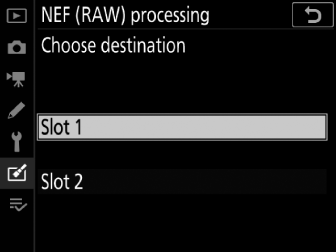
Choose a destination.
-
If two memory cards are inserted, highlight [] and press 2.
-
[] is not available when only one memory card is inserted. Proceed to Step 3.
-
Press 1 or 3 to highlight a card slot and press J.
-
-
Choose how pictures are selected.
Option
Description
[]
Create JPEG copies of selected NEF (RAW) pictures. Multiple NEF (RAW) pictures can be selected.
[]
Create JPEG copies of all NEF (RAW) pictures taken on selected dates.
[]
Create JPEG copies of all NEF (RAW) pictures in a selected folder.
If you chose [], proceed to Step 5.
-
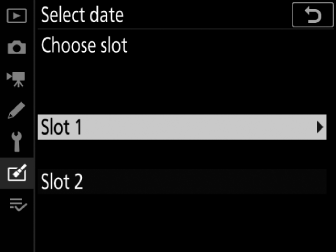
Select the source slot.
-
Highlight the slot with the card containing the NEF (RAW) pictures and press 2.
-
You will not be prompted to select the slot if only one memory card is inserted.
-
-
Select photographs.

If you chose []:
-
Highlight pictures using the multi selector.
-
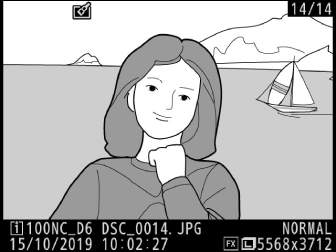
To view the highlighted picture full screen, press and hold the X button.
-
To select the highlighted picture, press the center of the multi selector. Selected pictures are indicated by a L icon. To deselect the current picture, press the center of the multi selector again; the L will no longer be displayed. All pictures will be processed using the same settings.
-
Press J to proceed once selection is complete.
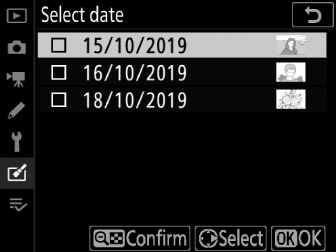
If you chose []:
-
Highlight dates using the multi selector and press 2 to select (M) or deselect (U).
-
All pictures taken on dates marked with a check (M) will be processed using the same settings.
-
Press J to proceed once selection is complete.
If you chose []:
Highlight a folder and press J to select; all pictures in the selected folder will be processed using the same settings.
-
-
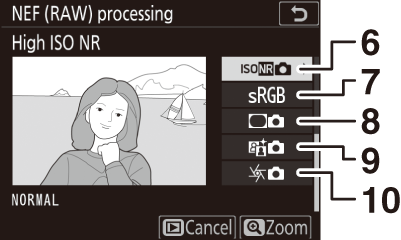
Choose settings for the JPEG copies.
-
The settings in effect when the photograph was taken appear below a preview.
-
To use the setting in effect when the photograph was taken, if applicable, select [].
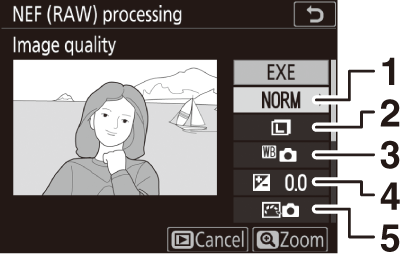

1 Image quality ( Adjusting Image Quality )
2 Image size ( Choosing an Image Size )
3 White balance (Achieving Natural Colors with Different Light Sources (White Balance))
4 Exposure compensation ( Exposure Compensation )
5 Set Picture Control (Image Processing (Picture Controls))
6 High ISO NR ( High ISO NR )
7 Color space ( Color Space )
8 Vignette control ( Vignette Control )
9 Active D-Lighting (Active D-Lighting)
10 Diffraction compensation ( Diffraction Compensation )
-
-
Copy the photographs.
-
Highlight [] and press J to create JPEG copies of the selected photographs.
-
If multiple photos are selected, a confirmation dialog will be displayed after you highlight [] and press J; highlight [] and press J to create JPEG copies of the selected photos.
-
To exit without copying the photographs, press the G button.
-
-
NEF (RAW) processing is available only with NEF (RAW) pictures created with this camera. Pictures in other formats and NEF (RAW) photos taken with other cameras or Camera Control Pro 2 cannot be selected.
-
[] can only be set to values between −2 and +2 EV.