Adjust settings for upload to a computer or ftp server connected via an Ethernet cable or optional WT-6 wireless transmitter.
Wired LAN/WT Functions
Select [] to enable connection via Ethernet or a wireless transmitter. The camera’s built-in Bluetooth and Wi-Fi turn off.
Choose Hardware
Choose the connection type: Ethernet (“wired LAN”) or wireless LAN.
Network Settings
Display the network profiles list, where you can create new profiles or select an existing profile.
-
Highlight a profile and press J to connect to the highlighted host computer or ftp server.
-
The camera can store up to nine network profiles.
-
To delete the highlighted profile, press O (Q).
-
To view information on the highlighted profile, press g (h/Q).
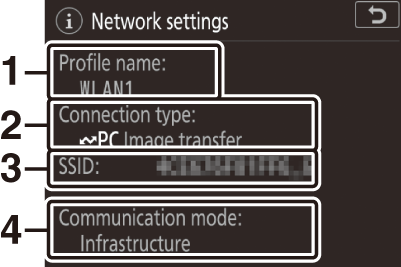
1 Profile name
2 Connection type
3 SSID (wireless connections only)
4 Communication mode
-
To edit the highlighted profile (Edit), press W (M).
Synchronized Release
When a WT-6 wireless transmitter is connected, the shutters on remote cameras can be synchronized with the release on a master camera. For more information, see “Synchronized Release” ( Synchronized Release ).
Synchronize Date and Time
Synchronize the clocks on two cameras connected via Ethernet. For more information, see “Synchronizing Camera Clocks” ( Synchronizing Camera Clocks ).
Create Profile
Create new network profiles. For more information, see “Creating a Network Profile (Ethernet)”( Creating a Network Profile (Ethernet) ) and “Creating Network Profiles (WT-6)”( Creating Network Profiles (WT-6) ).
|
Option |
Description |
|---|---|
|
[] |
Create a new profile with the help of a wizard. |
|
[] |
Enter [] or [] settings manually. |
Copy to/from Card
Use this option to share [] and [] profiles.
-
If there are two memory cards inserted in the camera, the card in the Slot 1 will be used for both “copy from” and “copy to” operations.
|
Option |
Description |
|---|---|
|
[] |
Copy profiles from the root directory of the memory card to the camera profile list. |
|
[] |
Copy profiles from the camera to the memory card. Highlight a profile and press J to copy it to the memory card.
|
Edit
Edit wireless, TCP/IP, ftp, and other settings for existing profiles. Highlight a
profile in the profile list and press W (M) to display [] options.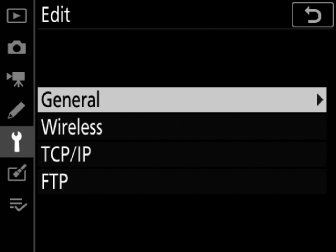
If the shutter-release button is pressed while menus are displayed, the monitor will turn off. Any changes to the current profile will be lost.
Edit the profile name and enable or disable password protection.
|
Option |
Description |
|---|---|
|
[] |
Edit the profile name. |
|
[] |
Enable password protection to prevent others from viewing network settings. |
Edit the following wireless settings:
|
Option |
Description |
|---|---|
|
[] |
Enter the name (SSID) of the network on which the host computer or ftp server is located. This is a required field. |
|
[] |
Choose an option according to the type of network.
|
|
[] |
Choose a channel ([] mode only). If [] is selected, the channel will be chosen automatically. |
|
[] |
Choose from [] (open system), [] (shared key), [], and []. [] and [] are available only when [] is selected for []. |
|
[] |
Choose the type of encryption used on the network. If the network uses encryption, enter an encryption key; the number and type of characters in the key vary with the type of encryption selected.
|
|
[] |
If [] is selected for [] and [], [], [], or [] is selected for [], choose a key index matching that used by the access point or host computer. |
The choices available for [] depend on the option chosen for []:
|
Authentication |
Encryption |
|---|---|
|
[] |
[], [], [], [], []
|
|
[] |
[], [], [], [] |
|
[] |
[], [] |
|
[] |
[] |
Enter TCP/IP information.
|
Option |
Description |
|---|---|
|
[] |
Choose whether the camera obtains the IP address and sub-net mask automatically or via manual entry. A TCP/IP address is required in either case.
|
|
[] |
If the network requires a gateway address, enter the address supplied by the network administrator. |
|
[] |
If a Domain Name Server exists on the network, enter the address supplied by the network administrator. |
Enter information for connection to an ftp server.
|
Option |
Description |
|---|---|
|
[] |
Choose the ftp server type and enter the URL or IP address, destination folder, and port number. An IP address is required. |
|
[] |
Select [] to enable PASV mode. |
|
[] |
Select [] for anonymous login. This option can only be used with servers that are configured for anonymous login. Select [] to supply a user ID and password. |
|
[] |
Enable this option as required. |
Options
Adjust upload settings. The settings available vary with the connection type.
Auto Send
Select [] to upload new photos as they are taken.
-
Upload begins only after the photo has been recorded to the memory card. Be sure a memory card is inserted in the camera.
-
Movies and photos taken during filming are not uploaded automatically when recording is complete. They must instead be uploaded from the playback display.
Delete After Send
Select [] to delete photographs from the camera memory card automatically once upload is complete.
-
Sequential file numbering is used when [] is selected, regardless of the item selected for Custom Setting d9 [].
-
Files marked for transfer before you selected [] are not deleted.
-
Deletion may be suspended during some camera operations.
Send File As
When uploading NEF + JPEG images, choose whether to upload both the NEF (RAW) and JPEG files or only the JPEG copy.
-
When [] is selected for [] in the photo shooting menu, the option chosen for [] applies only to photos uploaded automatically by selecting [] for [].
JPEG + JPEG Slot Selection
Choose a source slot for auto upload when taking pictures with [] selected for [] in the photo shooting menu.
Overwrite If Same Name
Choose [] to overwrite files with duplicate names during upload. Choose [] to add numbers to the names of newly uploaded files as necessary to prevent existing files being overwritten.
Protect If Marked to Send
Select [] to automatically protect files marked for upload. Protection is removed as the files are uploaded.
Send Marking
Select [] to add a timestamp to the pictures on the camera memory card giving the time of upload.
The timestamp can be viewed using NX Studio. For more information, see NX Studio’s online help.
Send Folder
Select folders for upload. All photos in the selected folders (including those already marked as “sent”) will be marked for upload.
Movies cannot be uploaded using this option. They must instead be uploaded from the playback display.
Deselect All?
Remove transfer marking from all pictures. Upload of images with a “sending” icon will immediately be terminated.
HTTP User Settings
Enter a user name and password for connection to an http server (http server connections
only).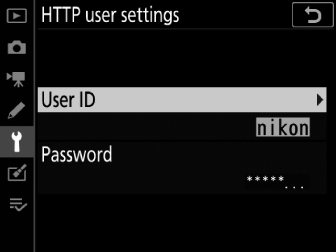
Power Saving
Choose whether the camera prioritizes network speed or reduced power consumption.
-
[] ensures that LAN connections remain active even when data are not being exchanged with the server. Ethernet connections can use the high-speed 1000BASE-T standard.
-
[] limits Ethernet connections to 100BASE-TX. LAN connections are terminated automatically when data transfer ends. The camera network indicator will turn off.
MAC Address
When [] is selected for [], this option can be used to view the MAC address of the hardware selected for [].