Parts of the Camera
- Camera Body
- The Power Switch
- The Control Panel
- The Viewfinder
- The Live View Displays (Photos/Movies)
- Touch Controls
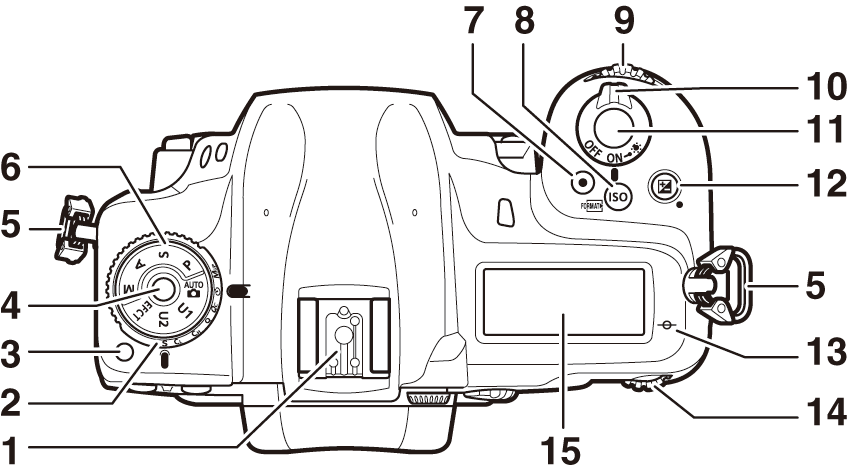
Camera Body
| 1 |
Accessory shoe (for optional flash unit) |
|---|---|
| 2 |
Release mode dial (The Release Mode Dial) |
| 3 |
Release mode dial lock release (Choosing a Release Mode) |
| 4 |
Mode dial lock release (Using the Mode Dial) |
| 5 |
Eyelet for camera strap (Attaching the Strap) |
| 6 |
Mode dial ( The Mode Dial ) |
| 7 |
Movie-record button ( Recording Movies (b Mode) ) |
| 8 |
S (Q) button ( The S (Q) Button ) |
| 9 |
Sub-command dial |
|---|---|
| 10 |
Power switch (The Power Switch) |
| 11 |
Shutter-release button ( Taking Photographs (b Mode) ) |
| 12 |
E button ( The E Button ) |
| 13 |
E (focal plane mark) |
| 14 |
Main command dial |
| 15 |
Control panel (The Control Panel, The Control Panel) |

| 1 |
Self-timer lamp |
|---|---|
| 2 |
Stereo microphone ( Recording Movies (b Mode) ) |
| 3 |
c (Y) button ( The N (Y) Button ) |
| 4 |
BKT button ( The BKT Button ) |
| 5 |
Audio connector cover |
| 6 |
Accessory terminal connector cover |
| 7 |
Cover for USB and HDMI connectors |
| 8 |
Lens release button ( Detaching Lenses ) |
| 9 |
AF-mode button ( The AF‑Mode Button ) |
| 10 |
Focus-mode selector (The Focus-Mode Selector) |
| 11 |
Lens mounting mark ( Attaching a Lens ) |
|---|---|
| 12 |
Mirror (Cleaning) |
| 13 |
Meter coupling lever |
| 14 |
Power connector cover ( Attaching a Power Connector and AC Adapter ) |
| 15 |
Connector for external microphones (Other Compatible Accessories) |
| 16 |
Headphone connector |
| 17 |
Accessory terminal (Other Compatible Accessories) |
| 18 |
USB connector |
| 19 |
HDMI connector |
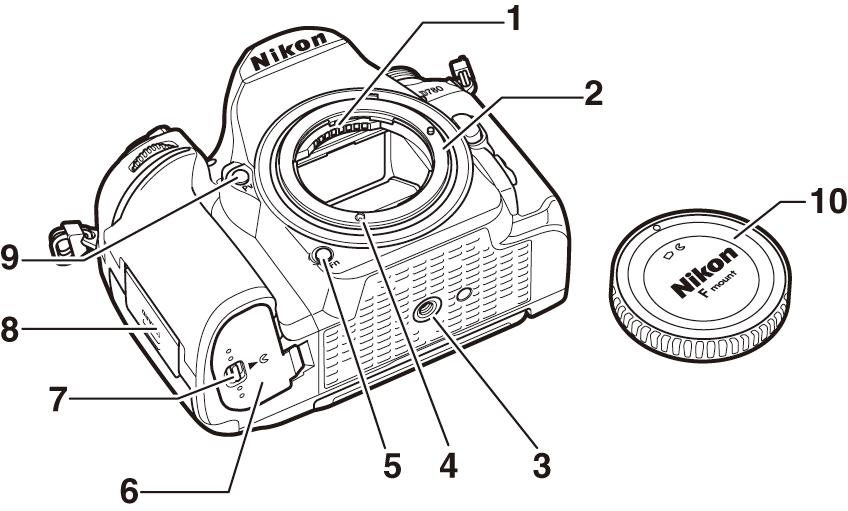
| 1 |
CPU contacts |
|---|---|
| 2 |
Lens mount ( Attaching a Lens ) |
| 3 |
Tripod socket |
| 4 |
AF coupling |
| 5 |
Fn button ( The Fn Button ) |
| 6 |
Battery-chamber cover |
|---|---|
| 7 |
Battery-chamber cover latch |
| 8 |
Memory card slot cover ( Inserting Memory Cards ) |
| 9 |
Pv button ( The Pv Button ) |
| 10 |
Body cap ( Attaching a Lens ) |
| 1 |
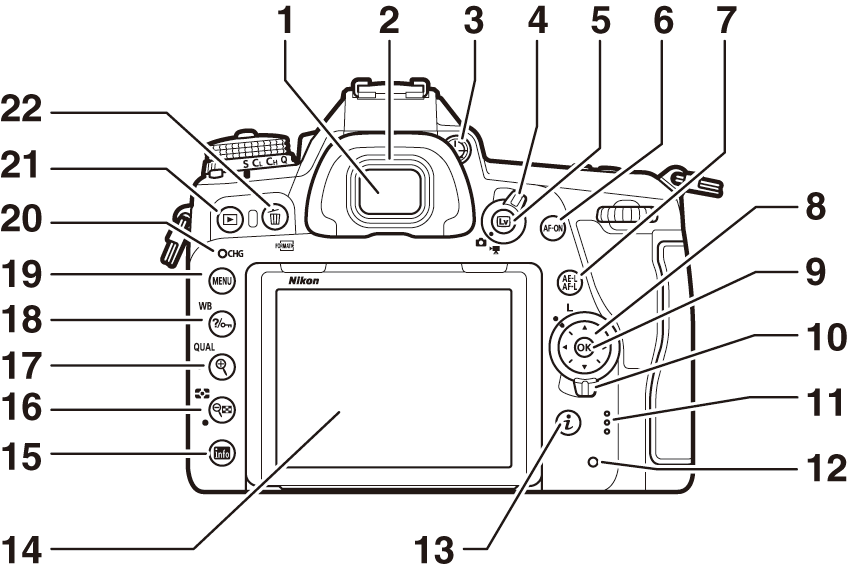
Viewfinder eyepiece ( The Diopter Adjustment Control ) |
|---|---|
| 2 |
Rubber eyecup |
| 3 |
Diopter adjustment control ( The Diopter Adjustment Control ) |
| 4 |
Live view selector (Framing Photographs in the Monitor (Live View), Recording Movies (b Mode) ) |
| 5 |
a button (Framing Photographs in the Monitor (Live View), Recording Movies (b Mode) ) |
| 6 |
AF‑ON button ( The AF‑ON Button ) |
| 7 |
A button ( The A Button ) |
| 8 |
Multi selector (Using the Menus) |
| 9 |
J button (Using the Menus) |
| 10 |
Focus selector lock |
| 11 |
Speaker |
| 12 |
Memory card access lamp ( Inserting Memory Cards , Taking Photographs (b Mode) ) |
|---|---|
| 13 |
i button ( The i Button (the i Menu) ) |
| 14 |
Tilting monitor (The Monitor, Touch Controls ) |
| 15 |
R button ( The R Button ) |
| 16 |
W (Y) button ( The W (Y) Button ) |
| 17 |
X (T) button ( The X (T) Button ) |
| 18 |
Q/g (U) button ( The Q/g (U) Button ) |
| 19 |
G button ( The G Button ) |
| 20 |
Charge lamp ( Charging AC Adapters ) |
| 21 |
K button ( Playback ) |
| 22 |
O (Q) button ( Deleting Unwanted Pictures ) |
Be sure to close the covers when the connectors are not in use. Foreign matter in the connectors could cause malfunction.
Close proximity to the speaker could corrupt data stored on magnetic stripe cards or other such magnetic storage devices. Keep magnetic storage devices away from the speaker.
The angle of the monitor can be adjusted as shown.
|
|
|
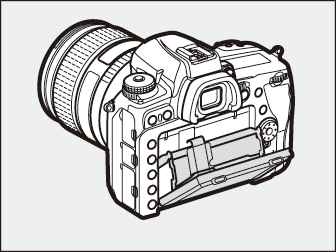
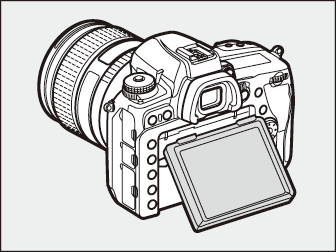
The product serial number is located behind the monitor.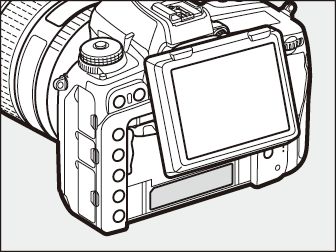
-
Rotate the monitor gently within the limits of the hinges. Do not use force; failure to observe this precaution could damage the camera or monitor.
-
Do not touch the area to the rear of the monitor. Be particularly careful not to touch the area shown. Failure to observe this precaution could cause product malfunction.

-
Do not allow liquid to contact the monitor’s inner surface. Failure to observe this precaution could cause product malfunction.
-
We recommend that you keep the monitor in the storage position when not using it to frame photographs.
-
Do not lift or carry the camera by the monitor. Failure to observe this precaution could damage the camera.
-
When the camera is mounted on a tripod, care should be taken to ensure that the monitor does not contact the tripod.
The Power Switch
Rotate the power switch to the “ON” position as shown to turn the camera on. Returning
the switch to the “OFF” position turns the camera off.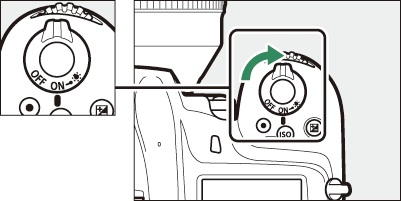
Rotating the power switch to D activates the control panel backlight (LCD illuminator). The backlight will remain
lit for a few seconds after the power switch is released. The backlight turns off
when the switch is rotated to D a second time or the shutter is released.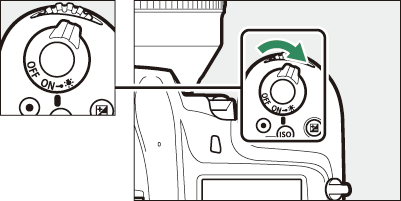
The Control Panel
The following indicators appear in the control panel at default settings. For a full list of the indicators that may be displayed, see “Camera Displays” (Camera Displays) in “Technical Notes”.
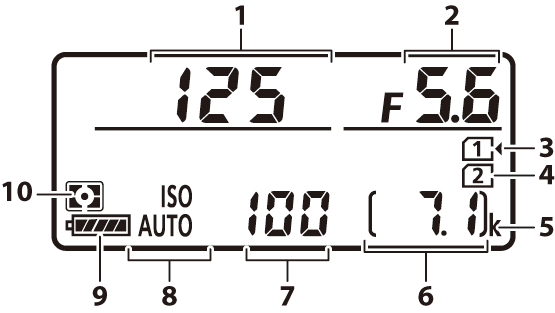
| 1 |
Shutter speed |
|---|---|
| 2 |
Aperture |
| 3 |
Memory card icon (Slot 1; Memory Card Indicators and Number of Exposures Remaining) |
| 4 |
Memory card icon (Slot 2; Memory Card Indicators and Number of Exposures Remaining) |
| 5 |
“k” (appears when memory remains for over 1000 exposures; Memory Card Indicators and Number of Exposures Remaining) |
| 6 |
Number of exposures remaining (Memory Card Indicators and Number of Exposures Remaining, Memory Card Capacity ) |
|---|---|
| 7 |
ISO sensitivity ( The S (Q) Button ) |
| 8 |
ISO sensitivity indicator ( The S (Q) Button ) Auto ISO sensitivity indicator ( Enabling Auto ISO Sensitivity Control ) |
| 9 |
Battery indicator (Battery Level) |
| 10 |
Metering ( The W (Y) Button ) |
If the camera is turned off with a battery inserted, the control panel will display
a memory card icon and the number of exposures remaining. In rare instances, some
memory cards may not display the memory card icon and number of exposures remaining
when the camera is off, even if a battery is inserted. This information will be displayed
when the camera is turned on.
The Viewfinder
The following indicators appear in the viewfinder at default settings. For a full list of the indicators that may be displayed, see “Camera Displays” (Camera Displays) in “Technical Notes”.
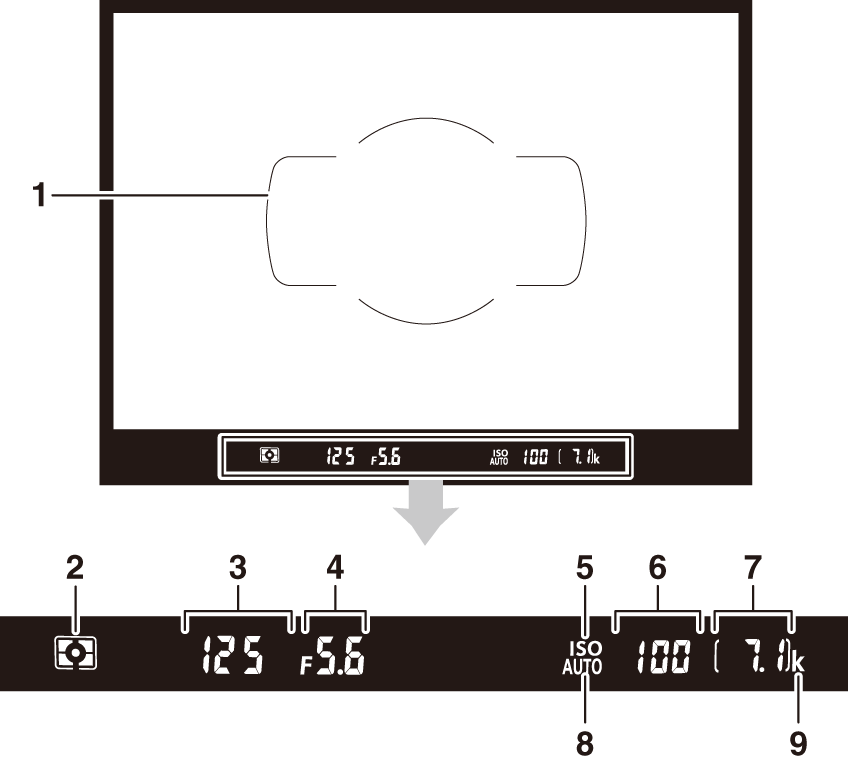
| 1 |
AF area brackets ( Taking Photographs (b Mode) ) |
|---|---|
| 2 |
Metering ( The W (Y) Button ) |
| 3 |
Shutter speed |
| 4 |
Aperture |
| 5 |
ISO sensitivity indicator ( The S (Q) Button ) |
| 6 |
ISO sensitivity ( The S (Q) Button ) |
|---|---|
| 7 |
Number of exposures remaining (Memory Card Indicators and Number of Exposures Remaining, Memory Card Capacity ) |
| 8 |
Auto ISO sensitivity indicator ( Enabling Auto ISO Sensitivity Control ) |
| 9 |
“k” (appears when memory remains for over 1000 exposures; Memory Card Indicators and Number of Exposures Remaining) |
When the battery is exhausted or no battery is inserted, the display in the viewfinder will dim. The display will return to normal when a charged battery is inserted.
The brightness of the control panel and viewfinder displays varies with temperature, and response times may drop when the temperature is low; the displays will return to normal at room temperature.
-
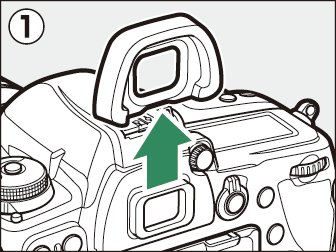
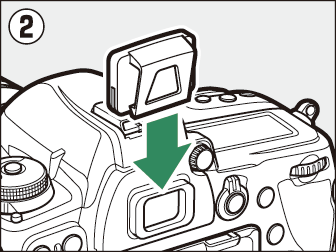
When taking photos without your eye to the viewfinder, attach the supplied eyepiece cap to prevent light entering via the viewfinder appearing in photographs or interfering with exposure.
-
Remove the rubber eyecup (q) and insert the supplied eyepiece cap as shown (w). Hold the camera firmly when removing the rubber eyepiece cup.
|
|
|
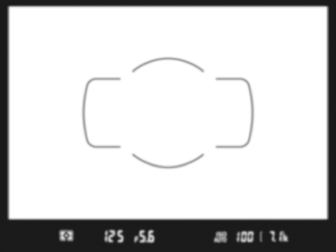
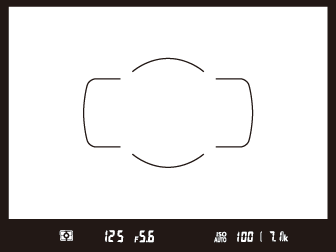
With your eye to the viewfinder, rotate the diopter control until display in the viewfinder
is in sharp focus.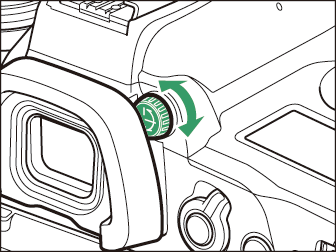
|
Viewfinder not in focus |
|
Viewfinder in focus |

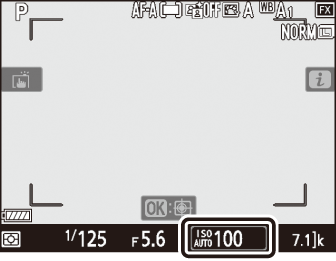
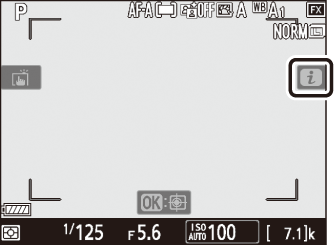
The Live View Displays (Photos/Movies)
Press the a button to display the view through the lens in the monitor. Rotate the live view selector to C to take photographs or to 1 to record movies.
Live View Photography
The following indicators appear in the monitor at default settings. For a full list of the indicators that may be displayed, see “Camera Displays” in “Technical Notes” (Camera Displays).
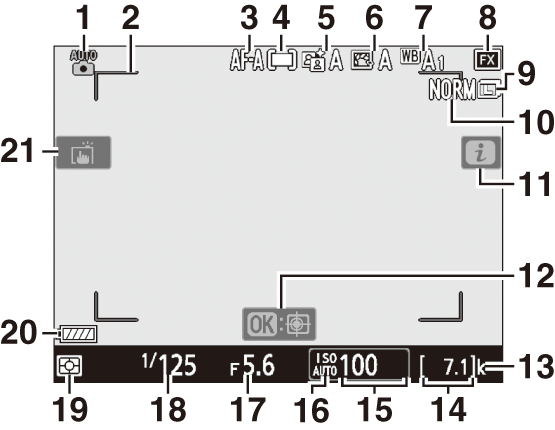
| 1 |
Shooting mode ( The Mode Dial ) |
|---|---|
| 2 |
AF-area brackets (Framing Photographs in the Monitor (Live View)) |
| 3 |
Autofocus mode ( The AF‑Mode Button ) |
| 4 |
AF-area mode ( Choosing an AF‑Area Mode ) |
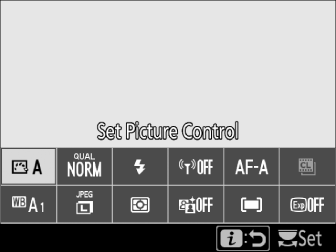
| 5 |
Active D-Lighting |
| 6 |
Set Picture Control |
| 7 |
White balance ( The Q/g (U) Button ) |
| 8 |
Image area |
| 9 |
Image size ( Choosing an Image Size ) |
| 10 |
Image quality ( Adjusting Image Quality ) |
| 11 |
i icon ( The i Button (the i Menu) ) |
| 12 |
Subject tracking AF |
|---|---|
| 13 |
“k” (appears when memory remains for over 1000 exposures; Memory Card Indicators and Number of Exposures Remaining) |
| 14 |
Number of exposures remaining (Memory Card Indicators and Number of Exposures Remaining, Memory Card Capacity ) |
| 15 |
ISO sensitivity ( The S (Q) Button ) |
| 16 |
ISO sensitivity indicator ( The S (Q) Button ) Auto ISO sensitivity indicator ( Enabling Auto ISO Sensitivity Control ) |
| 17 |
Aperture |
| 18 |
Shutter speed |
| 19 |
Metering ( The W (Y) Button ) |
| 20 |
Battery indicator (Battery Level) |
| 21 |
Touch shooting ( Touch Controls , The Still Photography i Menu ) |
Movies
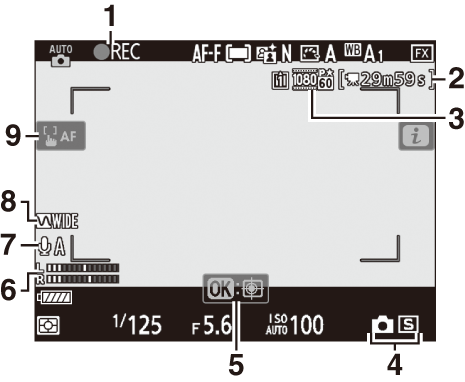
| 1 |
Recording indicator ( Recording Movies (b Mode) ) “No movie” indicator |
|---|---|
| 2 |
Time remaining ( Recording Movies (b Mode) ) |
| 3 |
Frame size and rate/image quality |
| 4 |
Release mode (still photography; Choosing a Release Mode) |
| 5 |
Subject tracking AF |
| 6 |
Sound level ( Recording Movies (b Mode) ) |
|---|---|
| 7 |
Microphone sensitivity |
| 8 |
Frequency response |
| 9 |
AF‑area brackets ( Recording Movies (b Mode) ) |
Touch Controls
-
The touch-sensitive monitor offers a variety of controls that can be operated by touching the display with your fingers.
-
Touch controls can be used to:
-
Focus and release the shutter (Focusing and Releasing the Shutter)
-
Adjust settings (Adjusting Settings)
-
View pictures (Playback)
-
View movies (Viewing Movies)
-
Access the i menu (The i Menu )
-
Enter text (Text Entry)
-
Navigate the menus (Navigating the Menus)
-
Focusing and Releasing the Shutter
-
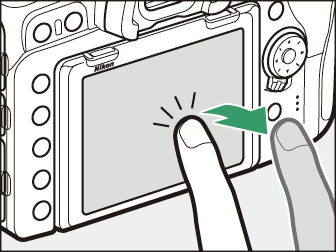
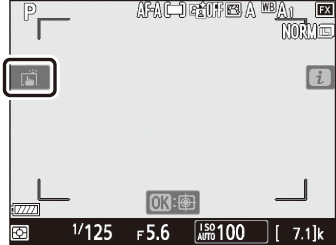
Touch the monitor during live view to focus on the selected point (touch AF).
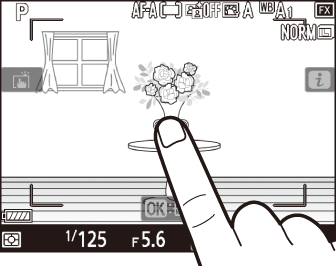
-
During still photography, the shutter will be released when you lift your finger from the display (touch shutter).
-
Touch AF settings can be adjusted by tapping the W icon.
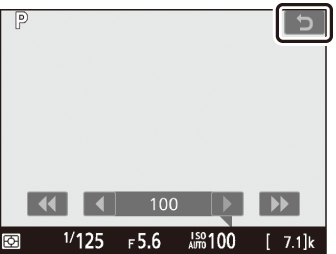
Adjusting Settings
-
Tap highlighted settings in the display.
-
You can then choose the desired option by tapping icons or sliders.
-
Tap Z or press J to select the chosen option and return to the previous display.
Playback
-
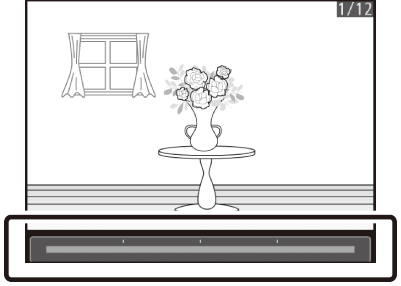
Flick left or right to view other pictures during full-frame playback.
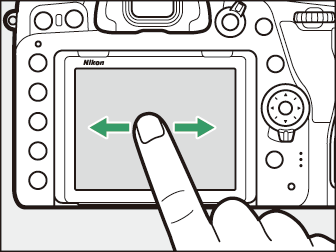
-
In full-frame playback, touching the bottom of the display brings up a frame-advance bar. Slide your finger left or right over the bar to scroll rapidly to other pictures.
-
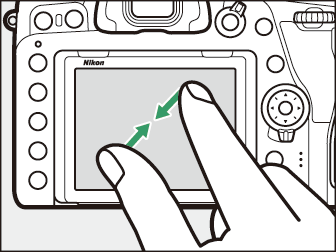
To zoom in on a picture displayed in full-frame playback, use a stretch gesture or give the display two quick taps. After zooming in, you can adjust the zoom ratio using stretch gestures to zoom in and pinch gestures to zoom out.
-
Use slide gestures to view other parts of the image during zoom.
-
Giving the display two quick taps while zoom is in effect cancels zoom.
-
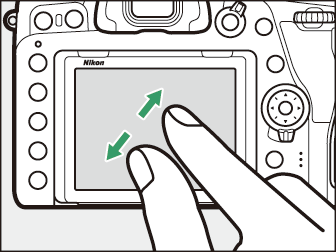
To “zoom out” to a thumbnail view, use a pinch gesture in full-frame playback. Use pinch and stretch to choose the number of images displayed from 4, 9, and 72 frames.
-
Using a pinch gesture when 72 frames are displayed selects calendar playback. Use a stretch gesture to return to the 72-frame display.
Viewing Movies
-
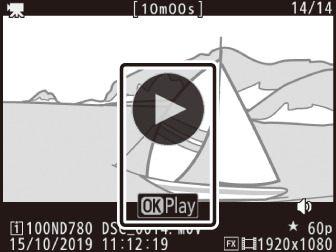
Movies are indicated by a 1 icon; to start playback, tap the on-screen guide.
-
Tap the display to pause. Tap again to resume.
-
Tap Z to exit to full-frame playback.
The i Menu
-
Tapping the i icon during live view displays the i menu ( The i Button (the i Menu) ).
-
Tap items to view options.
Text Entry
-
When a keyboard is displayed, you can enter text by tapping the keys.
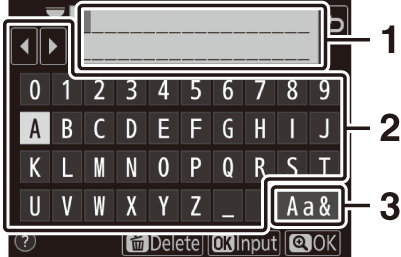
1 Text display area
2 Keyboard area
3 Keyboard selection
-
To position the cursor, tap e or f or tap directly in the text display area.
-
To cycle through the upper- and lower-case and symbol keyboards, tap the keyboard selection button.
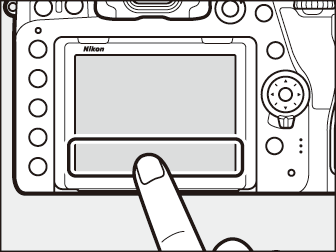
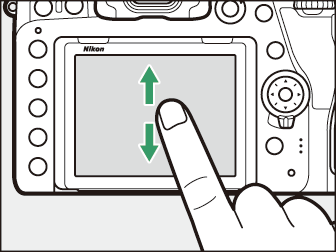
Navigating the Menus
-
After pressing the G button to display the menus, you can slide up or down to scroll.
-
Tap a menu icon to choose a menu.
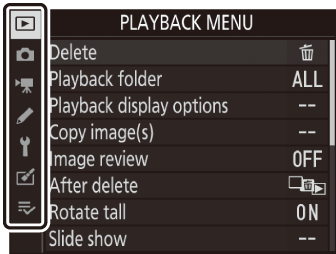
-
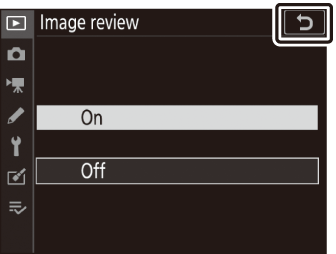
Tap menu items to display options. You can then choose the desired option by tapping icons or sliders.
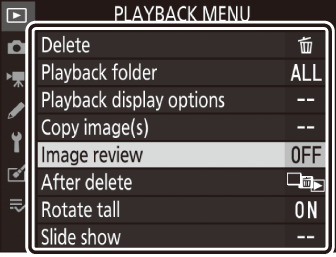
-
To exit without changing settings, tap Z.
-
The touch screen responds to static electricity. It may not respond when touched with fingernails or gloved hands.
-
Do not touch the screen with sharp objects.
-
Do not use excessive force.
-
The screen may not respond when covered with third-party protective films.
-
The screen may not respond when touched simultaneously in multiple locations.
Touch controls can be enabled or disabled using the [] item in the setup menu.