Preserving Detail in Highlights and Shadows (Active D-Lighting and HDR)
Active D‑Lighting
Active D-Lighting, accessed via the [] item in the photo or movie shooting menu, is used to preserve details in highlights and shadows, creating pictures with natural contrast. Use for high-contrast scenes, for example when photographing brightly-lit outdoor scenery through a door or window or taking pictures of shaded subjects on a sunny day. Active D‑Lighting is most effective when [] is selected for metering.
|
[] |
[] |
Active D-Lighting Options
|
Option |
Description |
|
|---|---|---|
|
Y |
[] |
The camera automatically adjusts Active D‑Lighting in response to shooting conditions. |
|
Z |
[] |
Choose the amount of Active D‑Lighting performed from [], [], [], and []. |
|
P |
[] |
|
|
Q |
[] |
|
|
R |
[] |
|
|
[] |
Active D‑Lighting off. |
|
If [] is selected for [] in the movie shooting menu and [] is selected in the photo shooting menu, movies will be shot at a setting equivalent to [].
-
“Noise” in the form of randomly-spaced bright pixels, fog, or lines may appear in photos taken with Active D‑Lighting.
-
In mode M, [] is equivalent to [].
-
Uneven shading may be visible with some subjects.
-
Active D‑Lighting does not apply at high ISO sensitivities (Hi 0.3–Hi 2), including high sensitivities selected via auto ISO sensitivity control.
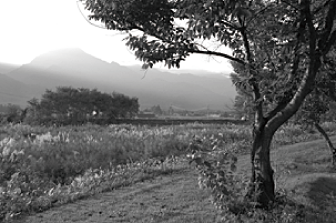
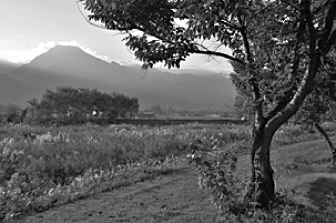
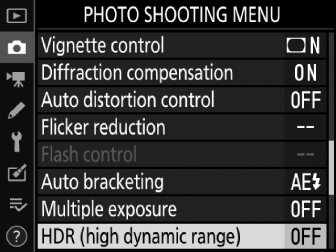
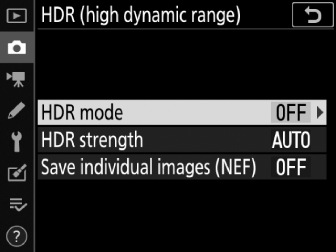
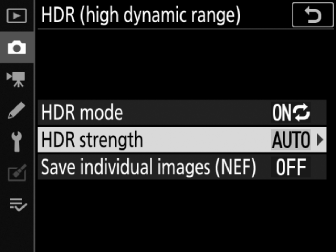
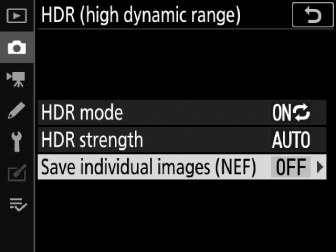
High Dynamic Range (HDR)
The [] item in the photo shooting menu can be used with high-contrast subjects to preserve details in highlights and shadows by combining two shots taken at different exposures. Use with high-contrast scenes and other subjects to preserve a wide range of details, from highlights to shadows.

HDR Options
The following options are available:
-
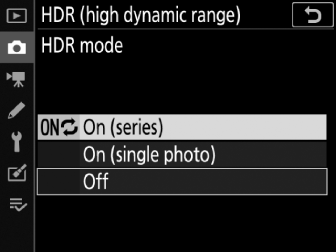
[]: Choose from [] (take a series of HDR photographs, ending when [] is selected), [] (take one HDR photograph), and [] (exit without taking additional HDR photographs).
-
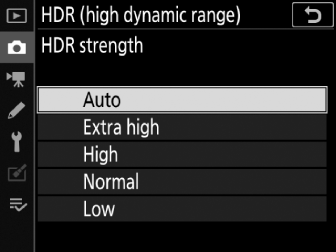
[]: Choose the HDR strength. If [] is selected, the camera will automatically adjust HDR strength to suit the scene.
-
[]: Choose [] to save each of the individual shots used to create the HDR image; the shots are saved in NEF (RAW) format.
Taking HDR Photographs
We recommend that you use the [] metering option when shooting with HDR.
-
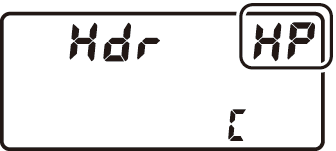
Select [].
Highlight [] in the photo shooting menu and press 2.
-
Select a mode.
-
Highlight [] and press 2.
-
Choose an HDR mode using 1 or 3 and press J.
-
-
Choose the [].
-
To choose the difference in exposure between the two shots (HDR strength), highlight [] and press 2.
-
Highlight the desired option and press J. If [] is selected, the camera will automatically adjust HDR strength to suit the scene.
-
-
Choose whether to keep individual exposures.
To choose whether to save the individual NEF (RAW) images that make up the HDR photograph, highlight [] and press 2, then press 1 or 3 to choose the desired option and press J to select.
-
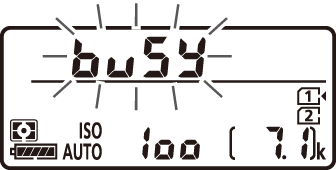
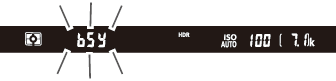
Frame a photograph, focus, and shoot.
-
The camera takes two exposures when the shutter-release button is pressed all the way down. Flashing “1” and “2” indicators will appear respectively in the control panel and viewfinder while the images are combined. No pictures can be taken until recording is complete.
-
If [] is selected, HDR will only turn off when [] is selected for HDR mode; if [] is selected, HDR turns off automatically after the photograph is taken.
-
HDR photographs taken when an NEF (RAW) or NEF (RAW) + JPEG option is selected for image quality will be recorded in JPEG format.
-
The edges of the image will be cropped out.
-
The desired results may not be achieved if the camera or subject moves during shooting. Use of a tripod is recommended.
-
Depending on the scene, you may notice shadows around bright objects or halos around dark objects. In some cases, HDR may have little effect.
-
Uneven shading may be visible with some subjects.
-
With non-CPU lenses and when [] or [] is selected, an [] setting of [] is equivalent to [].
-
Optional flash units will not fire.
-
Regardless of the option currently selected for release mode, only one photograph will be taken each time the shutter-release button is pressed.
-
Shutter speeds of Bulb (Bulb) and Time (Time) are not available.
HDR cannot be combined with some camera features, including:
-
Modes other than P, S, A, and M
-
Flicker reduction
-
Bracketing
-
Multiple exposure
-
Interval-timer photography
-
Time-lapse movies
-
Focus shift
-
The negative digitizer
When [] is selected for Custom Setting f3 [] > [], [] (Step 2) and [] (Step 3) can be selected using the BKT button and command dials.
-
Hold the BKT button and rotate the main command dial to choose from the following HDR modes: a ([]), 1 ([]), and b ([]).
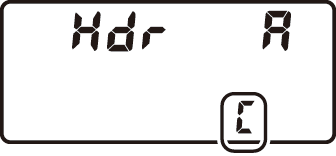
-
When 1 ([]) or b ([]) is selected, you can adjust HDR strength by holding the BKT button and rotating the sub-command dial.