Readying the Camera
- Attaching the Strap
- Charging the Battery
- Inserting the Battery
- Attaching a Lens
- Inserting Memory Cards
- Camera Setup
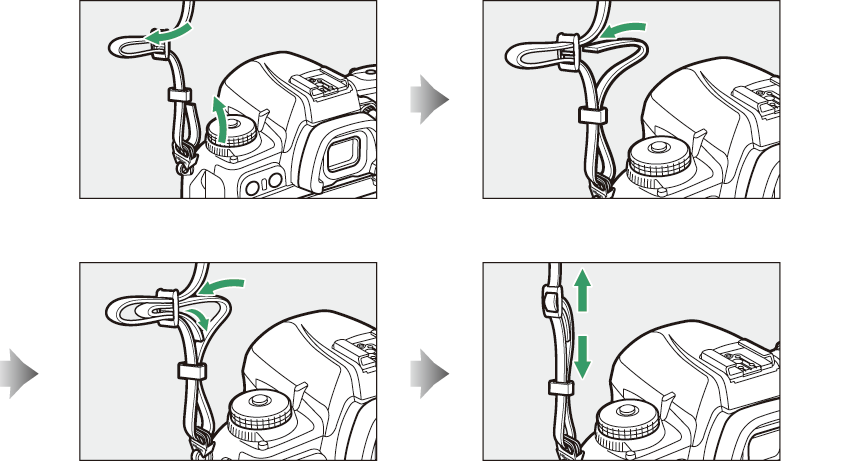
Attaching the Strap
To attach a strap (whether the supplied strap or one that has been purchased separately):
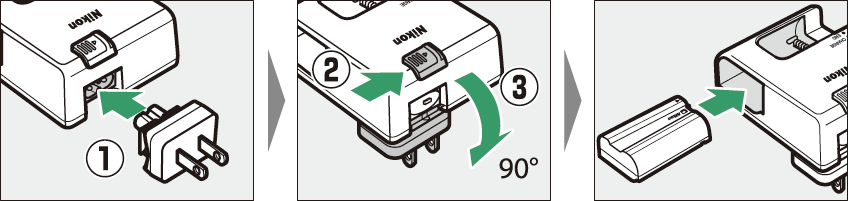
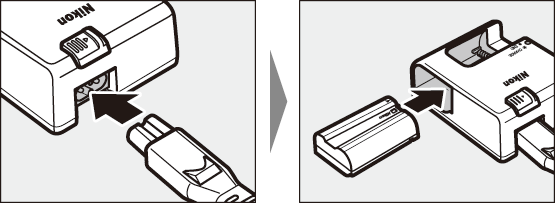
Charging the Battery
Charge the supplied EN‑EL15b battery in the supplied MH-25a battery charger before use. Insert the battery and plug the charger in (depending on the country or region, the charger comes with either an AC wall adapter or a power cable).
-
AC wall adapter: After inserting the AC wall adapter into the charger AC inlet (q), slide the AC wall adapter latch as shown (w) and rotate the adapter 90 ° to fix it in place (e).
-
Power cable: After connecting the power cable with the plug in the orientation shown, insert the battery and plug the cable in.
-
An exhausted battery will fully charge in about two hours and 35 minutes.
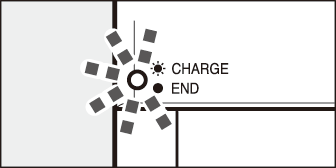
Battery charging (flashes)
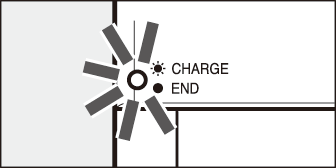
Charging complete (steady)
Read and follow the warnings and cautions in “For Your Safety” (For Your Safety) and “Caring for the Camera and Battery: Cautions” (Caring for the Camera and Battery: Cautions).
If the CHARGE lamp flashes rapidly (8 times a second):
-
A battery charging error has occurred: Unplug the charger and remove and reinsert the battery.
-
The ambient temperature is too hot or too cold: Use the battery charger at temperatures within the designated temperature range (0 – 40 °C).
If the problem persists, unplug the charger and end charging. Bring the battery and charger to a Nikon-authorized service representative.
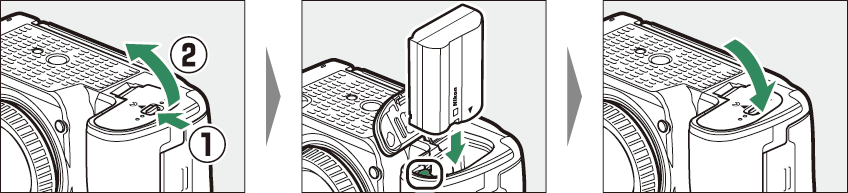
Inserting the Battery
-
Turn the camera off before inserting or removing the battery.
-
Using the battery to keep the orange battery latch pressed to one side, slide the battery into the battery chamber until the latch locks it in place.
Removing the Battery
Turn the camera off and open the battery-chamber cover. Press the battery latch in
the direction shown to release the battery and then remove the battery by hand.
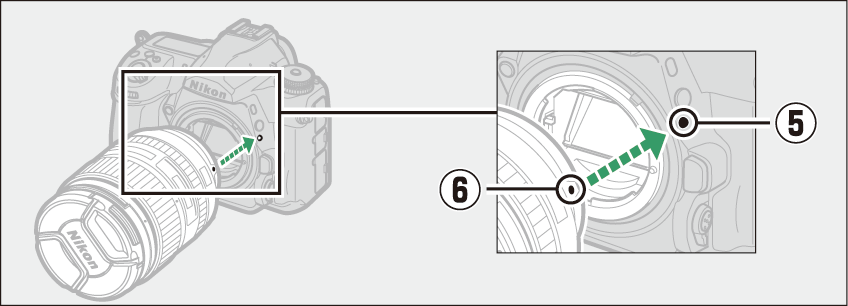
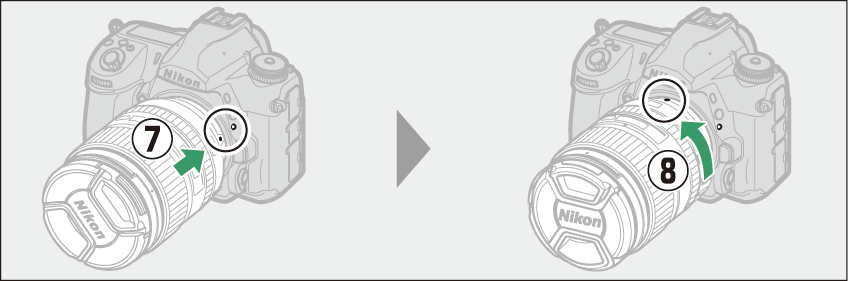
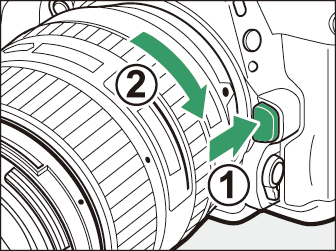
Attaching a Lens
-
The lens generally used in this manual for illustrative purposes is an AF‑S NIKKOR 24–120mm f/4G ED VR.
-
Be careful to prevent dust entering the camera.
-
Confirm that the camera is off before attaching the lens.
-
Remove the camera body cap (q, w) and rear lens cap (e, r).

-
Align the mounting marks on the camera (t) and lens (y).
-
Rotate the lens as shown until it clicks into place (u, i).
-
-
Remove the lens cap before taking pictures.
When using a CPU lens equipped with an aperture ring ( Recognizing CPU and Type G, E, and D Lenses ), lock aperture at the minimum setting (highest f-number).
Detaching Lenses
-
After turning the camera off, press and hold the lens release button (q) while turning the lens in the direction shown (w).
-
After removing the lens, replace the lens caps and camera body cap.
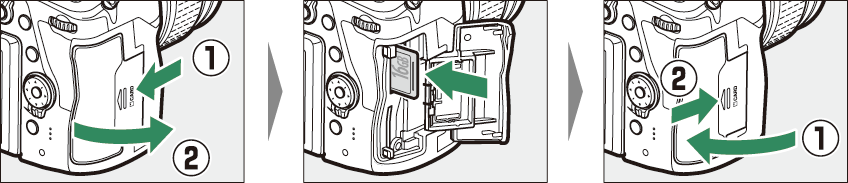
Inserting Memory Cards
-
Turn the camera off before inserting or removing memory cards.
-
The camera has two memory card slots: Slot 1 (q) and Slot 2 (w). If you are using only one memory card, insert it into Slot 1.

-
Holding the memory card in the orientation shown, slide it straight into the slot until it clicks into place.
Removing Memory Cards
After confirming that the memory card access lamp is off, turn the camera off and
open the memory card slot cover. Press the card in to eject it (q); the card can then be removed by hand (w).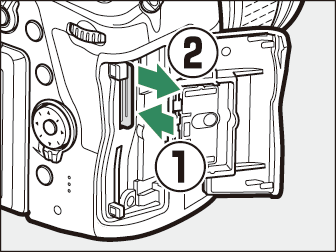
-
Memory cards may be hot after use. Observe due caution when removing memory cards from the camera.
-
Do not perform the following operations during formatting or while data are being recorded, deleted, or copied to a computer or other device. Failure to observe these precautions could result in loss of data or in damage to the camera or card.
-
Do not remove or insert memory cards
-
Do not turn the camera off
-
Do not remove the battery
-
Do not disconnect AC adapters
-
-
Do not touch the card terminals with your fingers or metal objects.
-
Do not use excessive force when handling memory cards. Failure to observe this precaution could damage the card.
-
Do not bend or drop memory cards or subject them to strong physical shocks.
-
Do not expose memory cards to water, heat, or direct sunlight.
-
Do not format memory cards in a computer.
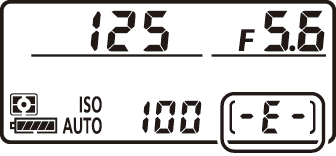
If no memory card is inserted, the exposure count displays in the control panel and viewfinder will show S. If the camera is turned off with a battery and no memory card inserted, S will be displayed in the control panel.
|
|
|

-
SD memory cards are equipped with a write-protect switch. Sliding the switch to the “lock” position write-protects the card, protecting the data it contains.

-
If you attempt to release the shutter while a write-protected card is inserted, a warning will be displayed and no picture will be recorded. Unlock the memory card before attempting to take or delete pictures.
Camera Setup
Choose a language and set the camera clock. Pictures cannot be taken nor settings adjusted until the clock is set.
-
Turn the camera on.
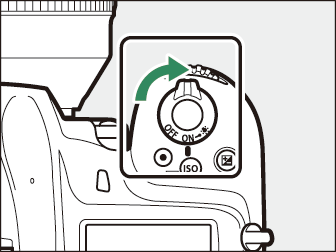
When the camera is turned on for the first time after purchase, a language-selection dialog will be displayed. The languages available vary with the country or region in which the camera was originally purchased.
Use the multi selector and J button to navigate the menus.
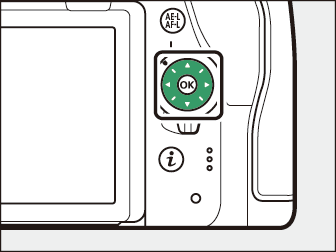
Press 1 and 3 to highlight a language and press J to select. The language can be changed at any time using the [] item in the setup menu.
-
Set the camera clock.
Use the multi selector and J button to set the camera clock.
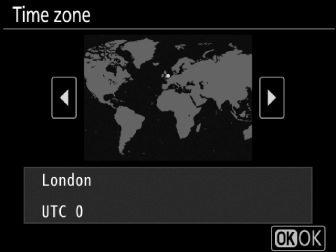
Select time zone


Select date format
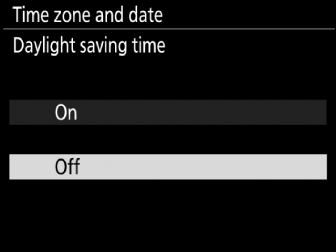
Select daylight saving time option
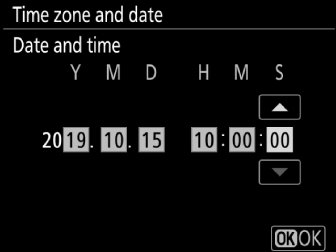
Set time and date (note that the camera uses a 24-hour clock)
The clock can be adjusted at any time using the [] > [] item in the setup menu.
Flashing B icon in the control panel indicates that the camera clock has been reset. The date and time recorded with new photographs will not be correct; use the [] > [] item in the setup menu to set the clock to the correct time and date. The camera clock is powered by an independent clock battery. The clock battery charges when the main battery is inserted or the camera is powered by an optional power connector and AC adapter. It takes about 2 days to charge. Once charged, it will power the clock for about a month.
Use the SnapBridge app to synchronize the camera clock with the clock on a smartphone
or tablet (smart device). See SnapBridge online help for details.![]()