Radio AWL
Radio AWL is available with SB‑5000 flash units. Attach a WR-R10 wireless remote controller
to the camera and establish a wireless connection between the flash units and the
WR-R10.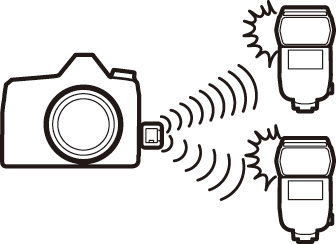
Establishing a Wireless Connection
Before using radio AWL, establish a wireless connection between the WR-R10 and the remote flash units.
-
C: Connect the WR-R10.
For more information, see the documentation provided with the WR-R10.
-
C: Select [].
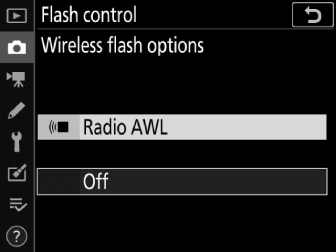
Select [] for [] > [] in the photo shooting menu.
The WR-R10 Wireless Remote ControllerBe sure to update the WR-R10 firmware to version 3.0 or later; for information on firmware updates, see the Nikon website for your area.
-
C: Choose a channel.
Set the WR-R10 channel selector to the desired channel.

-
C: Choose a link mode.
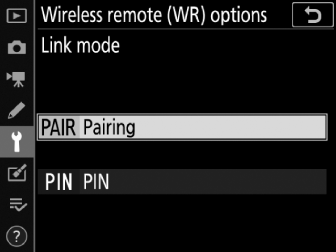
Select [] > [] in the setup menu and choose from the following options:
Option
Description
[]
The camera connects only to devices with which it has previously been paired, preventing signal interference from other devices in the vicinity. Given that each device must be paired separately, [] is recommended when connecting to a large number of devices.
[]
Communication is shared among all devices with the same four-digit PIN, making this a good choice for photography featuring a large number of remote devices. If there are multiple cameras present that share the same PIN, the flash units will be under the sole control of the camera that connects first, preventing all other cameras from connecting (the LEDs on the WR-R10 units connected to the affected cameras will blink).
-
f: Establish a wireless connection.
Set the remote flash units to radio AWL remote mode and set the devices to the channel you selected in Step 3, then pair each of the remote units with the WR-R10 according to the option selected in Step 4:
-
[]: Initiate pairing on the remote unit and press the WR-R10 pairing button. Pairing is complete when the LINK lamps on the WR-R10 and flash unit flash orange and green; once a connection is established, the LINK lamp on the remote flash unit will light green.
-
[]: Use the controls on the remote flash unit to enter the PIN you selected in Step 4. The LINK lamp on the remote unit will light green once a connection is established.
-
-
f: Confirm that the flash-ready lights for all flash units are lit.
In radio AWL, the flash-ready indicator will light in the camera viewfinder or flash information display when all flash units are ready.
To view the flash units currently controlled using radio AWL, select [] > [] in the photo shooting menu. The identifier (remote flash unit name) for each unit can be changed using flash unit controls.
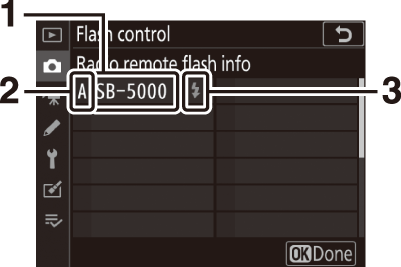
| 1 |
Connected flash unit |
|---|---|
| 2 |
Group |
| 3 |
Flash-ready indicator |
|---|
As long as the channel, link mode, and other settings remain the same, the WR-R10 will automatically connect to previously paired flash units when you select remote mode and Steps 3–5 can be omitted. The flash unit LINK lamp lights green when a connection is established.
Adjusting Flash Settings
After selecting [] for [] > [] in the photo shooting menu, select [], [], or [] for [] and adjust settings as described below.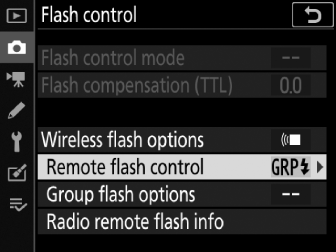
Group Flash
Select this item to adjust settings separately for each group.
-
C: Select [].
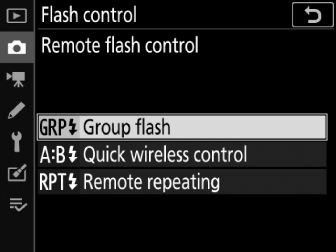
Select [] for [] > [] in the photo shooting menu.
-
C: Select [].

Highlight [] in the flash control display and press 2.
-
C: Choose the flash control mode.
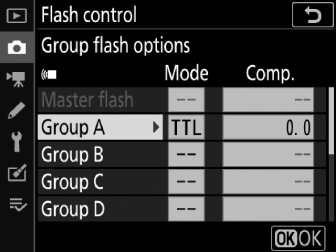
Choose the flash control mode and flash level for the master flash and the flash units in each group:
Option
Description
TTL
i‑TTL flash control.
qA
Auto aperture (available only with compatible flash units).
M
Choose the flash level manually.
–– (off)
The units do not fire and the flash level cannot be adjusted.
-
f: Group the remote flash units.
-
Choose a group (A–F) for each of the remote flash units.
-
The master flash can control up to 18 flash units in any combination.
-
-
C/f: Compose the shot.
-
Compose the shot and arrange the flash units. See the documentation provided with the flash units for more information.
-
After arranging the units, press the i button in the flash info display (Changing Flash Settings) and select [] to test-fire the units and confirm that they are functioning normally.
-
-
C: Take the photograph.
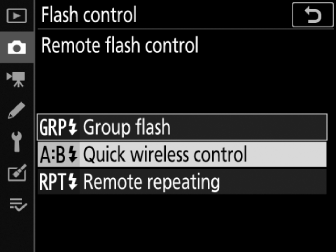
Quick Wireless Control
Select this item to control overall flash compensation for, and the relative balance between, groups A and B, while setting output for group C manually.
-
C: Select [].
Select [] for [] > [] in the photo shooting menu.
-
C: Select [].
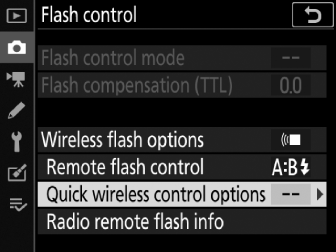
Highlight [] in the flash control display and press 2.
-
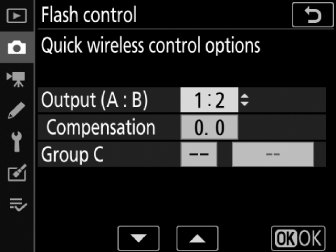
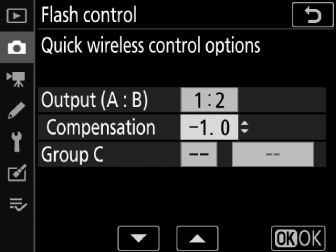
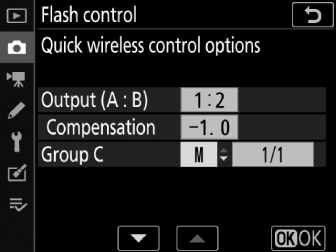
C: Adjust flash settings.
-
Choose the balance between groups A and B.
-
Adjust flash compensation for groups A and B.
-
Choose a flash control mode and flash level for the units in group C:
-
[]: Choose the flash level manually.
-
[]: The units in group C do not fire.
-
-
-
f: Group the remote flash units.
-
Choose a group (A, B, or C).
-
The master flash can control up to 18 flash units in any combination.
-
-
C/f: Compose the shot.
-
Compose the shot and arrange the flash units. See the documentation provided with the flash units for more information.
-
After arranging the units, press the i button in the flash info display (Changing Flash Settings) and select [] to test fire the units and confirm that they are functioning normally.
-
-
C: Take the photograph.
Remote Repeating
When “remote repeating” is enabled, the flash units fire repeatedly while the shutter is open, producing a multiple-exposure effect.
-
C: Select [].
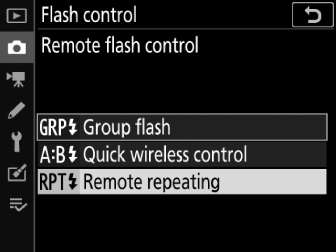
Select [] for [] > [] in the photo shooting menu.
-
C: Select [].
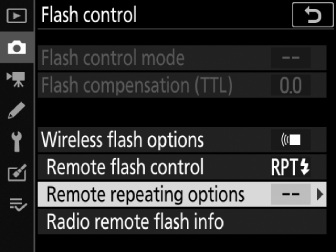
Highlight [] in the flash control display and press 2.
-
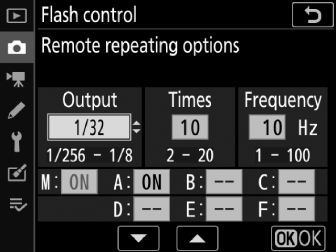
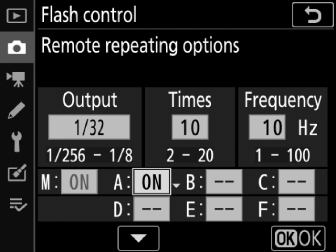
C: Adjust flash settings.
-
Choose the flash level ([]), the maximum number of times the flash units fire ([]), and the number of times the flash units fire per second ([]).
-
Enable or disable selected groups. Select [] to enable the selected group, [] to disable the selected group.
-
-
f: Group the remote flash units.
-
Choose a group (A–F) for each of the remote flash units.
-
The master flash can control up to 18 flash units in any combination.
-
-
C/f: Compose the shot.
-
Compose the shot and arrange the flash units. See the documentation provided with the flash units for more information.
-
After arranging the units, press the i button in the flash info display (Changing Flash Settings) and select [] to test-fire the units and confirm that they are functioning normally.
-
-
C: Take the photograph.
Adding a Shoe-Mounted Flash Unit
Radio-controlled flash units (Radio AWL) can be combined with any of the following flash
units mounted on the camera accessory shoe: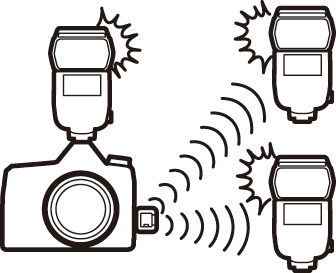
-
SB‑5000: Before attaching the flash unit, set it to radio-controlled master flash mode (a d icon will appear at the top left corner of the display) and choose group or remote repeating flash control. Once the unit is attached, settings can be adjusted using the controls on the flash unit or the options listed in the camera menus under [] > [] or under “M” in the [] display.
-
SB‑910, SB‑900, SB‑800, SB‑700, SB‑600: Configure the flash for standalone use and use the controls on the flash unit to adjust flash settings.
-
SB‑500, SB‑400, SB‑300: Mount the unit on the camera and adjust settings using the [] > [] item in the camera menus.