The camera automatically takes photos at selected intervals to create a time-lapse video.
|
Option |
Description |
|---|---|
|
[] |
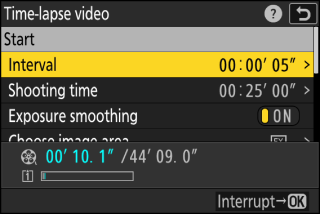
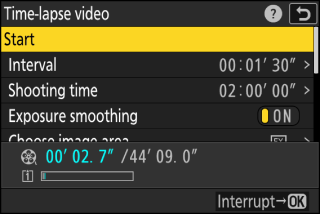
Start time-lapse recording. Shooting starts after about 3 s and continues at the interval selected for [] for the time selected for []. |
|
[] |
Choose the interval between shots, in minutes and seconds. |
|
[] |
Choose how long the camera will continue to take pictures, in hours and minutes. |
|
[] |
Selecting [] smooths abrupt changes in exposure.
|
|
[] |
Choose the image area for time-lapse videos from [] and []. |
|
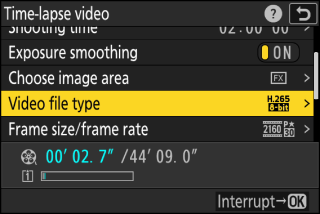
[] |
Choose the video file type for the final video. |
|
[] |
Choose the frame size and rate for the final video. The options available vary with the setting chosen for []. |
|
[] |
|
|
[] |
If [] is selected, the camera will focus between shots. |
|
[] |
Choose the slot used to record time-lapse videos when two memory cards are inserted. |
Recording Time-Lapse Videos
-
Time-lapse videos are shot using the video crop.
-
Take test shots and check the results in the monitor.
-
Before proceeding, select [] in the setup menu and make sure that the camera clock is set to the correct time and date.
-
To ensure that shooting is not interrupted, use a fully-charged battery, the supplied charging AC adapter, or an optional AC adapter and power connector.
-
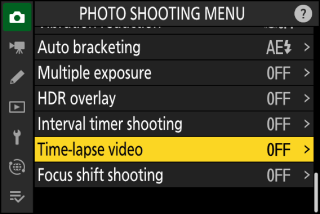
Highlight [] in the photo shooting menu and press 2.
-
Adjust time-lapse video settings.
-
Choose the interval between shots.
Highlight [] and press 2.

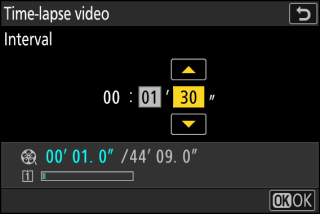
Choose an interval (in minutes and seconds) and press J.
-
Choose an interval longer than the slowest anticipated shutter speed.
-
-
Choose the total shooting time.
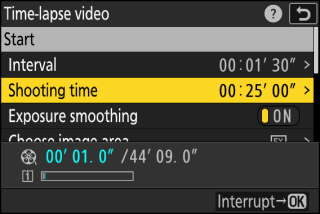
Highlight [] and press 2.
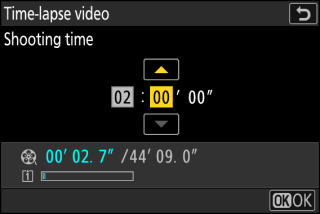
Choose a shooting time (in hours and minutes) and press J.
-
The maximum shooting time is 23 hours and 59 minutes.
-
-
Enable or disable exposure smoothing.
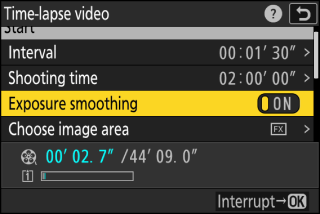
Highlight [] and press 2 to select [] or [].
-
Selecting [] smooths abrupt changes in exposure.
-
-
Choose the image area.
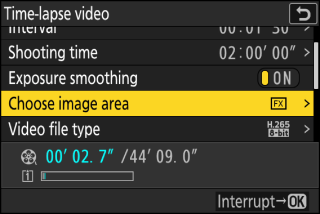
Highlight [] and press 2.
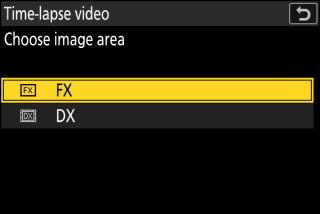
Highlight an option and press J.
-
Choose a video file type.
Highlight [] and press 2.
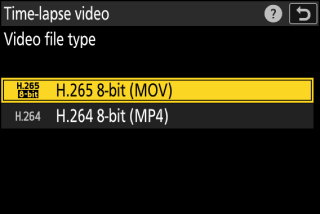
Highlight an option and press J.
-
Choose the frame size and rate.
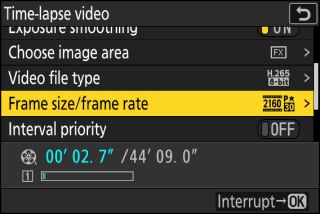
Highlight [] and press 2.
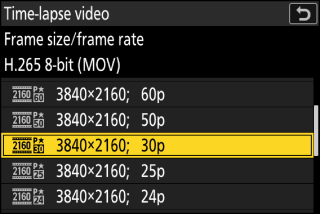
Highlight an option and press J.
-
Choose an interval priority option.
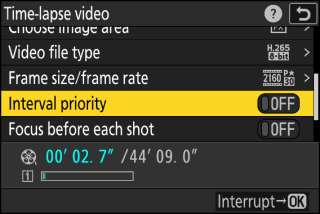
Highlight [] and press 2 to select [] or [].
-
Choose whether the camera focuses between shots.
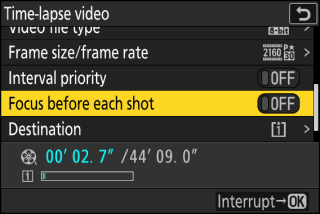
Highlight [] and press 2 to select [] or [].
-
If [] is selected for [], the camera will focus before each shot according to the option currently selected for focus mode.
-
-
Choose a destination.
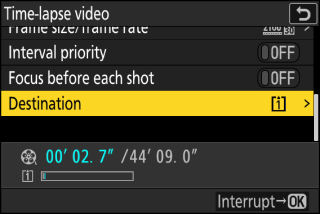
Highlight [] and press 2.
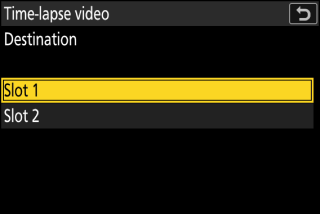
Highlight the slot that will be used to record time-lapse videos when two memory cards are inserted and press J.
-
-
Highlight [] and press J.
-
Shooting starts after about 3 s.
-
The display turns off during shooting.
-
The camera takes pictures at interval selected for [] for the time selected for [] in Step 2.
-
-
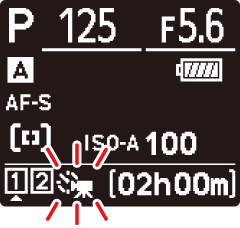
A 8 icon is displayed in the control panel during shooting.
-
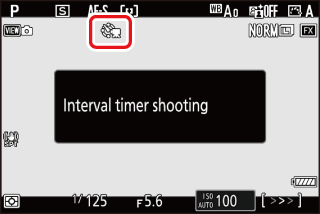
If the display is turned on by pressing the shutter-release button halfway, the message [] will be displayed and the 8 icon will flash.
Ending Shooting
To end shooting before all the photos are taken, press J or select [] in the photo shooting menu, highlight [], and press J. Note that the menus may not be displayed when the G button is pressed if the time selected for [] is very short.
-
A video will be created from the frames shot to the point where shooting ended and normal photography will resume.
-
The total number of frames in the final video can be calculated by dividing the shooting time selected in Step 2 by the interval, rounding up, and adding 1.
-
The length of the final video can then be calculated by dividing the number of shots by the frame rate selected for [] (for example, a 48-frame video recorded with [] selected for [] will be about two seconds long).
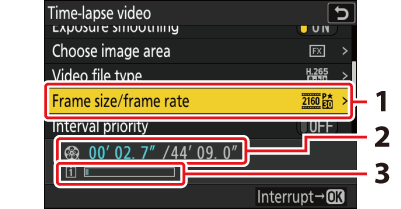
| 1 |
Frame size/frame rate |
|---|---|
| 2 |
Length recorded/maximum length |
| 3 |
Memory card indicator |
|---|
The K button cannot be used to view pictures while shooting is in progress. The current frame will however be displayed for a few seconds after each shot if [] or [] is selected for [] in the playback menu. Note that other playback operations cannot be performed while the frame is displayed. The current frame may not be displayed if the interval is very short.
-
Sound is not recorded with time-lapse videos.
-
The shutter speed and the time needed to record the picture to the memory card may vary from shot to shot. As a result, camera may be unable to take shots at the selected interval.
-
Shooting will not begin if a time-lapse video cannot be recorded at current settings, for example if:
-
the value selected for [] is longer than that selected for [],
-
[] is selected for [] or [], or
-
the memory card is full.
-
-
Time-lapse recording will not start if the recording time is shown in red in the [] display. Adjust the [] or [].
-
When 7680 × 4320 is selected for [], shooting will not start if a DX lens is attached or [] selected for [].
-
The K button cannot be used to view pictures while time-lapse recording is in progress.
-
For consistent coloration, choose a white balance setting other than 4 [] or D [] when recording time-lapse videos.
-
Regardless of the option selected for Custom Setting c3 [] > [], the standby timer will not expire while recording is in progress.
-
Shooting may end if camera controls are used, settings are changed, or an HDMI cable is connected. A video will be created from the frames shot to the point where shooting ended.
-
The following end shooting without a beep sounding or a video being recorded:
-
Disconnecting the power source
-
Ejecting the memory card
-
Shooting and menu settings can be adjusted between shots. Note, however, that the monitor will turn off approximately 2 s before the next shot is taken.
Time-lapse video recording cannot be combined with some camera features, including:
-
video recording,
-
long time-exposures (“Bulb” or “Time”),
-
the self-timer,
-
high-speed frame capture,
-
bracketing,
-
multiple exposures,
-
HDR overlay,
-
interval-timer photography, and
-
focus shift.