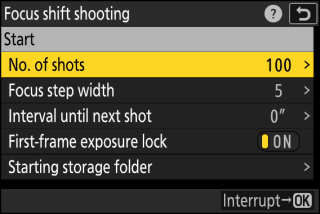
Focus shift automatically varies focus over a series of shots. Use it to take photos that will later be combined using focus stacking to create a single picture with increased depth of field. Before using focus shift, choose a focus mode of AF-S or AF-C and a release mode other than self-timer or high-speed frame capture.
|
Option |
Description |
|---|---|
|
[] |
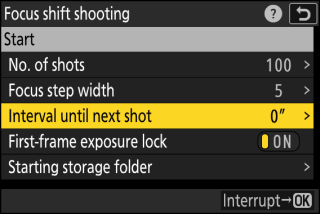
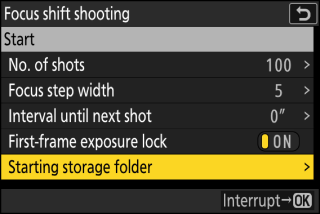
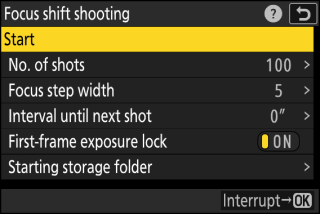
Start shooting. The camera will take the selected number of shots, changing the focus distance by the selected amount with each shot. |
|
[] |
Choose the number of shots (maximum 300). |
|
[] |
Focus shift varies the focus distance over a series of photographs. Choose the amount the focus distance changes with each shot. |
|
[] |
Choose the interval between shots, in seconds.
|
|
[] |
|
|
[] |
Highlight options and press J or 2 to select (M) or deselect (U).
|
Focus Shift Photography
-
Take a test shot at current settings.
-
To ensure that shooting is not interrupted, use a fully-charged battery, the supplied charging AC adapter, or an optional AC adapter and power connector.
-
Focus.
-
During focus shift, the camera takes a series of shots starting from a selected focus position and continuing toward infinity. Given that shooting ends when infinity is reached, the starting focus position should be slightly in front of (i.e., closer to the camera than) the closest point on the subject.
-
Do not move the camera after focusing.
-
-
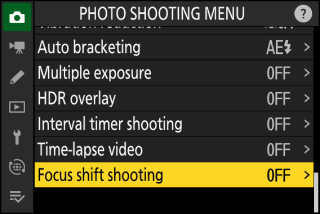
Highlight [] in the photo shooting menu and press 2.
-
Adjust focus shift settings.
-
Choose the number of shots.
Highlight [] and press 2.

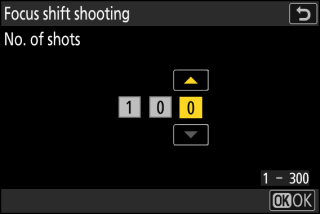
Choose the number of shots and press J.
-
The maximum number of shots is 300.
-
We recommend taking more shots than you think you’ll need. You can winnow them down during focus stacking.
-
More than 100 shots may be required for photographs of insects or other small objects. On the other hand, only a few may be needed to photograph a landscape from front to back with a wide-angle lens.
-
-
Choose the amount the focus distance changes with each shot.
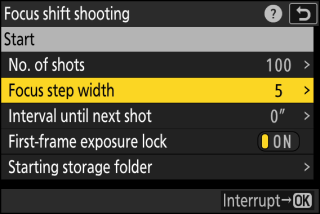
Highlight [] and press 2.
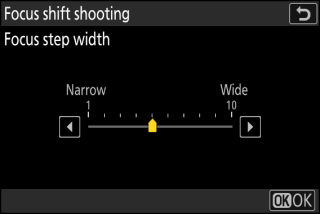
Choose a focus step width and press J.
-
Press 4 to reduce the focus step width, 2 to increase.
-
Note that high settings increase the risk that some areas will be out of focus when the shots are stacked. A value of 5 or less is recommended.
-
Try experimenting with different settings before shooting.
-
-
Choose the interval until next shot.
Highlight [] and press 2.
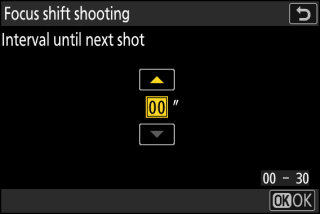
Choose the interval between shots and press J.
-
Choose the interval between shots, in seconds.
-
Select [] to take photos at up to about 5 fps.
-
To ensure correct exposure when using a flash, choose an interval long enough for the flash to charge. A setting of [] is recommended when shooting without a flash.
-
-
Enable or disable first-frame exposure lock.
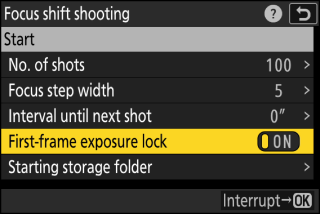
Highlight [] and press 2 to select [] or [].
-
[] is recommended if lighting and other conditions will not change during shooting, [] when photographing landscapes and the like under variable lighting.
-
Selecting [] locks exposure at the value for the first shot, ensuring that all photos have the same exposure. Large changes in subject brightness during shooting may however result in apparent variations in exposure. This can be addressed by selecting [].
-
-
Choose starting folder options.
Highlight [] and press 2.

After highlighting the desired options and pressing J to turn them on (M) or off (U), press 4.
-
-
Highlight [] and press J.
-
Shooting starts after about 3 s.
-
The display turns off during shooting.
-
The camera takes photographs at the selected interval, starting at the focus distance selected at the start of shooting and progressing out toward infinity by the selected focus step distance with each shot.
-
Shooting ends when the selected number of shots has been taken or focus reaches infinity.
-
Ending Focus Shift Photography
To end shooting before all shots have been taken, either:
-
select [] in the photo shooting menu, highlight [], and press J, or
-
press the shutter-release button halfway or press the J button between shots.
A 9 icon is displayed in the control panel during shooting.
-
The shutter speed and the time needed to record the picture may vary from shot to shot. As a result, the camera may be unable to take shots at the selected interval.
-
Shooting ends when focus reaches infinity, and consequently depending on the focus position at the start of shooting, shooting may end before the selected number of shots has been taken.
-
Regardless of the option selected for Custom Setting c3 [] > [], the standby timer will not expire while shooting is in progress.
-
If you are using a flash, choose an interval longer than the time needed for the flash to charge. If the interval is too short, the flash may fire at less than the power needed for full exposure.
-
If shooting cannot proceed at current settings, for example because shutter speed is set to “Bulb” or “Time”, a warning will be displayed.
-
Changing camera settings while focus shift photography is in progress may cause shooting to end.
Focus-shift photography cannot be combined with some camera features, including:
-
video recording,
-
long time-exposures (“Bulb” or “Time”),
-
the self-timer,
-
high-speed frame capture,
-
bracketing,
-
multiple exposures,
-
HDR overlay,
-
interval-timer photography, and
-
time-lapse video recording.
Given that pictures shot at very small apertures (high f-numbers) may lack definition, we recommend that you choose apertures wider (f-numbers lower) than f/8–f/11.
Because focus depth is reduced at short focus distances, we recommend choosing smaller focus steps and increasing the number of shots when photographing subjects close to the camera.