New Smart Device Connection Method: “Wi-Fi Connection (STA Mode)”
- A compatible version of SnapBridge is required to establish connections in Wi-Fi station mode and Wi-Fi access point mode. Be sure to use the latest version of the SnapBridge app.
- Some operations are performed using the camera, others on the smart device.
- Additional instructions are available via SnapBridge online help.

Connecting to an Existing Network (Wi-Fi Station Mode)
The camera connects to a smart device on an existing network (including home networks) via a wireless LAN access point. The smart device can still connect to the Internet while connected to the camera.
Connection to smart devices beyond the local area network is not supported. You can connect only to smart devices on the same network.
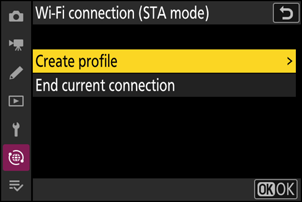
Camera: Select [Connect to smart device] > [Wi-Fi connection (STA mode)] in the network menu, then highlight [Create profile] and press J.
Camera: Name the new profile.
- To proceed to the next step without changing the default name, press X.
- Whatever name you choose will appear in the network menu [Connect to smart device] > [Wi-Fi connection (STA mode)] list.
- To rename the profile, press J.

Camera: Highlight [Search for Wi-Fi network] and press J.
The camera will search for networks currently active in the vicinity and list them by name (SSID).

To connect without entering an SSID or encryption key, press X in Step 3. Next, highlight one of the following options and press J. After connecting, proceed to Step 6.
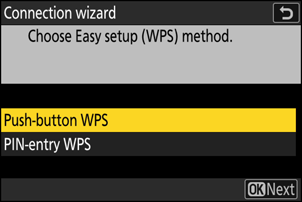
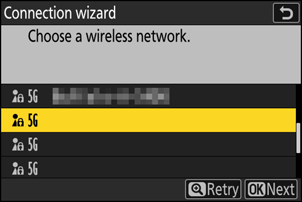
Option Description [Push-button WPS] For routers that support push-button WPS. Press the WPS button on the router and then press the camera J button to connect. [PIN-entry WPS] The camera will display a PIN. Using a computer, enter the PIN on the router. For more information, see the documentation provided with the router. Camera: Choose a network.
- Highlight a network SSID and press J.
- The band on which each SSID operates is indicated by an icon.
- Encrypted networks are indicated by a h icon. If the selected network is encrypted (h), you will be prompted to enter the encryption key. If the network is not encrypted, proceed to Step 6.
- If the desired network is not displayed, press X to search again.

Hidden SSIDs
Networks with hidden SSIDs are indicated by blank entries in the network list.
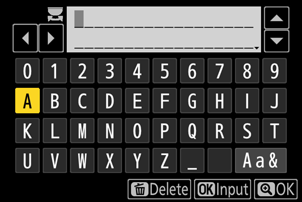
- To connect to a network with a hidden SSID, highlight a blank entry and press J. Next, press J; the camera will prompt you to provide an SSID.
- Enter the network name and press X. Press X again; the camera will now prompt you to enter the encryption key.
Camera: Enter the encryption key.
- Press J and enter the encryption key for the wireless router.

- For more information on the wireless router encryption key, see the documentation for the wireless router.
- Press X when entry is complete.
- Press X again to initiate the connection. A message will be displayed for a few seconds when the connection is established.
Camera: Obtain or select an IP address.
Highlight one of the following options and press J.

Option Description [Obtain automatically] Select this option if the network is configured to supply the IP address automatically. A “configuration complete” message will be displayed once an IP address has been assigned. [Enter manually] Enter the IP address and sub-net mask manually.
- Press J; you will be prompted to enter the IP address.
- Rotate the main command dial to highlight segments.
- Press 4 or 2 to change the highlighted segment and press J to proceed.
- Next, press X; a “configuration complete” message will be displayed. Press X again to display the sub-net mask.
- Press 1 or 3 to edit the sub-net mask and press J; a “configuration complete” message will be displayed.
Camera: Press J to proceed when the “configuration complete” message is displayed.
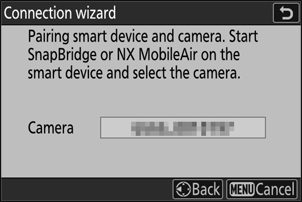
Camera: Start a Wi-Fi connection with the smart device.
When prompted, launch the SnapBridge app on the smart device.
Smart device: Launch the SnapBridge app, open the
 tab, tap
  , and select [Wi-Fi STA Mode Connection].
If this is the first time you have launched the app, you should instead tap [Connect to camera] in the welcome display.
Smart device: Select the camera.
Select the camera name displayed on the camera in Step 8.
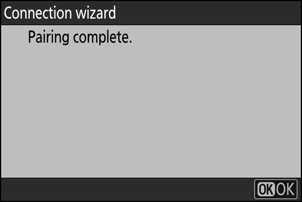
Camera/smart device: Establish the Wi-Fi connection.
- When the camera displays the dialog as shown, press J.
- After establishing a Wi-Fi connection to the camera, the smart device will display Wi-Fi station mode options.
The camera will display a message stating that the connection is complete.
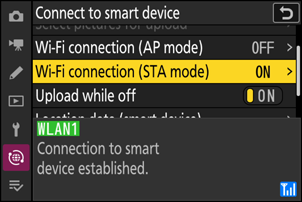
The camera and smart device are now connected via Wi-Fi.
For information on using the SnapBridge app, see online help.
Direct Wireless Connection to a Smart Device (Wi-Fi Access Point Mode)
Connect the camera and a smart device directly via Wi-Fi. The camera acts as a wireless LAN access point, allowing you to connect when working outdoors and in other situations in which the smart device is not already connected to a wireless network and eliminating the need for complicated adjustments to settings. The smart device cannot connect to the Internet while connected to the camera.
Smart device: Launch the SnapBridge app, open the
tab, tap , and select [Wi-Fi AP Mode Connection].If this is the first time you have launched the app, you should instead tap [Connect to camera] in the welcome display. When prompted, tap the category for your camera and then tap the “Wi‑Fi” option when prompted to choose the connection type.
Camera/smart device: Turn the camera on when prompted.
Do not use any of the controls in the app at this point.
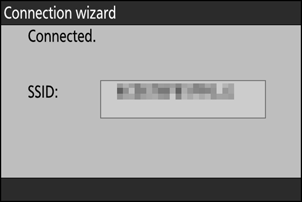
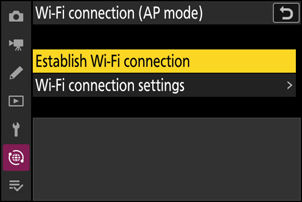
Camera: Select [Connect to smart device] > [Wi-Fi connection (AP mode)] in the network menu, then highlight [Establish Wi-Fi connection] and press J.
The camera SSID and password will be displayed.
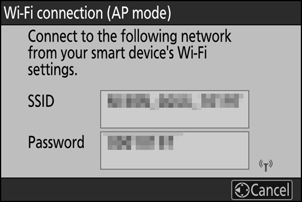
Smart device: Follow the on-screen instructions to establish a Wi-Fi connection.
On iOS devices, the “Settings” app will launch. Tap [< Settings] to open [Settings], then scroll up and tap [Wi-Fi] (which you’ll find near the top of the settings list) to display Wi-Fi settings.

- In the Wi-Fi settings display, select the camera SSID and enter the password displayed by the camera in Step 3.
Smart device: After adjusting device settings as described in Step 4, return to the SnapBridge app.
- After establishing a Wi-Fi connection to the camera, the smart device will display Wi-Fi access point mode options.
The camera will display a message stating that the connection is complete.
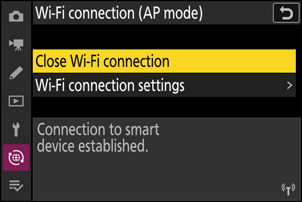
The camera and smart device are now connected via Wi-Fi.
For information on using the SnapBridge app, see online help.
Terminating Wi-Fi Station/Wi-Fi Access Point Mode
To end the Wi-Fi connection, tap  in the SnapBridge tab. After the icon changes to
  , tap , and select [Disconnect] or [Exit Wi-Fi STA mode].