Auto Capture
G button UC photo shooting menu
The camera shoots bursts automatically in auto capture when it detects a subject that meets certain conditions, such as being in the frame, within a certain range of distances, and moving in a certain direction. This feature helps photographers take photographs automatically without being present.
| Option | Description |
|---|---|
| [Set] | Display |
| [Select user preset] |
|
The Auto Capture Settings Display
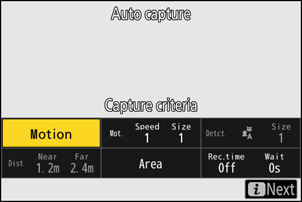
You can set the conditions that trigger the camera to shoot bursts automatically in the auto capture settings display. Highlight items and press J to display options for the selected item.
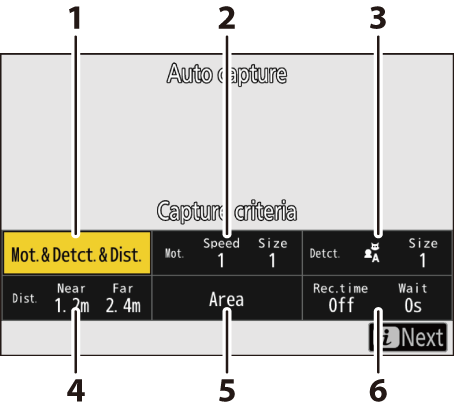
- [Capture criteria]
- [Advanced: Motion]
- [Advanced: Subject detection]
- [Advanced: Distance]
- [Target area]
- [Timing options]
| Option | Description |
|---|---|
| [Capture criteria] |
|
| [Advanced: Motion] | This option will take effect only if [Motion] is selected (M) for [Capture criteria]. It is used to choose the direction of motion, size, and speed of subjects that will trigger auto capture (0“Capture Criteria“ > “Motion”). |
| [Advanced: Subject detection] | This option will take effect only if [Subject detection] is selected (M) for [Capture criteria]. It is used to choose the type and size of subjects that will trigger auto capture ( 0“Capture Criteria” > “Subject Detection”). |
| [Advanced: Distance] | This option will take effect only if [Distance] is selected (M) for [Capture criteria]. It is used to choose the range of distances at which the presence of a subject will trigger auto capture (0“Capture Criteria“ > “Distance”). Shooting will continue while the subject is within the specified range of distances. |
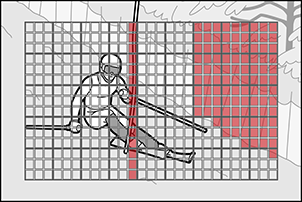
| [Target area] | Choose an area for subject detection when [Auto-area AF] is selected for AF-area mode. Auto capture will be triggered if a subject that meets the trigger conditions is detected in any of the target areas (points). Target-area selection can be used to disable the areas of the frame that are blocked by obstacles or can otherwise be ignored for purposes of subject detection, ensuring that the desired subject can be detected more reliably. |
| [Timing options] | Choose values for [Recording time selection] and [Wait after shooting].
|
Taking Pictures Using Auto Capture
- To ensure that shooting is not interrupted, use a fully-charged battery, the supplied charging AC adapter, or an optional AC adapter and power connector.
- Only the [FX (36×24)] and [DX (24×16)] image area options are available. Auto capture cannot be used when [1:1 (24×24)] or [16:9 (36×20)] is selected.
Mount the camera on a tripod or take other measures to keep it steady.
Fix the camera in place after framing the shot.
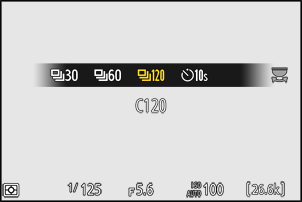
Select a release mode from [Continuous high-speed], [Continuous low-speed], [C15], [C30], [C60], or [C120].
- If single-frame or self-timer mode is selected, the camera will temporarily switch to continuous high-speed mode when auto capture begins.
- If you selected continuous low-speed or continuous high-speed mode, choose the frame advance rate before proceeding.
Position the focus point.
Choose an AF-area mode and position the focus point in the area of the frame in which you anticipate the subject will appear.
- If autofocus is enabled, the camera will temporarily switch to focus mode AF‑C during auto capture.
- If [Auto-area AF] is selected for AF-area mode, the actual frame rate drops to 15 fps when a frame advance rate of 20 fps is selected in continuous high-speed mode.
- Adjust the focus position manually when using manual focus.
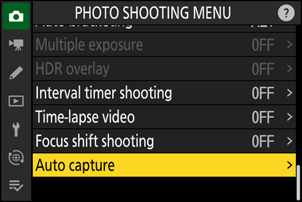
Highlight [Auto capture] in the photo shooting menu and press 2.
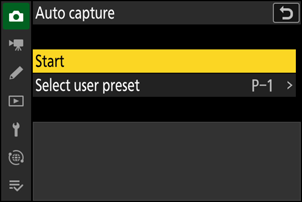
Choose [Select user preset], then highlight a destination preset for the auto capture settings and press J.
Choose a destination from presets [User preset 1] through [User preset 5].

Highlight [Set] and press J.
Auto capture settings will be displayed.
Highlight [Capture criteria] and press J.
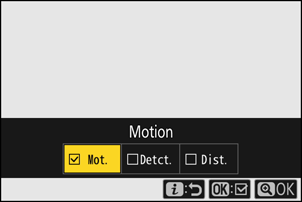
- Adjust auto capture criteria. Highlight options and press J to select (M) or deselect (U).
- Press X to save changes and return to the auto capture settings display.
Adjust settings for each of the criteria selected for [Capture criteria].
- For information on the criteria available when [Motion] is enabled (M), see ‘“Capture Criteria” > “Motion”’ ( 0“Capture Criteria“ > “Motion”).
- For information on the criteria available when [Subject detection] is enabled (M), see ‘“Capture Criteria” > “Subject Detection”’ ( 0“Capture Criteria” > “Subject Detection”).
- For information on the criteria available when [Distance] is enabled (M), see ‘“Capture Criteria” > “Distance”’ (0“Capture Criteria“ > “Distance”).
- Although multiple [Capture criteria] can be used together, we recommend that you enable (M) only one criterion at a time until you have grown used to auto capture.
Highlight [Target area] and press J.
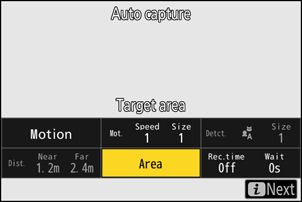
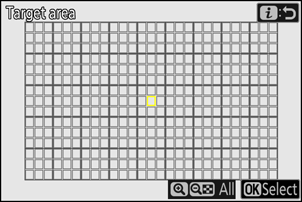
- Choose an area for subject detection when [Auto-area AF] is selected for AF-area mode in autofocus mode or when using manual focus. Target-area selection is not available in other AF-area modes. In that case, proceed to Step 10.
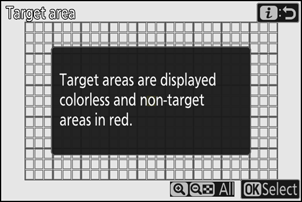
- The target area selection guide is only displayed once.
Press J to turn the points red (disabled), excluding them from the subject detection area. Press J again to clear (re-enable) the points.

Disabling areas that do not require subject detection or are blocked by obstacles provides more accurate subject detection.
- Press X to enable all points.
- Press W (Q) to disable all points.
- Points can be enabled and disabled nine at a time (in 3 × 3 grids) by tapping the monitor.
- Press i to save changes and return to the auto capture settings display.
Subjects meeting the [Capture criteria] will be detected only in the vicinity of the selected target area. For example, the camera will ignore motion in disabled areas (points) even when [Motion] is enabled (M).
Target-area selection is not available when [Capture criteria] > [Distance] is enabled (M).
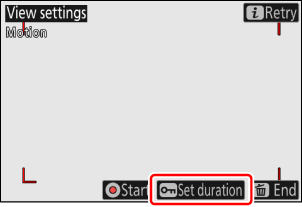
Highlight [Timing options] and press J.
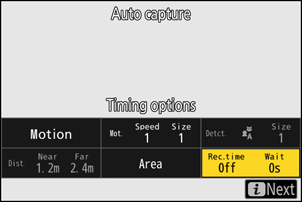
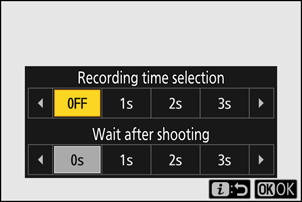
- Use [Recording time selection] to choose the length of each individual burst or video recording; options include [OFF] (no limit) and values of from 1 second to 30 minutes. When an option other than [OFF] is selected, shooting will continue for the selected time even if the trigger conditions are no longer met.
- The minimum length of time the camera will wait before beginning shooting again can be selected using [Wait after shooting], which offers a choice of values of from 0 seconds to 30 minutes.
- Press J to save changes and return to the auto capture settings display.
Press the i button.
- The settings confirmation dialog will be displayed.
- The currently selected (M) [Capture criteria] are listed in the top left corner of the dialog.

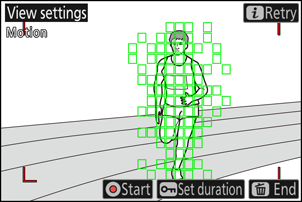
Check that the camera can detect subjects as desired using the selected criteria.
- Subjects detected by the camera are shown by green boxes in the settings confirmation dialog.
- You can choose the focus point when an option other than [Auto-area AF] is selected for AF-area mode.
- If you select [Wide-area AF (C1)] or [Wide-area AF (C2)] for AF-area mode, you can choose the size of the focus area by holding the focus-mode button and pressing 1, 3, 4, or 2.
- You can select AF-area mode from the settings confirmation dialog by pressing the focus-mode button and rotating the sub-command dial.
- If green boxes are not displayed as expected, press the i button and repeat Steps 8 and 9 until the desired results are achieved.
Press the g (Fn4) button to set the date and time to start auto capture.

- Pressing the g (Fn4) button on the settings confirmation dialog allows you to configure the date and time to start auto capture.
- To start auto capture without setting a date and time, proceed to Step 14.
- Select [Yes] for [Set start day/time] to perform auto capture shooting for the configured duration starting on the set date and time.
- Select [Start day/time] to specify the date, hour, and minute to start shooting.
- Select [Shooting duration] to set the duration to perform auto capture from [No limit], [1 hour], [2 hours], and [3 hours]. If [No limit] is selected, auto capture will continue until it is terminated manually.
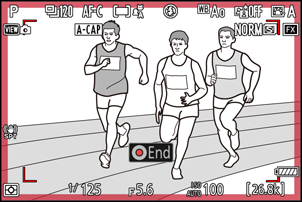
Initiate auto capture.
- Auto capture starts when the video-record button is pressed in the settings confirmation dialog or at the date and time set in Step 13.
- Shooting will begin when a subject that meets the selected criteria is detected and continue while the criteria are met.
- A red border will appear around the shooting display while the camera detects and captures the subject.
- Auto capture will be triggered only if all the options selected for [Capture criteria] are satisfied.
- The shooting display will turn off to save power if no operations are performed for about three minutes, but auto capture will remain active. The display can be reactivated by pressing the DISP button or pressing the shutter-release button halfway.
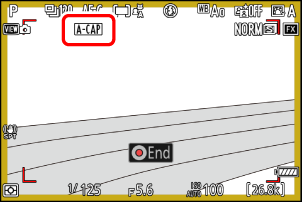
The Auto Capture Standby Display
“A-CAP” will flash in the control panel.
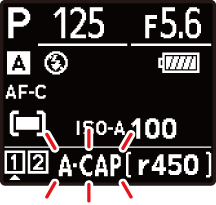
An X icon will flash in the shooting display. A yellow border will appear around the shooting display if the camera does not detect a subject that meets the configured criteria after starting auto capture.
The settings selected for Custom Setting d4 [Pre-Release Capture options] apply when [C15], [C30], [C60], or [C120] is selected for release mode.
Silent mode can be enabled by selecting [ON] for [Silent mode] in the setup menu.
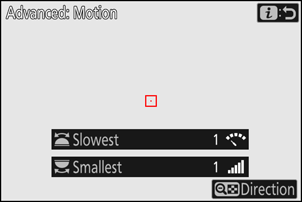
“Capture Criteria“ > “Motion”
This option is used to choose the direction of motion, size, and speed of subjects that will trigger auto capture.
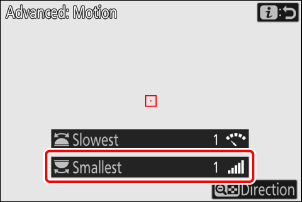
Highlight [Advanced: Motion] in the auto capture settings display and press J.
The motion settings display will appear.
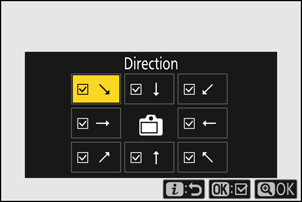
Press the W (Q) button and select directions.
- Direction criteria will be displayed.
- Highlight directions and press J to select (M) or deselect (U).
- Press X to save changes and return to the motion settings display.
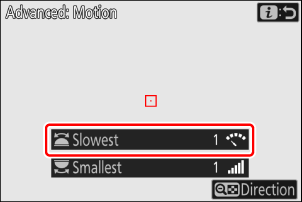
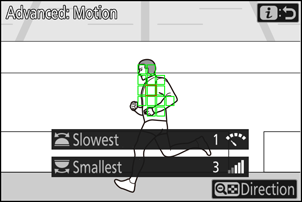
Rotate the main command dial to choose the subject speed.
Rotate the main command dial to set [Slowest] to a value from [1] to [5]. Choose higher values to restrict subject detection to faster-moving subjects, lower values to include subjects moving at slower speeds.
- Subjects that meet the criteria for [Smallest] and [Slowest] are shown by green boxes in the motion settings display.
Set [Slowest] according to the time required for the subject to cross the frame horizontally. The approximate time for each value is listed below. Subjects that are moving too quickly may not be detected.
- [1]: About 5 s or less
- [2]: About 4 s or less
- [3]: About 3 s or less
- [4]: About 2 s or less
- [5]: About 1 s or less
- Selecting [1] for both [Smallest] and [Slowest] makes it easier for the camera to detect subjects of a variety of sizes moving at a variety of speeds. We recommend that you begin from low values and then gradually raise them while checking the display of green boxes in the motion settings display or taking test pictures until subject detection functions as desired.
Rotate the sub-command dial to choose the subject size.
Rotate the sub-command dial to set [Smallest] to a value from [1] to [5]. Choose lower values to include smaller subjects, higher values to restrict subject detection to larger subjects.
- Subjects that meet the criteria for [Smallest] and [Slowest] are shown by green boxes in the motion settings display.
The apparent subject size (measured in points) for each [Smallest] option is listed below.
- [1]: 4 points or larger
- [2]: 8 points or larger
- [3]: 14 points or larger
- [4]: 24 points or larger
- [5]: 34 points or larger
Subject detected in 14 points
If both [Motion] and [Subject detection] are selected for [Capture criteria], the [Smallest] selected for the former will have no effect on the [Smallest] selected for the latter. Changing the [Smallest] selected in the subject detection display has no effect on the [Smallest] selected in the motion settings display. The two conditions will be assessed separately, but only subjects that meet the criteria for both will trigger auto capture.
Press the i button.
The camera will save the changes and return you to the auto capture settings display.
“Capture Criteria” > “Subject Detection”
This option is used to choose the types and sizes of subject that trigger auto capture.
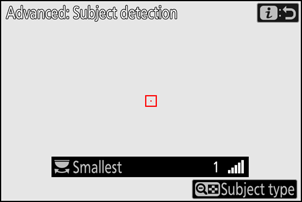
Highlight [Advanced: Subject detection] in the auto capture settings display and press J.
The subject detection display will appear.
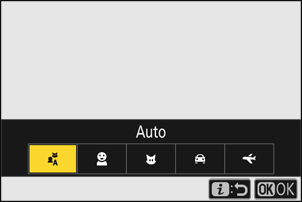
Press the W (Q) button and select the desired subject types.
- Your choices are auto, people, animals, vehicles and airplanes.
- Press J to save changes and return to the subject detection display.
Rotate the main command dial to choose the subject size.
Set [Smallest] to a value from [1] to [5]. Choose lower values to include smaller subjects, higher values to restrict subject detection to larger subjects.
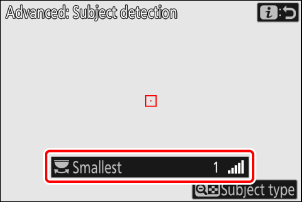
- Subjects that meet the criterion for [Smallest] are shown by green boxes in the subject detection display.
The apparent subject size (as a percentage of the angle of view) for each setting is listed below.
- [1]: 2.5% or more
- [2]: 5% or more
- [3]: 10% or more
- [4]: 15% or more
- [5]: 20% or more

Subject detected at size of 20%
- Selecting [1] for [Smallest] makes it easier for the camera to detect subjects of different sizes. We recommend that you begin from a low value and then gradually raise it while checking the display of green boxes in the subject detection display or taking test pictures until subject detection functions as desired.
If both [Motion] and [Subject detection] are selected for [Capture criteria], the [Smallest] selected for the former will have no effect on the [Smallest] selected for the latter. Changing the [Smallest] selected in the motion settings display has no effect on the [Smallest] selected in the subject detection display. The two conditions will be assessed separately, but only subjects that meet the criteria for both will trigger auto capture.
Press the i button.
The camera will save the changes and return you to the auto capture settings display.
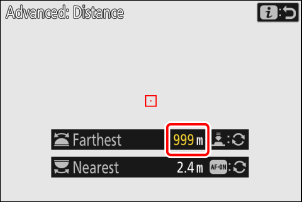
“Capture Criteria“ > “Distance”
Choose the maximum and minimum distances at which the camera will detect subjects for auto capture. Auto capture shooting will continue while the subject is within the specified range of distances.
You can use the [Advanced: Distance] feature when a NIKKOR Z lens is attached. It may not function with other lenses.
Highlight [Advanced: Distance] in the auto capture settings display and press J.
- The distance settings display will appear.
- A focus-point target will appear in the distance settings display.
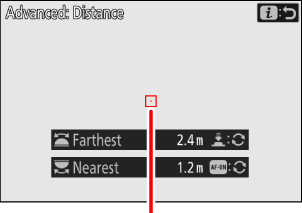
Focus-point target
Choose the nearest and farthest distances at which the camera will detect subjects for auto capture.
Choose the nearest distance at which the camera will detect subjects for auto capture. Place the target over a subject at the nearest distance for auto capture subject detection and press the AF-ON button to set the minimum distance, which will appear in the display as [Nearest]. The minimum distance can be fine-tuned by rotating the main command dial.
Choose the farthest distance at which the camera will detect subjects for auto capture. Place the target over a subject at the farthest distance for auto capture subject detection and press the shutter-release button halfway to set the maximum distance, which will appear in the display as [Farthest]. The maximum distance can be fine-tuned by rotating the sub-command dial.
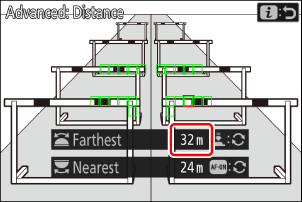
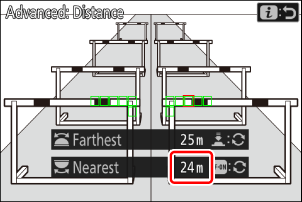
Fine-Tuning the Distances for “Nearest” and “Farthest”
Fine-tuning is available exclusively with Nikon Z mount lenses, but not with the NIKKOR Z 58mm f/0.95 S Noct.
Supported Distances for “Nearest” and “Farthest”
We recommend that you configure [Nearest] and [Farthest] within the range of values indicated by the numbers in white. Setting these options to the values indicated in yellow may reduce the accuracy with which the camera can detect the distance to the subject.
The “Nearest” and “Farthest” Displays
The distances for [Nearest] and [Farthest] are displayed in meters only. They will not be displayed in feet even when [Feet (ft)] is selected for [Distance units] in the setup menu.
Press the i button.
The camera will save the changes and return you to the auto capture settings display.
- Pressing the AF-ON button or the shutter-release button to set the distance in manual focus saves the current focus position. Before pressing either button, adjust the focus position by rotating the focus or control ring on the lens.
- The accuracy of camera distance detection may drop and prevent the camera from shooting at the intended time if the subject is significantly out of focus.
Pausing and Ending Auto Capture
- To pause auto capture and return to the settings confirmation dialog, press the video-record button. Auto capture can be resumed by pressing the button again.
- To end auto capture and exit to the shooting display, press the O (Q) button.
- During auto-capture standby, the camera focuses as described below.
- [Capture criteria] > [Distance] enabled (M): The camera focuses at the distance selected for [Farthest].
- [Capture criteria] > [Distance] disabled (U): The camera focuses at the distance in effect when auto capture began.
- The camera may fail to detect subjects in the [Target area] when there are multiple subjects in the frame.
- Falling rain and snow may interfere with subject detection. Auto capture may be triggered by falling snow, heat haze, or other weather phenomena.
- Auto capture may end automatically to prevent the camera overheating when the ambient temperature is high or the camera has been used to shoot for extended periods.
All controls other than shutter-release button half-presses and the DISP, video-record, and O (Q) buttons are disabled while auto capture shooting is in progress. End auto capture before attempting to adjust camera settings.
Auto capture cannot be combined with some camera features, including:
- long time-exposures (“Bulb” or “Time”),
- the self-timer,
- bracketing,
- multiple exposures,
- HDR overlay,
- interval-timer photography,
- time-lapse video recording, and
- focus shift.