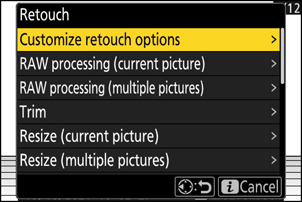
Creating Retouched Copies
| Option | Description |
|---|---|
| [Customize retouch options] | Configure the retouch options displayed in the [Retouch] menu.
|
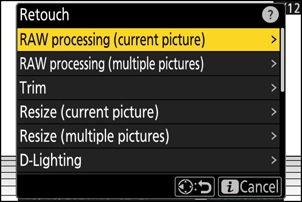
| [RAW processing (current picture)] | Save a copy of the current NEF (RAW) picture in another format such as JPEG (0Processing the Current Picture). |
| [RAW processing (multiple pictures)] | Select multiple existing NEF (RAW) pictures for conversion to JPEG or other formats (0Processing Multiple Pictures). |
| [Trim] | Create a cropped copy of the current photograph (0Trim). |
| [Resize (current picture)] | Create a small copy of the current photograph (0Resizing the Current Picture). |
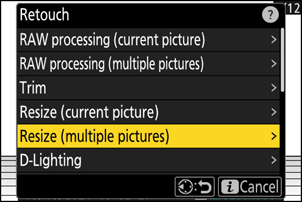
| [Resize (multiple pictures)] | Create small copies from one or more existing photos (0Resizing Multiple Pictures). |
| [D-Lighting] | Brighten shadows (0D-Lighting). |
| [Straighten] | Straighten pictures (0Straighten). |
| [Distortion control] | Reduce barrel distortion in pictures taken with wide-angle lenses or pin-cushion distortion in pictures taken with telephoto lenses (0Distortion Control). |
| [Perspective control] | Reduce the effects of perspective (0Perspective Control). |
| [Monochrome] | Create a monochrome copy of the current photograph (0Monochrome). |
| [Overlay (add)] | Overlay two pictures to create a new picture in JPEG format (0Overlay (Add)). |
| [Lighten] | Compare the pixels at each point in multiple pictures and select the brightest to create a new picture in JPEG format (0“Lighten” and “Darken”). |
| [Darken] | Compare the pixels at each point in multiple pictures and select the darkest to create a new picture in JPEG format (0“Lighten” and “Darken”). |
| [Motion blend] | The camera examines a selected burst of pictures to detect moving subjects and overlays them to create a single JPEG image (0 Motion Blend). |
Select the desired picture with the multi selector and press the i button.
You will not need to select a picture if you are using [RAW processing (multiple pictures)] or [Resize (multiple pictures)], as you will be prompted to choose the pictures later.

Highlight [Retouch] and press 2.
Highlight the desired option and press 2.
Select retouch options.
- For more information, see the section for the selected item.
- To exit without creating a retouched copy, press K. This will return you to the playback display.
Create a retouched copy.
- For more information, see the section for the selected item.
- Retouched copies are indicated by a p icon.
- The camera may not be able to display or retouch images that were taken or retouched using other cameras or that have been retouched on a computer.
- If no actions are performed for a brief period, the display will turn off and any unsaved changes will be lost. To increase the time the display remains on, choose a longer menu display time using Custom Setting c3 [Power off delay] > [Menus].
- Most items can be applied to copies created using other retouch options, although multiple edits may result in reduced image quality or unnatural colors.
- The effect produced may vary with the order in which edits are performed.
- Some items may be unavailable depending on the items used to create the copy.
- [Retouch] items in the i menu that cannot be applied to the current picture are grayed out and unavailable.
- Copies created from NEF (RAW) pictures are saved at an image quality of [JPEG finem].
- Copies created from JPEG pictures are the same quality as the original.
- In the case of dual-format pictures recorded to the same memory card at image-quality settings of RAW+ JPEG, only the NEF (RAW) copy will be retouched.
Except in the case of copies created with [RAW processing (current picture)], [RAW processing (multiple pictures)], [Trim], [Resize (current picture)], and [Resize (multiple pictures)], copies are the same size as the original.
RAW Processing
RAW processing is used to save NEF (RAW) pictures in other formats, such as JPEG. Use [RAW processing (current picture)] to process the current picture, or [RAW processing (multiple pictures)] to process multiple pictures.
RAW processing is available only with NEF (RAW) images created with this camera. Pictures in other formats and NEF (RAW) photos taken with other cameras, Camera Control Pro 2, or NX Tether cannot be selected.
Processing the Current Picture
Select [Retouch] in the i menu, then highlight [RAW processing (current picture)] and press 2.
Choose a destination.
- Press 1 or 3 to highlight a card slot and press J.
- You will not be prompted to select the slot if only one memory card is inserted.

Choose settings for the JPEG copy.
The following settings can be adjusted:
- Image quality (0Adjusting Image Quality)
- Image size (0Adjusting Image Size Settings)
- White balance (0White Balance)
- Exposure compensation (0Exposure Compensation)
- Set Picture Control (0Picture Controls)
- High ISO NR mode (0High ISO NR Mode)
- High ISO NR (0High ISO NR)
- Color space (0Color Space)
- Vignette control (0Vignette Control)
- Active D-Lighting (0Active D-Lighting)
- Diffraction compensation (0Diffraction Compensation)
- Portrait impression balance (0Portrait Impression Balance)
- The settings in effect when the photograph was taken will in some cases appear below the preview.
- To use the setting in effect when the photograph was taken, if applicable, select [Original].
- The effects can be previewed in the edit display. To view the unedited picture, press and hold the DISP button.
- [Exposure compensation] can only be set to values between –2 and +2 EV.
Copy the photograph.
Highlight [EXE] and press J to create a JPEG copy of the selected photographs.

Processing Multiple Pictures
Select [Retouch] in the i menu, then highlight [RAW processing (multiple pictures)] and press 2.

Choose how pictures are selected.
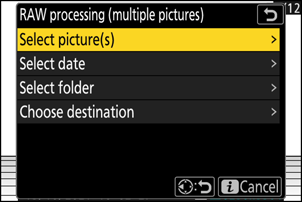
Option Description [Select picture(s)] Create JPEG copies of selected NEF (RAW) pictures. Multiple NEF (RAW) pictures can be selected. [Select date] Create JPEG copies of all NEF (RAW) pictures taken on selected dates. [Select folder] Create JPEG copies of all NEF (RAW) pictures in a selected folder. [Choose destination] Choose the destination for the JPEG copies. You will not be prompted to select the slot if only one memory card is inserted. If you chose [Select picture(s)], proceed to Step 4.
Select the source slot.
- Highlight the slot with the card containing the NEF (RAW) images and press 2.
- You will not be prompted to select the slot if only one memory card is inserted.

Select photographs.
If you chose [Select picture(s)]:
- Highlight pictures using the multi selector.
- To view the highlighted picture full screen, press and hold the X button.
- To select the highlighted picture, press the W (Q) button. Selected pictures are marked with a check (
 ). To remove the check (
 ) and deselect the current picture, press the W (Q) button again. All pictures will be processed using the same settings.
 - Press J to proceed once selection is complete.

If you chose [Select date]:
- Highlight dates using the multi selector and press 2 to select (M) or deselect (U).
- All images taken on dates marked with a check (M) will be processed using the same settings.
- Press J to proceed once selection is complete.

If you chose [Select folder]:
Highlight a folder and press J to select; all images in the selected folder will be processed using the same settings.
Choose settings for the JPEG copies.
The following settings can be adjusted:
- Image quality (0Adjusting Image Quality)
- Image size (0Adjusting Image Size Settings)
- White balance (0White Balance)
- Exposure compensation (0Exposure Compensation)
- Set Picture Control (0Picture Controls)
- High ISO NR mode (0High ISO NR Mode)
- High ISO NR (0High ISO NR)
- Color space (0Color Space)
- Vignette control (0Vignette Control)
- Active D-Lighting (0Active D-Lighting)
- Diffraction compensation (0Diffraction Compensation)
- Portrait impression balance (0Portrait Impression Balance)
- To use the settings in effect when the photographs were taken, if applicable, select [Original].
- The effects can be previewed in the edit display. To view the unedited picture, press and hold the DISP button.
- [Exposure compensation] can only be set to values between –2 and +2 EV.
Copy the photographs.
- Highlight [EXE] and press J to display a confirmation dialog and then highlight [Yes] and press J to create JPEG copies of the selected photos.
- To cancel the operation before all copies have been created, press the G button; when a confirmation dialog is displayed, highlight [Yes] and press J.
Trim
Create a cropped copy of the current photograph. The photograph is displayed with the selected crop shown in yellow; create a cropped copy as described below.
| To | Description |
|---|---|
| Size the crop | Press X or W (Q) to choose the crop size. |
| Change the crop aspect ratio | Rotate the main command dial to choose the crop aspect ratio. |
| Position the crop | Use the multi selector to position the crop. |
| Save the crop | Press J to save the current crop as a separate file. |

Resize
Create small copies of selected photographs. Use [Resize (current picture)] to resize the current picture, or [Resize (multiple pictures)] to resize multiple pictures.
Depending on the copy size, playback zoom may not be available when resized copies are displayed.
Pictures cropped to aspect ratios of 4 : 3 or 3 : 4 cannot be resized.
Resizing the Current Picture
Select [Retouch] in the i menu, then highlight [Resize (current picture)] and press 2.

Choose a destination.
- Press 1 or 3 to highlight a card slot and press J.
- You will not be prompted to select the slot if only one memory card is inserted.

Highlight the desired size and press J.
A copy will be saved at the selected size.
Resizing Multiple Pictures
Select [Retouch] in the i menu, then highlight [Resize (multiple pictures)] and press 2.
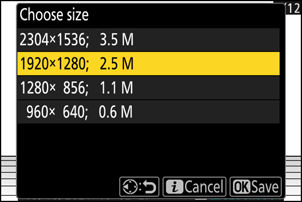
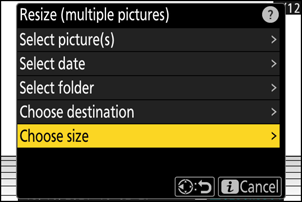
Choose a size.
- Highlight [Choose size] and press 2.
Highlight the desired size (length in pixels) using 1 and 3 and press J.

Choose how pictures are selected.

Option Description [Select picture(s)] Resize selected pictures. Multiple pictures can be selected. [Select date] Resize all pictures taken on selected dates. [Select folder] Resize all pictures in a selected folder. If you chose [Select picture(s)], proceed to Step 5.
Select the source slot.
- Highlight the slot with the card containing the desired pictures and press 2.
- You will not be prompted to select the slot if only one memory card is inserted.

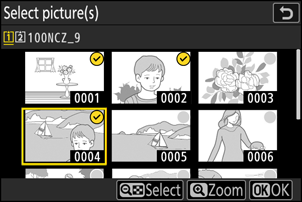
Choose pictures.
If you chose [Select picture(s)]:
- Highlight pictures using the multi selector.
- To view the highlighted picture full screen, press and hold the X button.
- To select the highlighted picture, press the W (Q) button. Selected pictures are marked with a check (). To remove the check () and deselect the current picture, press the W (Q) button again. The selected pictures will all be copied at the size selected in Step 2.
- Press J to proceed once selection is complete.
If you chose [Select date]:
- Highlight dates using the multi selector and press 2 to select (M) or deselect (U).
- All pictures taken on dates marked with a check (M) will be copied at the size selected in Step 2.
- Press J to proceed once selection is complete.

If you chose [Select folder]:
Highlight a folder and press J to select; all pictures in the selected folder will be copied at the size selected in Step 2.
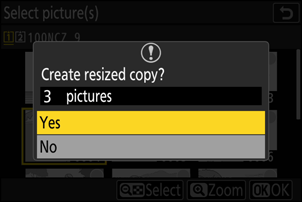
Save the resized copies.
- A confirmation dialog will be displayed; highlight [Yes] and press J to save the resized copies.
- To cancel the operation before all copies have been created, press the G button; when a confirmation dialog is displayed, highlight [Yes] and press J.
D-Lighting
D-Lighting brightens shadows. It is ideal for dark or backlit photographs.
Before

After
The effect is shown in the display. To view the unedited picture, press and hold the DISP button.
- Press 1 or 3 to choose the amount of correction performed. The effect can be previewed in the edit display.
- Press J to save the retouched copy.

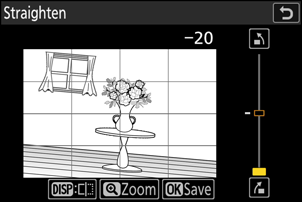
Straighten
Rotate pictures by up to ±5° in increments of approximately 0.25°.
- The effect can be previewed in the edit display. To view the unedited picture, press and hold the DISP button.
- The greater the rotation, the more will be trimmed from the edges.
- Press 1 or 3 to choose the amount of straightening performed.
- Press J to save the retouched copy.
Distortion Control
Create copies with reduced peripheral distortion, reducing barrel distortion in pictures taken with wide-angle lenses or pincushion distortion in pictures taken with telephoto lenses.
- If the camera detects distortion, it will offer a choice of [Auto] and [Manual]. Select [Auto] to let the camera correct distortion automatically.
- If the camera is unable to detect distortion, the only option available will be [Manual]. Select [Manual] to reduce distortion manually.
- Note that [Manual] must be used with copies created using the [Auto] option and with photos taken using the [Auto distortion control] option in the photo shooting menu.
- When [Manual] is selected, the effect can be previewed in the display. To view the unedited picture, press and hold the DISP button.
- Press 1 to reduce pin-cushion distortion, 3 to reduce barrel distortion. Press J to save changes and return to the previous display.
- Press J to save the retouched copy.

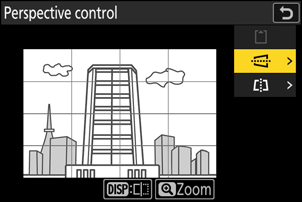
Perspective Control
Create copies that reduce the horizontal and vertical effects of perspective in photos taken looking up from the base of a tall object.
- The effect can be previewed in the edit display. To view the unedited picture, press and hold the DISP button.
- Note that greater amounts of perspective control result in more of the edges being cropped out.
- For horizontal correction, highlight J and press 2. Press 1 to stretch the left edge, 3 to stretch the right. Press J to save changes and return to the previous display.
- For vertical correction, highlight K and press 2. Press 1 to stretch the top edge, 3 to stretch the bottom. Press J to save changes and return to the previous display.
- Press J to save the retouched copy.

Before

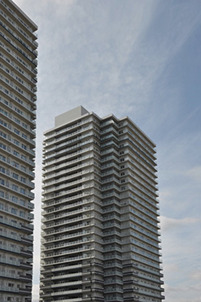
After
Monochrome
Copy photographs in a selected monochrome tint.
| Option | Description |
|---|---|
| [Black-and-white] | Copy photographs in black-and-white. |
| [Sepia] | Copy photographs in sepia. |
| [Cyanotype] | Copy photographs in blue-and-white monochrome. |
- The effect can be previewed in the edit display. To view the unedited picture, press and hold the DISP button.
- Highlighting [Sepia] or [Cyanotype] and pressing 2 displays saturation options for the selected monochrome tint; choose from [High], [Normal], and [Low]. Press J to save changes and return to the tint menu.
- Press J to save the retouched copy.

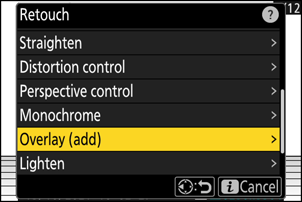
Overlay (Add)
Combine two existing photographs to create a single picture that is saved separately from the originals.

Select [Retouch] in the i menu, then highlight [Overlay (add)] and press 2.
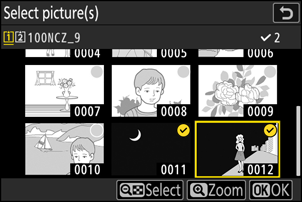
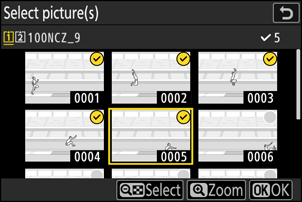
Select the pictures.
- Highlight pictures using the multi selector.
- To view the highlighted picture full screen, press and hold the X button.
- To select the highlighted picture, press the W (Q) button. Selected pictures are marked with a check (). To remove the check () and deselect the current picture, press the W (Q) button again.
- Pictures with different image areas cannot be selected.
- Press J to proceed once the second picture is selected.
Adjust balance.
The overlay can be previewed in the display. Press 1 or 3 to adjust the balance between the two pictures. Press 1 to make the first picture more visible and the second less, 3 for the opposite effect.
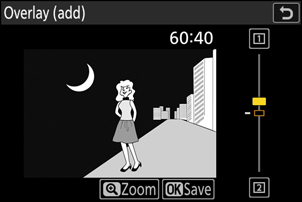
Save the overlay.
Press J to save the overlay.

- Colors and brightness in the preview may differ from the final picture.
- Only pictures created with this camera can be selected. Pictures created with other models cannot be selected.
- The overlay will include only pictures created with the same options selected for [Image area] > [Choose image area] in the photo shooting menu.
- The image quality setting for the completed overlay is that of the highest quality picture it contains.
- Overlays that include NEF (RAW) pictures will be saved at an image quality of [JPEG finem].
- All JPEG pictures in the overlay must be the same size.
- The size of overlays that include both NEF (RAW) and JPEG images is determined by the JPEG picture.
- The overlay has the same photo info (including date of recording, metering, shutter speed, aperture, shooting mode, exposure compensation, focal length, and picture orientation) and values for white balance and Picture Control as the first of the two pictures selected. Copyright information, however, is not copied to the new picture. The comment is similarly not copied; instead, the comment currently active on the camera, if any, is appended.
“Lighten ” and “Darken ”
The camera compares multiple selected pictures and selects only the brightest or darkest pixels at each point in the picture to create a single new JPEG copy.
Select [Retouch] in the i menu, then highlight [Lighten] or [Darken] and press 2.
[Lighten]: The camera compares the pixels in each picture and uses only the brightest.

[Darken]: The camera compares the pixels in each picture and uses only the darkest.

Choose how pictures are selected.
Option Description [Select individual pictures] Select pictures for the overlay one-by-one. [Select consecutive pictures] Select two pictures; the overlay will include the two pictures and all the pictures between them. [Select folder] The overlay will include all pictures in the selected folder. Select the source slot.
- Highlight the slot with the card containing the desired pictures and press 2.
- You will not be prompted to select the slot if only one memory card is inserted.
Select the pictures.
If you chose [Select individual pictures]:
- Highlight pictures using the multi selector.
- To view the highlighted picture full screen, press and hold the X button.
- To select the highlighted picture, press the W (Q) button. Selected pictures are marked with a check (). To remove the check () and deselect the current picture, press the W (Q) button again. The selected pictures will be combined using the option selected in Step 1.
- Press J to proceed once selection is complete.
If you chose [Select consecutive pictures]:
- All pictures in a range chosen using the multi selector will be combined using the option selected in Step 1.
- Use the W (Q) button to select the first and last pictures in the desired range.
- The first and last pictures are indicated by icons and the pictures between them by
 icons.
 - You can alter your selection by using the multi selector to highlight different pictures to serve as the first or last frame. Press the center of the sub-selector to choose the current picture as the new start or end point.
- To view the highlighted picture full screen, press and hold the X button.
- Press J to proceed once selection is complete.
If you chose [Select folder]:
Highlight the desired folder and press J to overlay all pictures in the folder using the option selected in Step 1.
Save the overlay.
- A confirmation dialog will be displayed; highlight [Yes] and press J to save the overlay and display the resulting picture.
- To interrupt the process and display a confirmation dialog before the operation is complete, press the G button; to save the current overlay “as is” without adding the remaining pictures, highlight [Save and exit] and press J. To exit without creating an overlay, highlight [Discard and exit] and press J.
- Only pictures created with this camera can be selected. Pictures created with other models cannot be selected.
- The overlay will include only pictures created with the same options selected for [Image area] > [Choose image area] in the photo shooting menu.
- The image quality setting for the completed overlay is that of the highest quality picture it contains.
- Overlays that include NEF (RAW) pictures will be saved at an image quality of [JPEG finem].
- All JPEG pictures in the overlay must be the same size.
- The size of overlays that include both NEF (RAW) and JPEG images is determined by the JPEG picture.
“Noise” (in the form of randomly-spaced bright pixels, fog, or lines) increases with the number of pictures in the overlay.
- Noise will be less noticeable if the pictures for the overlay were shot with 0 or a negative value selected for the [Sharpening] Picture Control parameter.
- Noise becomes noticeable in overlays that include around 50 pictures or more.
Motion Blend
The camera examines a selected burst of pictures to detect moving subjects and overlays them to create a single JPEG image.
Select [Retouch] in the i menu, then highlight [Motion blend] and press 2.

Select the source slot.
- Highlight the slot with the card containing the desired pictures and press 2.
- You will not be prompted to select the slot if only one memory card is inserted.
Select the pictures.
- Highlight pictures using the multi selector.
- To view the highlighted picture full screen, press and hold the X button.
- To select the highlighted picture, press the W (Q) button. Selected pictures are marked with a check (
 ). To remove the check (
 ) and deselect the current picture, press the W (Q) button again.
 - Motion blends can contain between 5 and 20 pictures.
- Press J to proceed once selection is complete.
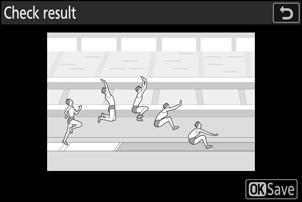
Check the results.
Check the results of the overlay in the preview display.
- To return to Step 3 and choose different pictures, tap Z or press 4.
- To proceed with the current selection, press J; a confirmation dialog will be displayed.
Save the overlay.
Highlight [Yes] in the confirmation dialog and press J to save the overlay.

- The final picture may differ from the preview both in how it looks (including color and brightness) and in how the pictures are combined.
- Only pictures created with this camera can be selected. Pictures created with other models cannot be selected.
- [Motion blend] is intended for bursts shot with the camera on a tripod, with a fixed background and moving subjects. The desired results may consequently not be achieved with bursts shot without a tripod.
- The overlay will include only pictures created with the same options selected for [Image area] > [Choose image area] in the photo shooting menu.
- The image quality setting for the completed overlay is that of the highest quality picture it contains.
- Overlays that include NEF (RAW) pictures will be saved at an image quality of [JPEG finem].
- All JPEG pictures in the overlay must be the same size.
- The size of overlays that include both NEF (RAW) and JPEG images is determined by the JPEG picture.