Parts of the Camera
Camera Body
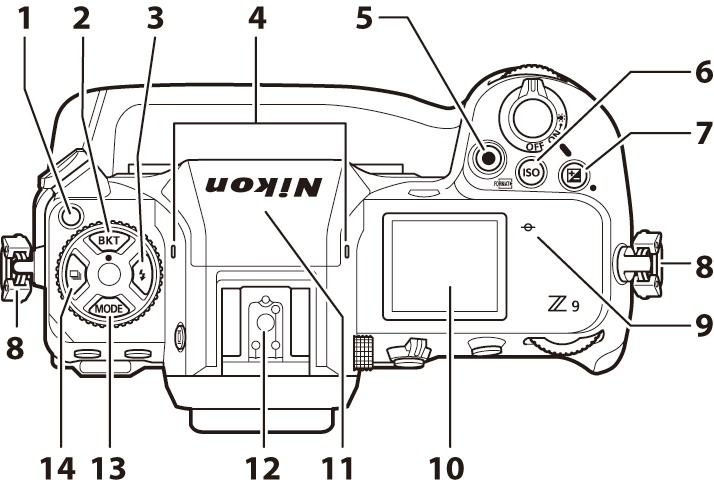
- Release mode dial lock release (0Release Mode)
- BKT button (0Bracketing)
- c button (0Flash Modes)
- Stereo microphone (for videos; 0Shooting Videos)
- Video-record button (0Shooting Videos)
- S (Q) button (0ISO Sensitivity)
- E button (0Exposure Compensation)
- Eyelet for camera strap (0Attaching the Strap)
- E (focal plane mark; 0The Focal Plane Mark and Flange-Back Distance)
- Control panel (0The Control Panel, The Control Panel)
- GNSS antenna (0Location Data)
- Accessory shoe (for optional flash unit; 0Using an On-Camera Flash, Compatible Flash Units)
- I button (0Choosing a Shooting Mode)
- c button (0Release Mode)

- Power switch (0Camera Setup, Taking Photographs)
- Shutter-release button (0Taking Photographs)
-
AF-assist illuminator (0The AF-Assist Illuminator, a12: Built-in AF-Assist Illuminator)
Red-eye reduction lamp (0Flash Modes)
Self-timer lamp (0Using the Self-Timer (E))
- M button (0The Monitor Mode Button and the Eye Sensor, Limit Monitor Mode Selection)
- Flash sync terminal cover
- Ten-pin remote terminal cover
- Cover for microphone, headphone, and Ethernet connectors
- Cover for USB and HDMI connectors
- Focus-mode button (0Focus)
- Battery chamber cover latch (0Inserting the Battery)
- Battery chamber cover (0Inserting the Battery)
- Lens mounting mark (0Attaching a Lens)
- Flash sync terminal (0The Sync Terminal)
- Ten-pin remote terminal (0Remote Terminal Accessories)
- Charge lamp (0The Charging AC Adapter: Charging)
- Ethernet connector (0Ethernet Connections, Ethernet)
- Connector for external microphone (0Microphones)
- Headphone connector (0Headphone Volume)
- HDMI connector (0Connecting to HDMI Devices)
- USB connector (0Computers: Connecting via USB, USB Power Delivery)
- Body cap (0Attaching a Lens)
- Microphone (for voice memos; 0Recording Voice Memos)
- U button (0White Balance)
- T button (0Adjusting Image Quality)
- b button (0Recording Voice Memos)
- Network indicator (0Connection Status, Connection Status)
- Monitor (0Touch Controls, The Touch Shutter)
- Speaker (0Video Playback Controls)
- Eyepiece release (0Viewfinder Eyepiece Accessories)
- O (Q) button (0Deleting Unwanted Pictures, Deleting Pictures)
- g (Fn4) button (0Picture Controls, Protecting Pictures from Deletion)
- Release mode dial (0Release Mode)
- Rubber eyecup (0Viewfinder Eyepiece Accessories)
- Viewfinder (0The Viewfinder)
- Eye sensor (0The Monitor Mode Button and the Eye Sensor)
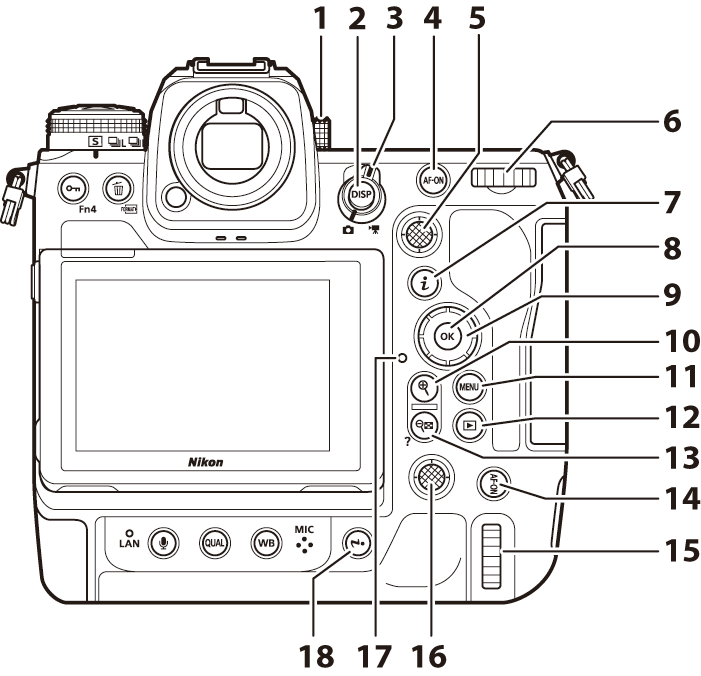
- Diopter adjustment control (0The Diopter Adjustment Control)
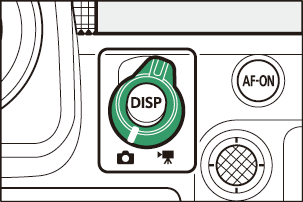
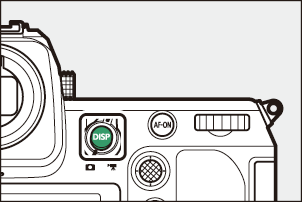
- DISP button (0Choosing a Display, Choosing a Display)
- Photo/video selector (0Taking Photographs, Shooting Videos)
- AF-ON button (0Locking Focus with the AF-ON Button)
- Sub-selector (0The Sub-Selector, Focus Lock, Autoexposure Lock)
- Main command dial (0f5: Reverse Dial Rotation)
- i button (0The i Button (the i Menu), The i Button (Playback Mode))
- J button (0Using the Menus)
- Multi selector (0Using the Menus)
- X button (0Manual Focus, Thumbnail Playback, Playback Zoom)
- G button (0The G Button)
- K button (0Playback, Viewing Pictures)
- W (Q) button (0The d (Help) Icon, Thumbnail Playback, Using Playback Zoom)
- AF-ON button for vertical shooting (0Locking Focus with the AF-ON Button)
- Main command dial for vertical shooting (0f5: Reverse Dial Rotation)
- Multi selector for vertical shooting (0Portrait (“Tall”) Orientation)
- Memory card access lamp (0The Memory Card Access Lamp, The Memory Card Access Lamp)
- i button for vertical shooting (0The i Button (the i Menu), The i Button (Playback Mode))
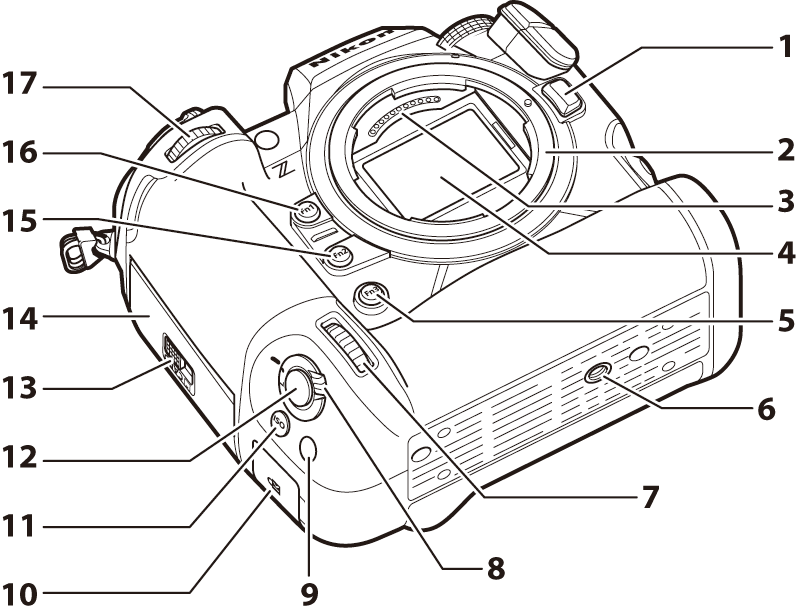
- Lens release button (0Detaching Lenses)
- Lens mount (0Attaching a Lens, The Focal Plane Mark and Flange-Back Distance)
- CPU contacts
- Image sensor (0Image Sensor Cleaning)
- Fn3 button
- Tripod socket
- Sub-command dial for vertical shooting (0 f5: Reverse Dial Rotation)
- Shutter-release button lock for vertical shooting (0Framing Photos in Portrait (“Tall”) Orientation)
- Fn button for vertical shooting
- Security slot (for anti-theft cable; 0The Security Slot)
- S button for vertical shooting (0ISO Sensitivity)
- Shutter-release button for vertical shooting
- Memory card slot cover latch (0Inserting Memory Cards)
- Memory card slot cover (0Removing Memory Cards)
- Fn2 button (0Adjusting Image Area Settings)
- Fn1 button
- Sub-command dial (0f5: Reverse Dial Rotation)
Do Not Touch the Image Sensor or Sensor Shield
Under no circumstances should you poke or exert pressure on the image sensor or sensor shield (0Sensor Shield Behavior at Power Off) or subject them to powerful air currents from a blower. Failure to observe this precaution could scratch or otherwise damage the sensor or shield. For information on cleaning the image sensor, see “Image Sensor Cleaning” (0Image Sensor Cleaning).
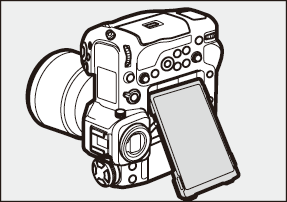
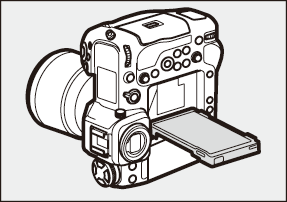
The angle of the monitor can be adjusted.
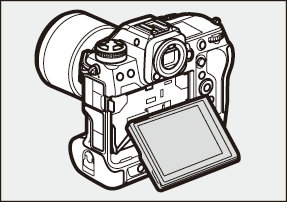

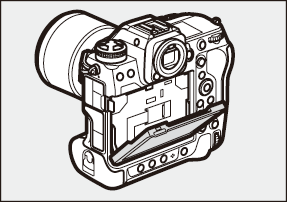
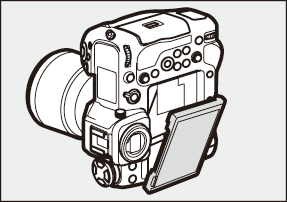
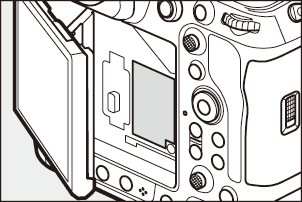
The serial number for this product can be found by opening the monitor.
If possible, stay in the open when using location data services. Keep the antenna pointed to the sky for best reception.
Rotating the power switch to D activates the backlights for the buttons and control panel (LCD illuminator). The backlights will remain lit for a few seconds after the power switch is released. The backlights turn off when the switch is rotated to D a second time or the shutter-release button is pressed halfway. Activating the button backlight makes the camera easier to use in the dark.

The security slot serves as an attachment point for third-party anti-theft cables. It is compatible and intended for use with Kensington security cable locks. For more information, see the documentation provided with the security cable lock.
The Control Panel
The control panel lights when the camera is on. At default settings, the following indicators are displayed. For a full list of the indicators that may be displayed, see “The Control Panel” (0 The Control Panel) in the section on “Camera Displays” in the “Technical Notes” chapter.
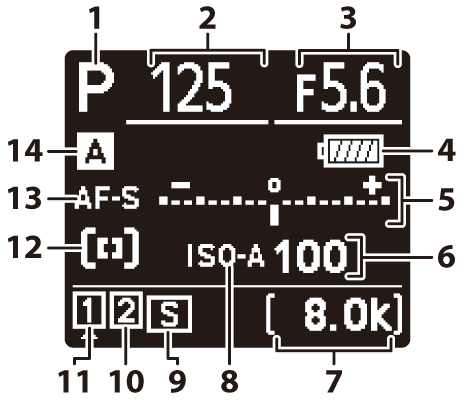
- Shooting mode (0Choosing a Shooting Mode)
- Shutter speed (0S (Shutter-Priority Auto), M (Manual))
- Aperture (0A (Aperture-Priority Auto), M (Manual))
- Battery indicator (0Battery Level)
-
Exposure indicator
- Exposure (0Exposure Indicators)
- Exposure compensation (0Exposure Compensation)
- Frame size and rate (0Video Frame Size and Rate Options)
- ISO sensitivity (0ISO Sensitivity)
-
Number of exposures remaining (0Number of Exposures Remaining, Memory Card Capacity)
Available recording time (0Shooting Videos)
-
ISO sensitivity indicator (0ISO Sensitivity)
Auto ISO sensitivity indicator (0Auto ISO Sensitivity Control)
- Release mode (0Release Mode)
- Memory card icon (Slot 2; 0Role Played by Card in Slot 2)
- Memory card icon (Slot 1; 0Role Played by Card in Slot 2)
- AF-area mode indicator (0AF-Area Mode)
- Focus mode (0Focus Mode)
- Shooting menu bank (0Shooting Menu Bank)
The Monitor
At default settings, the following indicators appear in the monitor. For a full list of the indicators that may be displayed, see “The Monitor” (0The Monitor) in the section on “Camera Displays” in the “Technical Notes” chapter.
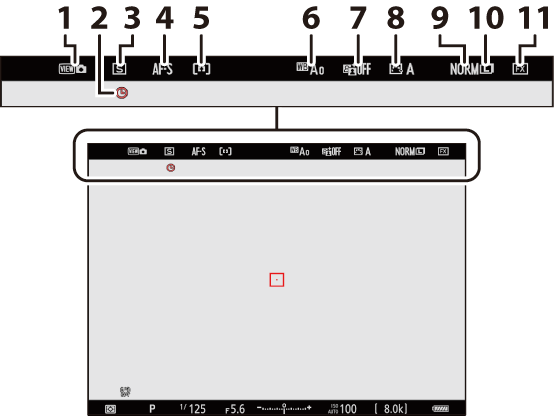
Photo Mode

- Shooting mode (0Choosing a Shooting Mode)
- Release mode (0Release Mode)
- Focus mode (0Focus Point Selection)
- AF-area mode (0AF-Area Mode)
- t icon (0The t Icon)
- White balance (0White Balance)
- Active D-Lighting (0Active D-Lighting)
- Picture Control (0Picture Controls)
- Image area (0Adjusting Image Area Settings)
- Image size (0Choosing an Image Size)
- Image quality (0Adjusting Image Quality)
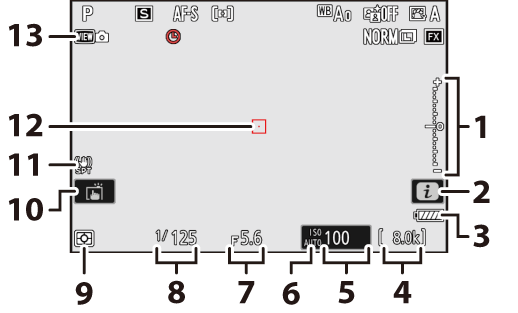
-
Exposure indicator
- Exposure (0Exposure Indicators)
- Exposure compensation (0Exposure Compensation)
- i icon (0The i Button (the i Menu), The i Button (Playback Mode))
- Battery indicator (0Battery Level)
- Number of exposures remaining (0Number of Exposures Remaining, Memory Card Capacity)
- ISO sensitivity (0ISO Sensitivity)
-
ISO sensitivity indicator (0ISO Sensitivity)
Auto ISO sensitivity indicator (0Auto ISO Sensitivity Control)
- Aperture (0A (Aperture-Priority Auto), M (Manual))
- Shutter speed (0S (Shutter-Priority Auto), M (Manual))
- Metering (0Metering)
- Touch shooting (0The Touch Shutter)
- Vibration reduction indicator (0Vibration Reduction)
- Focus point (0Focus Point Selection)
- View mode (photo live view; 0d8: View Mode (Photo Lv))
Using the Monitor with the Camera in “Tall” Orientation
When the camera is rotated to take pictures in “tall” (portrait) orientation, the display in the monitor rotates to match (photo mode only).

Press the
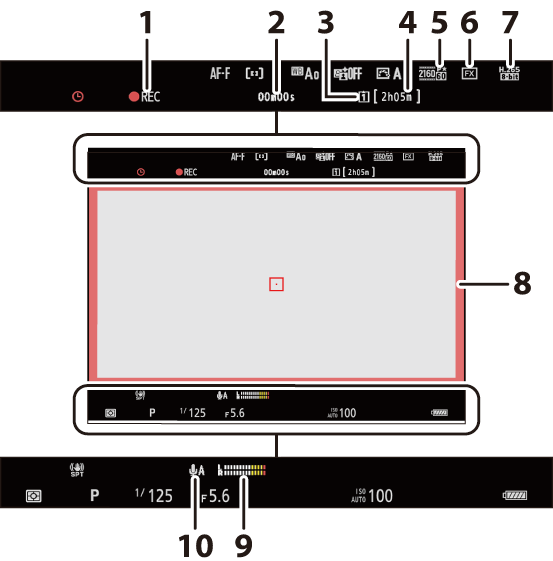
Video Mode


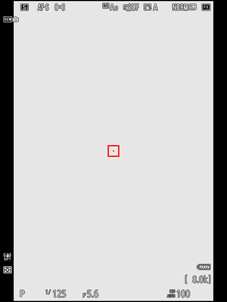
-
Recording indicator (0Shooting Videos)
“No video” indicator (0The 0 Icon)
-
Recording indicator (red border; 0g22: Red REC Frame Indicator)
- Video recording time (0Shooting Videos)
- Frame size and rate (0Video Frame Size and Rate Options)
- Destination (0Destination)
- Time remaining (0Shooting Videos)
- Image area (0Video Image Area Options)
- Video file type (0Video File Types)
- Sound level (0Microphone Sensitivity)
- Microphone sensitivity (0Microphone Sensitivity)
The Viewfinder
At default settings, the following indicators appear in the viewfinder. For a full list of the indicators that may be displayed, see “The Viewfinder” (0The Viewfinder) in the section on “Camera Displays” in the “Technical Notes” chapter.
Photo Mode
- View mode (photo live view; 0d8: View Mode (Photo Lv))
- t icon (0The t Icon)
- Release mode (0Release Mode)
- Focus mode (0Focus Mode)
- AF-area mode (0AF-Area Mode)
- White balance (0White Balance)
- Active D-Lighting (0Active D-Lighting)
- Picture Control (0Picture Controls)
- Image quality (0Adjusting Image Quality)
- Image size (0Choosing an Image Size)
- Image area (0Adjusting Image Area Settings)

- Battery indicator (0Battery Level)
- Number of exposures remaining (0Number of Exposures Remaining, Memory Card Capacity)
- ISO sensitivity (0ISO Sensitivity)
-
ISO sensitivity indicator (0ISO Sensitivity)
Auto ISO sensitivity indicator (0Auto ISO Sensitivity Control)
-
Exposure indicator
- Exposure (0Exposure Indicators)
- Exposure compensation (0Exposure Compensation)
- Aperture (0A (Aperture-Priority Auto), M (Manual))
- Shutter speed (0S (Shutter-Priority Auto), M (Manual))
- Shooting mode (0Choosing a Shooting Mode)
- Vibration reduction (0Vibration Reduction)
- Metering (0Metering)
- Focus point (0Focus Point Selection)
Using the Viewfinder with the Camera in “Tall” Orientation
When the camera is rotated to take pictures in “tall” (portrait) orientation, the display in the viewfinder rotates to match (photo mode only).
Press the
Video Mode
-
Recording indicator (0Shooting Videos)
“No video” indicator (0The 0 Icon)
- Video recording time (0Shooting Videos)
- Destination (0Destination)
- Time remaining (0Shooting Videos)
- Frame size/frame rate (0Video Frame Size and Rate Options)
- Image area (0Video Image Area Options)
- Video file type (0Video File Types)
- Recording indicator (red border; 0g22: Red REC Frame Indicator)
- Sound level (0Microphone Sensitivity)
- Microphone sensitivity (0Microphone Sensitivity)
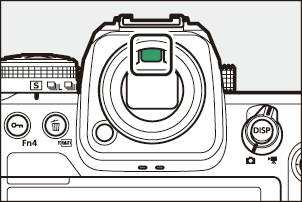
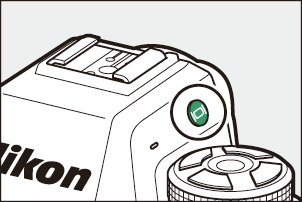
The Monitor Mode Button and the Eye Sensor
Placing your eye to the viewfinder activates the eye sensor, switching the display from the monitor to the viewfinder. Note that the eye sensor will also respond to other objects, such as your fingers.
- The viewfinder can be used for menus and playback if desired.
Press the M (monitor mode) button to cycle between viewfinder and monitor displays.
-
Press the M button to cycle through the displays as follows.
[Automatic display switch]: The camera automatically switches between the viewfinder and monitor displays based on information from the eye sensor.


[Viewfinder only]: The monitor remains blank. The viewfinder is used for shooting, menus, and playback.
- In photo mode, the viewfinder turns on for a few seconds after the camera is turned on, the shutter-release button is pressed halfway, or the AF-ON button is pressed, regardless of whether placing your eye to the viewfinder.

[Monitor only]: The monitor is used for shooting, menus, and playback. The viewfinder display will remain blank even if you put your eye to the viewfinder.


[Prioritize viewfinder (1)]: Placing your eye to the viewfinder turns the viewfinder on; the monitor remains off after you take your eye away. In video mode, the displays function as per [Automatic display switch].

[Prioritize viewfinder (2)]: In photo mode, in addition to when you look through it, the viewfinder turns on for a few seconds after the camera is turned on, the shutter-release button is pressed halfway, or the AF-ON button is pressed regardless of whether placing your eye to the viewfinder. In video mode, the displays function as per [Automatic display switch].
- The shooting display appears in the viewfinder if you put your eye to it while the monitor is used for menus or playback.
The
- The viewfinder can be focused by lifting and rotating the diopter adjustment control.
- Be careful not to put your fingers or fingernails in your eye.
- After adjusting diopter, push the diopter adjustment control back into its original position.

Putting your eye to the camera when the monitor is tilted will not trigger the viewfinder if both the following conditions are met:
- [Automatic display switch], [Prioritize viewfinder (1)], or [Prioritize viewfinder (2)] is selected for monitor mode, and
- a menu, picture, or other display currently appears in the monitor.
When using the viewfinder for extended periods, you can select [Adjust for ease of viewing] for Custom Setting d10 [View mode (photo Lv)] to ensure that viewfinder brightness and hue are adjusted for ease of viewing.
You can limit the choice of monitor modes available using the [Limit monitor mode selection] item in the setup menu.
Touch Controls
The touch-sensitive monitor offers a variety of controls that can be operated by touching the display with your fingers. During viewfinder photography, touch controls are disabled and cannot be used for focus or the like.

Focusing and Releasing the Shutter
- Touch the monitor to focus on the selected point (touch AF).
- In photo mode, the shutter will be released when you lift your finger from the display (touch shutter).

Touch shutter/AF settings can be adjusted by tapping the W icon (0The Touch Shutter).

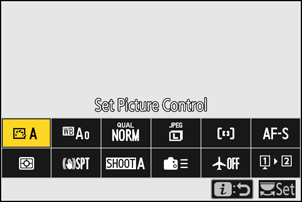
Adjusting Settings
- Tap highlighted settings in the display.
- You can then choose the desired option by tapping icons or sliders.

- Tap Z or press J to select the chosen option and return to the previous display.

Playback
Flick left or right to view other pictures during full-frame playback.

-
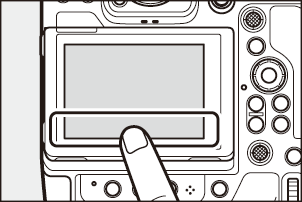
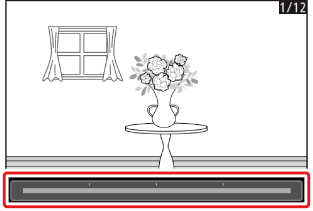
In full-frame playback, touching the bottom of the display brings up a frame-advance bar. Slide your finger left or right over the bar to scroll rapidly to other pictures.
To zoom in on a picture displayed during full-frame playback, use a stretch gesture or give the display two quick taps. You can adjust the zoom ratio using stretch gestures to zoom in and pinch gestures to zoom out.
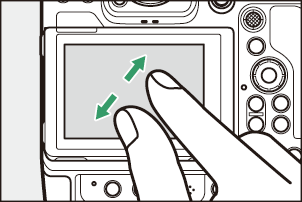
- Use slide gestures to view other parts of the picture during zoom.
- Giving the display two quick taps while zoom is in effect cancels zoom.
To “zoom out” to a thumbnail view, use a pinch gesture during full-frame playback. Use pinch and stretch to choose the number of pictures displayed from 4, 9, and 72 frames.

Viewing Videos
- Videos are indicated by a 1 icon; to start playback, tap the a icon.
- Tap Z to exit to full-frame playback.

The i Menu
- Tap the i icon to display the i menu during shooting (0The i Button (the i Menu)).

- Tap items to view and change options.
- You can choose the items displayed in the i menu (0Customizing the i Menu).
Text Entry
-
When a keyboard is displayed, you can enter text by tapping the keys.

- Text display area
- Keyboard area
- Keyboard selection
- To position the cursor, tap e or f or tap directly in the text display area.
- To cycle through the upper- and lower-case and symbol keyboards, tap the keyboard selection button.
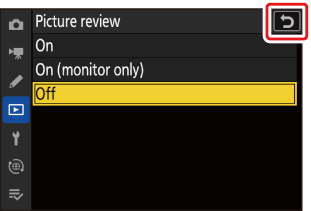
Navigating the Menus
Slide up or down to scroll.
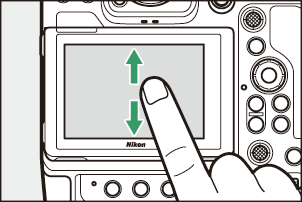
Tap a menu icon to choose a menu.

Tap menu items to display options. You can then choose the desired option by tapping icons or sliders.

To exit without changing settings, tap Z.
- The touch screen responds to static electricity. It may not respond when touched with fingernails or gloved hands. For improved response when using the touch screen with gloves, select [ON] for [Touch controls] > [Glove mode] in the setup menu.
- Do not touch the screen with sharp objects.
- Do not use excessive force.
- The screen may not respond when covered with third-party protective films.
- The screen may not respond when touched simultaneously in multiple locations.