Getting to Know the Camera
Take a few moments to familiarize yourself with camera controls and displays. You may find it helpful to bookmark this section and refer to it as you read through the rest of the manual.
- The Camera Body
- The Mode Dial
- The Control Panel
- The Viewfinder
- The Diopter Adjustment Control
- Using the Tilting Monitor
- Using the Touch Screen
- The Multi Selector
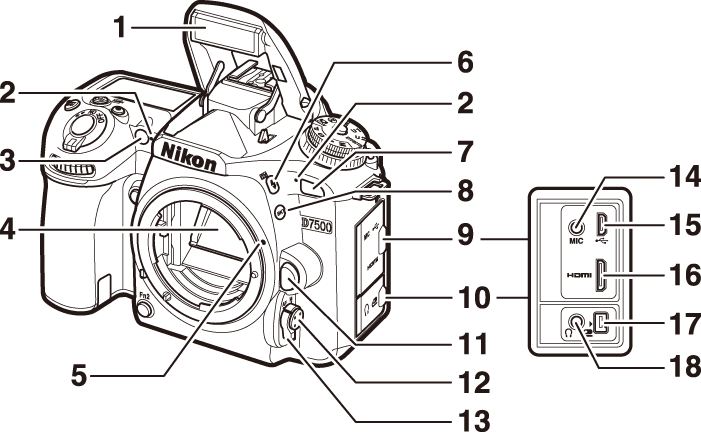
The Camera Body

| 1 | Release mode dial |
|---|---|
| 2 | Mode dial |
| 3 | Eyelet for camera strap |
| 4 | Mode dial lock release |
| 5 | Release mode dial lock release |
| 6 | Accessory shoe (for optional flash unit) |
| 7 | Movie-record button |
| 8 | Power switch |
| 9 | Shutter-release button |
|---|---|
| 10 |
E button |
| 11 |
S/Q button |
| 12 | Control panel |
| 13 | Focal plane mark (E) |
| 1 | Built-in flash |
|---|---|
| 2 | Stereo microphone |
| 3 |
AF-assist illuminator Self-timer lamp Red-eye reduction lamp |
| 4 | Mirror |
| 5 | Lens mounting mark |
| 6 |
M/Y button |
| 7 | Infrared receiver |
| 8 |
D button |
| 9 | Cover for USB, HDMI, and external microphone connectors |
|---|---|
| 10 | Cover for accessory terminal and headphone connector |
| 11 | Lens release button |
| 12 | AF-mode button |
| 13 | Focus-mode selector |
| 14 | Connector for external microphone |
| 15 | USB connector |
| 16 | HDMI connector |
| 17 | Accessory terminal |
| 18 | Headphone connector |

| 1 | Sub-command dial |
|---|---|
| 2 | Fn1 button |
| 3 | Fn2 button |
| 4 | Battery-chamber cover |
| 5 | Battery-chamber cover latch |
| 6 | Power connector cover |
| 7 | Tripod socket |
|---|---|
| 8 | CPU contacts |
| 9 | Lens mount |
| 10 | AF coupling |
| 11 | Body cap |
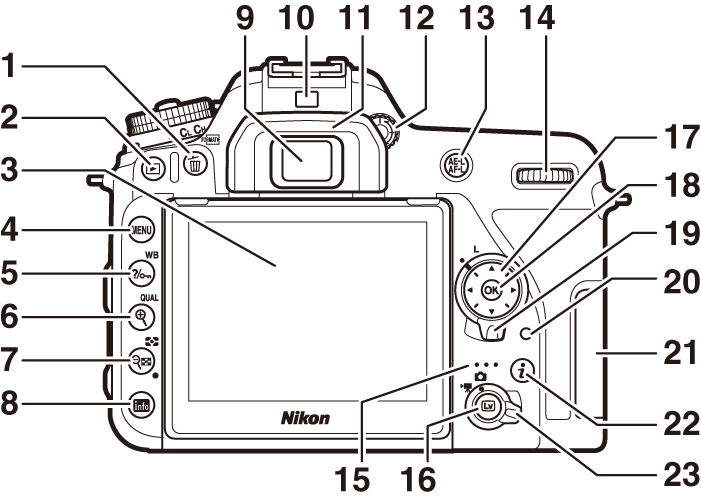
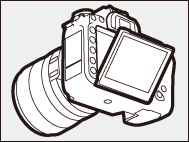
| 1 |
O/Q button |
|---|---|
| 2 |
K button |
| 3 | Tilting monitor |
| 4 | G button |
| 5 |
L/U button |
| 6 |
X/T button |
| 7 |
W/Z button |
| 8 |
R button |
| 9 | Viewfinder eyepiece |
| 10 | Eye sensor |
| 11 | Rubber eyecup |
|---|---|
| 12 | Diopter adjustment control |
| 13 |
A button |
| 14 | Main command dial |
| 15 | Speaker |
| 16 |
a button |
| 17 | Multi selector |
| 18 | J button |
| 19 | Focus selector lock |
| 20 | Memory card access lamp |
| 21 | Memory card slot cover |
| 22 |
i button |
| 23 | Live view selector |
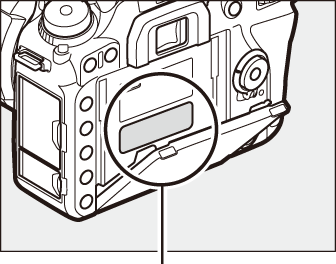
Close the Connector Cover
Close the connector cover when the connectors are not in use. Foreign matter in the connectors can interfere with data transfer.
LCD Illuminators
Rotating the power switch toward D activates the standby timer and control panel backlight (LCD illuminator), allowing the display to be read in the dark. After the power switch is released, the illuminators will remain lit for a few seconds while the standby timer is active or until the shutter is released or the power switch is rotated toward D again.

Power switch
The Speaker
Do not place the speaker in close proximity to magnetic devices. Failure to observe this precaution could affect the data recorded on the magnetic devices.
The Mode Dial
The camera offers the modes listed below. To choose a mode, press the mode dial lock release and rotate the mode dial.
Mode dial
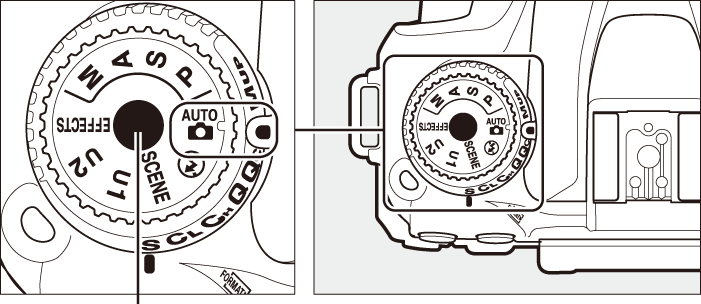
Mode dial lock release
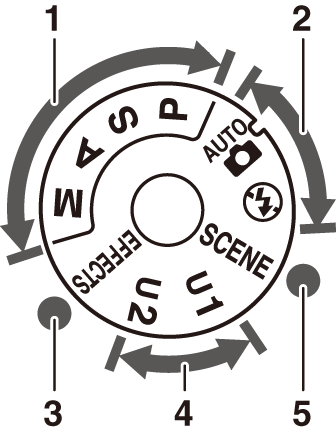
| 1 |
P, S, A, and M modes: P — Programmed auto S — Shutter-priority auto A — Aperture-priority auto M — Manual |
|---|---|
| 2 |
Auto modes: i Auto j Auto (flash off) |
| 3 | Special effects modes |
| 4 | U1 and U2 modes |
| 5 | Scene modes |
Non-CPU Lenses
Non-CPU (0 Compatible Non-CPU Lenses) lenses can be used only in mode M. Selecting another mode when a non-CPU lens is attached disables the shutter release.
Beeps During Live View
A beep may sound if you rotate the mode dial during live view. This does not indicate an error or malfunction.
The Control Panel
The control panel shows a variety of camera settings when the camera is on. The items shown here appear the first time the camera is turned on; information on other settings can be found in the relevant sections of this manual.
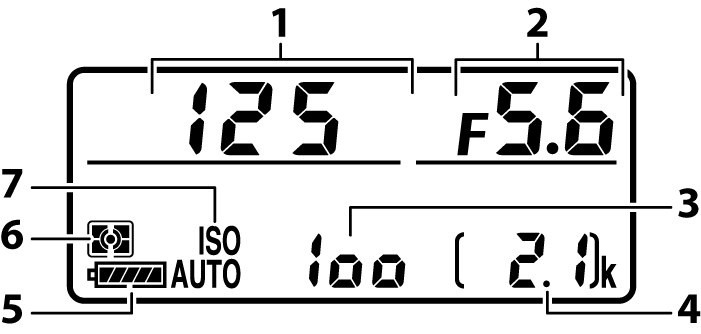
| 1 | Shutter speed |
|---|---|
| 2 | Aperture (f-number) |
| 3 | ISO sensitivity |
| 4 | Number of exposures remaining |
| 5 | Battery indicator |
|---|---|
| 6 | Metering |
| 7 |
ISO sensitivity indicator Auto ISO sensitivity indicator |
Camera Off Display
If the camera is turned off with a battery and memory card inserted, the number of exposures remaining will be displayed (some memory cards may in rare cases only display this information when the camera is on).

Control panel
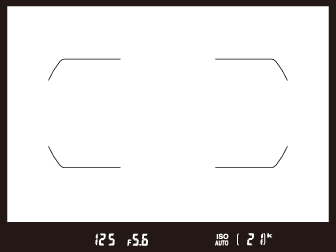
The Viewfinder
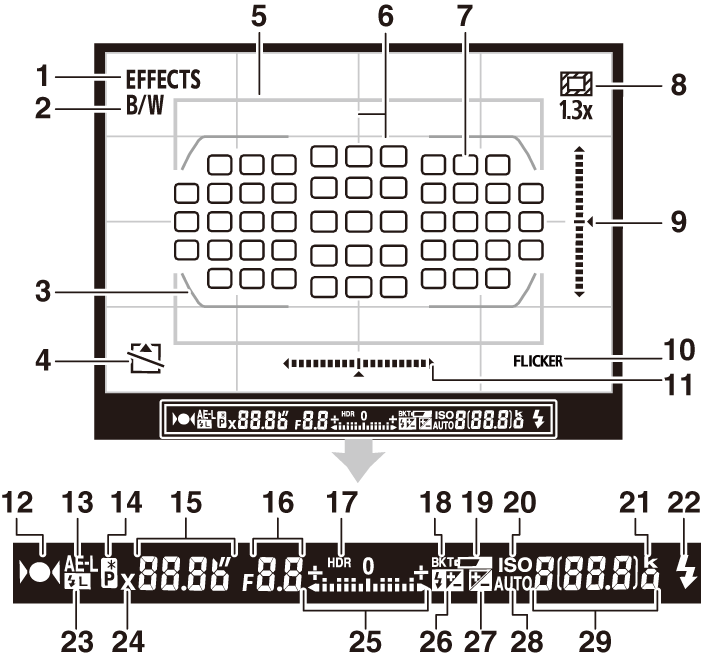
| 1 | Special effects mode indicator |
|---|---|
| 2 | Monochrome indicator |
| 3 | AF area brackets |
| 4 | “No memory card” indicator |
| 5 | 1.3× DX crop |
| 6 | Framing grid (displayed when On is selected for Custom Setting d6, Viewfinder grid display) |
| 7 | Focus points |
| 8 | 1.3× DX crop indicator |
| 9 | Pitch indicator 1, 2 |
| 10 | Flicker detection |
| 11 | Roll indicator 1, 3 |
| 12 | Focus indicator |
| 13 | Autoexposure (AE) lock |
| 14 | Flexible program indicator |
| 15 | Shutter speed |
| 16 | Aperture (f-number) |
| 17 | HDR indicator |
| 18 |
Exposure/flash bracketing indicator WB bracketing indicator ADL bracketing indicator |
|---|---|
| 19 | Low battery warning |
| 20 | ISO sensitivity indicator |
| 21 | “k” (appears when memory remains for over 1000 exposures) |
| 22 | Flash-ready indicator |
| 23 | FV lock indicator |
| 24 | Flash sync indicator |
| 25 |
Exposure indicator Exposure compensation display |
| 26 | Flash compensation indicator |
| 27 | Exposure compensation indicator |
| 28 | Auto ISO sensitivity indicator |
| 29 |
Number of exposures remaining Number of shots remaining before memory buffer fills ISO sensitivity Preset manual white balance recording indicator |
Can be displayed by pressing a button to which Viewfinder virtual horizon has been assigned using Custom Setting f1 (Custom control assignment, 0 f1: Custom Control Assignment).
Functions as a roll indicator when camera is rotated to take pictures in “tall” (portrait) orientation.
Functions as a pitch indicator when camera is rotated to take pictures in “tall” (portrait) orientation.
Note: Display shown with all indicators lit for illustrative purposes.
No Battery
When the battery is totally exhausted or no battery is inserted, the display in the viewfinder will dim. This is normal and does not indicate a malfunction. The viewfinder display will return to normal when a fully-charged battery is inserted.
The Control Panel and Viewfinder Displays
The brightness of the control panel and viewfinder displays varies with temperature, and the response times of the displays may drop at low temperatures. This is normal and does not indicate a malfunction.
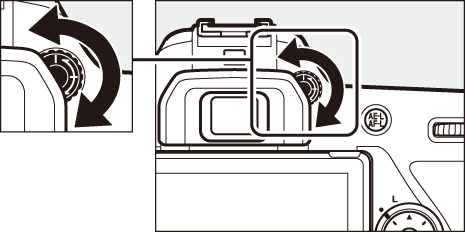
The Diopter Adjustment Control
Rotate the diopter adjustment control until the AF area brackets are in sharp focus. When operating the control with your eye to the viewfinder, be careful not to put your fingers or fingernails in your eye.
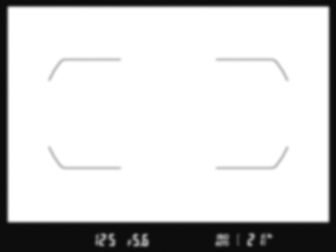
Viewfinder not in focus
Viewfinder in focus
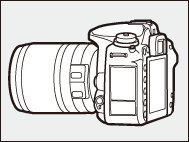
Using the Tilting Monitor
The monitor can be angled as shown below.
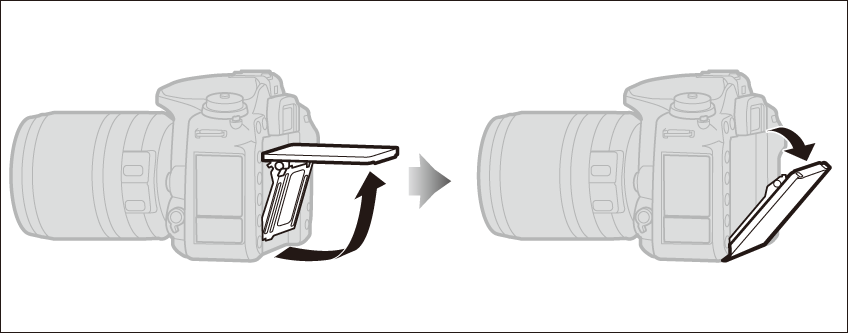
Normal use: The monitor is normally used in storage position.
Low-angle shots: Tilt the monitor up to take shots in live view with the camera held low.
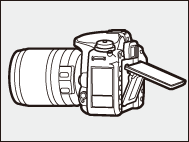
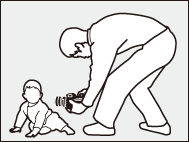
High-angle shots: Tilt the monitor down to take shots in live view with the camera held high.
Using the Monitor
Rotate the monitor gently, stopping when you feel resistance. Do not use force. Failure to observe these precautions could damage the camera or monitor. If the camera is mounted on a tripod, care should be taken to ensure that the monitor does not contact the tripod.
Do not lift or carry the camera by the monitor. Failure to observe this precaution could damage the camera. If the monitor is not being used to take photographs, return it to the storage position.
The grip and areas of the camera around the monitor may become hot. This does not indicate a malfunction.
This area becomes particularly hot.
Do not allow liquid to contact the inner surface of the monitor. Failure to observe this precaution could cause product malfunction.
Info Display Auto Off
The eye sensor will automatically turn the information display off if you put your eye to the viewfinder while the standby timer is active. The display will turn on again when you remove your eye from the viewfinder. If desired, you can prevent the information display turning off using the Info display auto off option (0 Info Display Auto Off) in the setup menu. Note, however, that regardless of the option selected the information display will turn off when the standby timer expires.
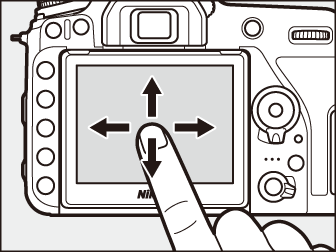
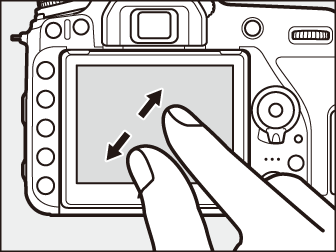
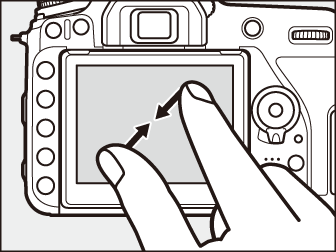
Using the Touch Screen
The touch-sensitive monitor supports the following operations:
Flick
Flick a finger a short distance left or right across the monitor.

Slide
Slide a finger over the monitor.
Stretch/Pinch
Place two fingers on the monitor and move them apart or pinch them together.
Using the Touch Screen
During playback (0 Using the Touch Screen), the touch screen can be used to:
- View other images
- Zoom in or out
- View thumbnails
- View movies
During live view, the touch screen can be used to take pictures (touch shutter; 0 Touch Photography (Touch Shutter)) or to measure a value for spot white balance (0 Live View (Spot White Balance)). The touch screen can also be used for typing (0 Text Entry) or navigating the menus (0 Using the Touch Screen).
The Touch Screen
The touch screen responds to static electricity and may not respond when covered with third-party protective films or when touched with fingernails or gloved hands. Do not use excessive force or touch the screen with sharp objects.
Using the Touch Screen
The touch screen may not respond as expected if you attempt to operate it while leaving your palm or another finger resting on it in second location. It may not recognize other gestures if your touch is too soft, your fingers are moved too quickly or too short a distance or do not remain in contact with the screen, or if the movement of the two fingers in a pinch or stretch is not correctly coordinated.
Enabling or Disabling Touch Controls
Touch controls can be enabled or disabled using the Touch controls option in the setup menu (0 Touch Controls).
See Also
For information on choosing the direction you flick your finger to view other images in full-frame playback, see B > Touch controls (0 Touch Controls).
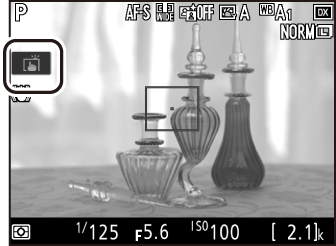
Touch Photography (Touch Shutter)
Touch the monitor to focus and lift your finger to take the photograph.
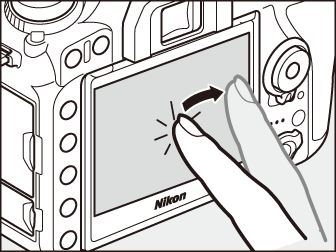
Tap the icon shown in the illustration to choose the operation performed by tapping the monitor in shooting mode. Choose from the following options:
For information on touch photography focus, see “Focus” (0 Autofocus).
Taking Pictures Using Touch Shooting Options
The shutter-release button can be used to focus and take pictures even when the 8 icon is displayed to show that touch shooting options are active. Use the shutter-release button to take photographs in continuous shooting mode (0 Choosing a Release Mode) and during movie recording. Touch shooting options can be used only to take pictures one at a time in continuous shooting mode and can not be used to take photographs during movie recording.
The touch screen can not be used to position the focus point when the focus selector lock is in the L (lock) position (0 Manual Focus-Point Selection), but it can still be used to select the subject when face-priority AF is selected for AF-area mode (0 AF-Area Mode).
In self-timer mode (0 Self-Timer Mode (E)), focus locks on the selected subject when you touch the monitor and the timer starts when you lift your finger from the screen. At default settings, the shutter is released about 10 s after the timer starts; the delay and number of shots can be changed using Custom Setting c3 (Self-timer, 0 Self-Timer). If the option selected for Number of shots is greater than 1, the camera will automatically take pictures one after the other until the selected number of shots is recorded.
The Multi Selector
In this manual, operations using the multi selector are represented by 1, 3, 4, and 2 icons.
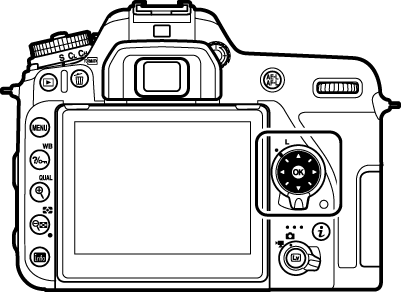
- 1: Press the multi selector up
- 3: Press the multi selector down
- 4: Press the multi selector left
- 2: Press the multi selector right
- J button