Radio AWL Using the Controls on an SB-5000
When an SB-5000 is mounted on the camera accessory shoe as a master unit for radio flash control, compatible remote flash units can be controlled by radio signals (radio AWL) from a WR-R10 wireless remote controller.

Establishing a Wireless Connection
Before using radio AWL, establish a wireless connection between the WR-R10 and the remote flash units.
The WR-R10
Be sure to update the WR-R10 firmware to the latest version; for information on firmware updates, see the Nikon website for your area.
-
C: Connect the WR-R10.
Connect the WR-R10 to the camera. For more information, see the documentation provided with the WR-R10.
-
C: Choose a channel.
Set the WR-R10 channel selector to the desired channel.

-
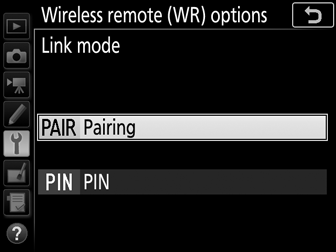
C: Choose a link mode.
Select Wireless remote (WR) options > Link mode in the setup menu (0 Wireless Remote (WR) Options) and choose from the following options:
- Pairing: Pair the remote flash units with the WR-R10.
- PIN: Connect the camera and remote flash units using a four-digit PIN.
-
f: Establish a wireless connection.
Set the remote flash units to radio AWL remote mode and set the devices to the channel you selected in Step 2, then pair each of the remote units with the WR-R10 according to the option selected in Step 3:
- Pairing: Initiate pairing on the remote unit and press the WR-R10 pairing button. Pairing is complete when the LINK lamps on the WR-R10 and flash unit flash orange and green; once a connection is established, the LINK lamp on the remote flash unit will light green.
- PIN: Use the controls on the remote flash unit to enter the PIN you selected in Step 3. The LINK lamp on the remote unit will light green once a connection is established.
Reconnecting
As long as the channel, link mode, and other settings remain the same, the WR-R10 will automatically connect to previously paired flash units when you select remote mode and Steps 2–4 can be omitted. The flash unit LINK lamp lights green when a connection is established.
Taking Photographs
Settings for the remote units must be adjusted using the controls on each unit. See the flash unit manuals for more information.
-
C: Adjust settings for the master flash.
Using the controls on the master flash, choose the flash mode and flash level for the master flash.
-
C: Adjust settings for the remote flash units.
Using the controls on the master flash, choose the flash mode and flash level for the remote flash units in each group.
-
f: Group the remote flash units.
Choose a group (A–F) for each of the remote flash units. The master flash can control up to 18 flash units in any combination.
-
C/f: Compose the shot.
Compose the shot and arrange the flash units. See the documentation provided with the flash units for more information. After arranging the flash units, perform a firing test to confirm that all flash units are functioning.
-
C/f: Take photographs.
The flash-ready indicator will light in the camera viewfinder or flash information display when all flash units are ready.

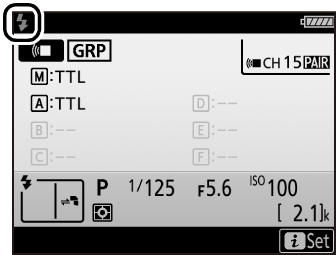
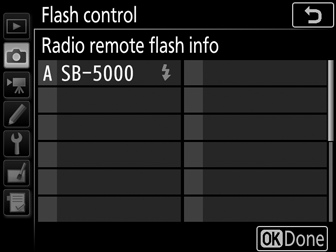
The status of radio-controlled flash units can also be viewed by pressing the i button in the flash information display.
Flash Compensation
The flash compensation value selected with the M (Y) button and sub-command dial is added to the flash compensation values selected in the wireless flash options menu. Y icons are displayed in the control panel and viewfinder when a flash compensation value other than ±0 is selected for the master or remote flash units in TTL or qA mode.