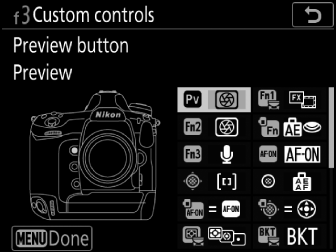
Choose the operations performed during still photography either by pressing camera controls or by pressing controls and rotating command dials.
-
Choose the roles played by the controls below. Highlight the desired control and press J.
0
[]
v
[]
x
[]
s
[]
z
[]
V
[]
7
[]
8
[]
l
[]
m
[]
2
[]
n
[]
3
[]
S
[]
-
The roles that can be assigned are listed below. The roles available vary with the control.
Role
Description
A
[]
Pressing the control selects a preset focus point.
-
To choose the point, highlight it, hold the control, and press the AF-mode button until the focus point flashes.
-
Separate focus points can be selected for “wide” (landscape) orientation and for each of the two “tall” (portrait) orientations if an option other than [] is selected for Custom Setting a5 [].
-
The behavior of the selected control can be chosen by pressing 2 when [] is highlighted.
-
[]: Pressing the control recalls the preset focus point.
-
[]: The preset focus point is selected while the control is pressed. Releasing the control restores the focus point selected before the control was pressed.
-
x
[]
Holding the control selects a preset AF-area mode. The mode previously in effect is restored when the control is released.
-
To choose the AF-area mode, press 2 when [] is highlighted.
q
[]
Holding the control selects a preset AF-area mode and initiates autofocus. The AF-area mode previously in effect is restored when the control is released.
-
To choose the AF-area mode, press 2 when [] is highlighted.
A
[]
Pressing the control initiates autofocus, duplicating the function of the AF-ON button.
F
[]
Focus locks while the control is pressed.
E
[]
Exposure locks when the control is pressed. Exposure lock does not end when the shutter is released. Exposure remains locked until the control is pressed a second time or the standby timer expires.
X
[]
Exposure locks when the control is pressed. If [] or [] is selected for white balance, white balance will lock at the value for the most recent photograph (white-balance lock). Exposure and white-balance lock do not end when the shutter is released. The lock will however be released when the control is pressed a second time or the standby timer expires.
D
[]
Exposure locks when the control is pressed. Exposure remains locked until the control is pressed a second time, the shutter is released, or the standby timer expires.
C
[]
Exposure locks while the control is pressed.
B
[]
Focus and exposure lock while the control is pressed.
r
[]
Press the control to lock flash value for optional flash units; press again to cancel FV lock.
h
[]
If the flash is currently enabled, it will be disabled while the control is pressed. If the flash is currently off, front-curtain sync will be selected while the control is pressed.
q
[]
-
: Hold the control to stop aperture down and preview depth of field.
-
: Press the control to stop aperture down and preview focus. Press the control again to restore the previously-selected aperture value.
o
[]
Hold the control to recall previously-selected settings.
-
To choose the settings recalled, press 2 when [] is highlighted.
-
Press 1 or 3 to highlight items and press 2 to view options. Press J to save changes and exit.
-
To store current camera settings for later recall using this option, select [].
-
-
Settings such as shutter speed and aperture can be changed by holding the control and rotating a command dial.
-
In mode P, you can adjust flexible program settings.
-
If an option other than [] is selected for Custom Setting b4 [], exposure compensation can be adjusted by rotating a command dial.
-
-
Settings cannot be saved or recalled if:
-
a non-CPU lens or a PC Micro-Nikkor 85mm f/2.8D lens is attached,
-
a CPU lens with an aperture ring is attached with [] selected for Custom Setting f6 [] > [], or
-
a CPU lens with an aperture ring is attached without locking the ring at minimum aperture.
-
1
[]
-
If the control is pressed when an option other than [] is selected for [] > [] in the photo shooting menu in release mode
ChorClor during burst photography in mode Q, the camera will take all the shots in the current bracketing program and repeat the bracketing burst while the shutter-release button is pressed. In release modes S and Q, shooting will end after the first bracketing burst.
-
If the control is kept pressed when [] is selected for [] > [], the camera will take pictures while the shutter-release button is pressed and apply white balance bracketing to each shot.
-
Selecting [] for Custom Setting e9 [] is equivalent to keeping the control pressed at all times.
c
[]
When an optional wireless transmitter or wireless remote controller is connected, the control can be used to toggle between remote release and master or synchronized release. The options available depend on the setting chosen for Custom Setting d4 [].
-
The following options are available when [] is selected for []:
-
c []
Keep the control pressed to take pictures with the master camera only. -
d []
Keep the control pressed to take pictures only with the remote cameras.
-
-
The following options are available when [] is selected for []:
-
6 []
Keep the control pressed to synchronize the releases on the master and remote cameras. -
d []
Keep the control pressed to take pictures only with the remote cameras.
-
4
[]
-
If a JPEG option is currently selected for image quality, an NEF (RAW) copy will be recorded with the next picture taken after the control is pressed (until the picture is taken, “RAW” will appear in the image-quality display in the rear control panel). The original image quality setting will be restored when you remove your finger from the shutter-release button or press the control again, canceling [].
-
NEF (RAW) copies are recorded at the settings currently selected for [] and [] > [] in the photo shooting menu.
b
[]
Press the control to display a framing grid in the viewfinder or monitor. Press the control again to turn the display off.
!
[]
Press the control to view a virtual horizon display in the viewfinder. Press the control again to turn the display off.
b
[]
Use the control for voice memo operations.
j
[]
If you have previously connected to networks via Ethernet or using a wireless transmitter, you can press the control to connect to the network last accessed. If you have not previously connected to a network, the network settings dialog will be displayed.
O
[]
Press the control to display “MY MENU”.
3
[]
Press the control to jump to the top item in “MY MENU.” Select this option for quick access to a frequently-used menu item.
K
[]
Press the control to start playback.
l
[]
Press the control to view only pictures that meet the criteria selected for [] in the playback menu.
W
[]
Press the control during full-frame playback to select the current picture for upload to a computer via Ethernet or using a wireless transmitter.
K
[]
Press the control to select the center focus point.
G
[]
The control performs the role currently selected for the AF-ON button.
n
[]
Press the control and rotate a command dial to choose the photo shooting menu bank.
z
[]
Hold the control and rotate the main command dial to choose the autofocus mode, the sub-command dial to choose the AF-area mode.
J
[]
Press the control and rotate a command dial to choose the image area. The options available for selection can be chosen using Custom Setting d8 [].
y
[]
Press the control and rotate a command dial to adjust Active D-Lighting.
z
[]
Press the control and rotate a command dial to choose the shutter-release delay.
$
[]
Press the control and rotate the main command dial to lock shutter speed (modes S and M). To lock aperture (modes A and M), press the control and rotate the sub-command dial.
v
[]
Make adjustments to shutter speed and aperture in increments of 1 EV, regardless of the option selected for Custom Setting b2 [].
-
In modes S and M, shutter speed can be adjusted in increments of 1 EV by holding the control and rotating the main command dial.
-
In modes A and M, aperture can be adjusted in increments of 1 EV by holding the control and rotating the sub-command dial.
w
[]
Press the control and rotate a command dial to choose a lens number saved using the [] item in the setup menu.
v
[]
Press the control and rotate the main command dial to choose the exposure mode.
E
[]
Press the control and rotate the main command dial to adjust exposure compensation.
9
[]
Press the control and rotate the main command dial to choose a value for ISO sensitivity. Press the control and rotate the sub-command dial to adjust auto ISO sensitivity control settings.
w
[]
Press the control and rotate a command dial to choose a metering option.
c
[]
To rate the current picture in playback mode, press the control and rotate the main command dial.
-
To display rating options, highlight [] and press 2. If an option other than [] is selected, the chosen rating can be assigned to pictures simply by pressing the selected control. Pressing the control again selects a “no star” rating.
t
[]
Press the control and rotate the main command dial to choose the number of shots and the sub-command dial to select the bracketing increment or Active D-Lighting amount.
$
[]
Press the control and rotate the main command dial to choose the mode and the sub-command dial to choose the number of shots.
2
[]
Press the control and rotate the main command dial to choose the mode and the sub-command dial to choose the exposure differential.
Y
[]
Pressing the selected control up, down, left, or right has the same effect as pressing 1, 3, 4, or 2 on the multi selector.
-
If this option is assigned to the sub-selector, the role played by the sub-selector during playback zoom can be chosen from [] and [].
-
If this option is assigned to the multi selector for vertical shooting, you can select the role played by the control during playback using []. If [] is selected, you can press the control up or down to display other pictures, left or right to view photo info.
-
If this option is assigned to the multi selector for vertical shooting, the role played by the center of the multi selector for vertical shooting is the same as that performed by the center of the multi selector.
x
[]
The selected control can be used to choose the focus point.
-
In the case of the multi selector for vertical shooting, the center of the selector plays the role chosen for [].
[]
The control has no effect.
-
If you press a control to which [] > [] has been assigned, the camera will display pitch and roll indicators in the viewfinder based on information from its built-in tilt sensor. These indicators can be read as follows:
Roll
|
Camera tilted right |
Camera level |
Camera tilted left |
|---|---|---|
|
|
|
|


Pitch
|
Camera tilted forward |
Camera level |
Camera tilted back |
|---|---|---|
|
|
|
|


-
Note that the display may not be accurate when the camera is tilted at a sharp angle forward or back. The camera will not display pitch and roll indicators when held at angles at which tilt cannot be measured.
-
The roles of the pitch and roll indicators are reversed when the camera is rotated to take pictures in “tall” (portrait) orientation.