Choose the functions performed either by pressing camera controls or by pressing controls and rotating command dials during filming.
-
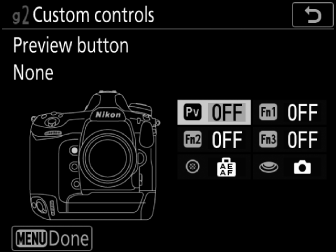
Choose the roles played by the controls below. Highlight the desired control and press J.
Option
0 []
v []
x []
z []
8 []
G []
-
The roles that can be assigned are listed below. The roles available vary with the control.
Role
Description
t
[]
Aperture widens while the Pv button is pressed. Use in combination with Custom Setting g2 [] > [] > [] for button-controlled aperture adjustment.
q
[]
Aperture narrows while the Fn1 button is pressed. Use in combination with Custom Setting g2 [] > [] > [] for button-controlled aperture adjustment.
i
[]
Exposure compensation increases while the Pv button is pressed. Use in combination with Custom Setting g2 [] > [] > [] for button-controlled exposure compensation.
h
[]
Exposure compensation decreases while the Fn1 button is pressed. Use in combination with Custom Setting g2 [] > [] > [] for button-controlled exposure compensation.
b
[]
Press the control to display a framing grid in the monitor. Press the control again to turn the display off.
X
[]
Press the control to zoom the display in on the area around the current focus point (the zoom ratio is selected in advance). Press again to cancel zoom. To choose the zoom ratio, highlight [] and press 2.
O
[]
Press the control to display “MY MENU”.
3
[]
Press the control to jump to the top item in “MY MENU.” Select this option for quick access to a frequently-used menu item.
K
[]
Press the control to select the center focus point.
F
[]
Focus locks while the control is pressed.
E
[]
Exposure locks when the control is pressed. Exposure lock does not end when the shutter is released. Exposure remains locked until the control is pressed a second time or the standby timer expires.
X
[]
Exposure locks when the control is pressed. If [] or [] is selected for white balance, white balance will lock at the value selected by the camera (white-balance lock). Exposure and white-balance lock do not end when the shutter is released. The lock will however be released when the control is pressed a second time or the standby timer expires.
C
[]
Exposure locks while the control is pressed.
B
[]
Focus and exposure lock while the control is pressed.
C
[]
Press the shutter-release button all the way down to take a photograph with an aspect ratio of 16:9.
1
[]
Press the shutter-release button halfway to start live view. If the focus mode selector is in the AF position, you can then press the shutter-release button halfway again to focus. To start movie recording, press the shutter-release button the rest of the way down. Press the shutter-release button again to end recording.
-
When [] is selected, the shutter-release button cannot be used for any purpose other than recording movies.
-
To end live view, press the a button.
-
The shutter-release buttons on optional wireless remote controllers or remote cords function in the same way as the camera shutter-release button.
J
[]
Press the control and rotate a command dial to choose the image area for movies. Note that the image area cannot be changed while recording is in progress.
H
[]
Press the control and rotate a command dial to adjust microphone sensitivity.
[]
The control has no effect.
-
-
Power aperture is available only in modes A and M.
-
A 6 icon displayed in the monitor indicates that power aperture cannot be used.
-
The display may flicker while aperture is adjusted.