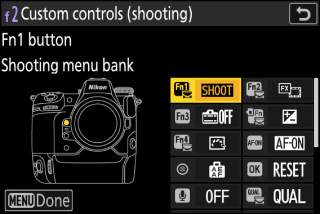
Choose the operations performed in photo mode using camera or lens controls, including the camera buttons and sub-selector and the lens control ring.
-
Choose the roles played by the controls below. Highlight the desired control and press J.
|
Option |
|
|---|---|
|
w |
[] |
|
y |
[] |
|
1 |
[] |
|
n |
[] |
|
b |
[] |
|
V |
[] |
|
8 |
[] |
|
p |
[] |
|
W |
[] |
|
B |
[] |
|
F |
[] |
|
j |
[] |
|
z |
[] |
|
y |
[] |
|
S |
[] |
|
3 |
[] |
|
l |
[] |
|
R |
[] |
|
S |
[] |
|
T |
[] |
-
The roles that can be assigned are listed below. The roles available vary with the control.
|
Role |
Description |
|
|---|---|---|
|
A |
[] |
Pressing the control selects a preset focus point.
|
|
K |
[] |
Pressing the control selects the center focus point. |
|
F |
[] |
Holding the control saves the current focus position.
|
|
H |
[] |
Pressing the control recalls a focus position saved using a control to which [] has been assigned.
|
|
d |
[] |
Holding the control selects a preset AF-area mode. The AF-area mode previously in effect is restored when the control is released.
|
|
5 |
[] |
Holding the control selects a preset AF-area mode and initiates autofocus. The AF-area mode previously in effect is restored when the control is released.
|
|
A |
[] |
Pressing the control initiates autofocus, duplicating the function of the AF-ON button. |
|
F |
[] |
Focus locks while the control is pressed. |
|
E |
[] |
Exposure locks when the control is pressed. Exposure lock does not end when the shutter is released. Exposure remains locked until the control is pressed a second time or the standby timer expires. |
|
N |
[] |
If [] or [] is selected for white balance, white balance will lock when the control is pressed (white-balance lock). White-balance lock does not end when the shutter is released. The lock will however be released when the control is pressed a second time or the standby timer expires. |
|
O |
[] |
Exposure locks when the control is pressed. White balance will also lock provided [] or [] is selected for white balance. Exposure and white-balance lock do not end when the shutter is released. The lock will however be released when the control is pressed a second time or the standby timer expires. |
|
D |
[] |
Exposure locks when the control is pressed. Exposure remains locked until the control is pressed a second time, the shutter is released, or the standby timer expires. |
|
C |
[] |
Exposure locks while the control is pressed. |
|
B |
[] |
Focus and exposure lock while the control is pressed. |
|
r |
[] |
Press the control to lock flash value for optional flash units; press again to cancel FV lock. |
|
h |
[] |
If the flash is currently enabled, it will be disabled while the control is pressed. If the flash is currently off, front-curtain sync will be selected while the control is pressed. |
|
q |
[] |
While the control is pressed, the shooting display will show how color, exposure, and depth of field are affected by current photo settings. |
|
o |
[] |
Hold the control to recall previously-selected settings.
|
|
L |
[] |
Press the control to recall previously-stored settings for still photography (including shooting mode and metering). Pressing the control a second time restores the settings in effect before stored settings were recalled.
|
|
E |
[] |
Pressing the control allows shutter speed to be fine-tuned in smaller increments. Press the control a second time to restore normal shutter-speed selection.
|
|
1 |
[] |
|
|
c |
[] |
When [] is selected for [] in the network menu, or when a wireless remote controller is used for synchronized release, the chosen control can be used to toggle between remote release and master or synchronized release. The options available depend on the setting chosen for Custom Setting d5 [].
|
|
4 |
[] |
|
|
L |
[] |
Press the control to enable silent mode. Press again to disable. |
|
b |
[] |
Press the control to hide icons and other information in the shooting display. Press again to view. |
|
b |
[] |
Press the control to display a framing grid. To hide the grid, press the control again. The display type can be selected using Custom Setting d16 []. |
|
p |
[] |
Press the control to zoom the display in on the area around the current focus point. Press again to cancel zoom. |
|
D |
[] |
Press the control to enable the virtual horizon display. Press again to hide the display. The display type can be selected using Custom Setting d17 []. |
|
k |
[] |
Press the control to toggle starlight view on. Press again to end starlight view. |
|
W |
[] |
Press the control once to enable focus peaking when MF is selected for focus mode. Press again to end focus peaking. |
|
O |
[] |
Press the control to display “MY MENU”. |
|
3 |
[] |
Press the control to jump to the top item in “MY MENU”. Select this option for quick access to a frequently-used menu item. |
|
K |
[] |
Press the control to start playback. |
|
l |
[] |
Press the control to view only pictures that meet the criteria selected for [] in the playback menu. |
|
e |
[] |
The control performs the role currently selected for the AF-ON button. |
|
n |
[] |
Press the control and rotate a command dial to choose a shooting menu bank. |
|
v |
[] |
Press the control and rotate the main command dial to choose a shooting mode. |
|
J |
[] |
Press the control and rotate a command dial to choose the image area. |
|
8 |
[] |
Press the control and rotate the main command dial to choose an image quality option and the sub-command dial to select image size. |
|
h |
[] |
Press the control and rotate a command dial to choose a Picture Control. |
|
y |
[] |
Press the control and rotate a command dial to adjust Active D-Lighting. |
|
w |
[] |
Press the control and rotate a command dial to choose a metering option. |
|
I |
[] |
Press the control and rotate the main command dial to choose a flash mode and the sub-command dial to adjust flash output. |
|
z |
[] |
Hold the control and rotate the main command dial to choose the focus mode, the sub-command dial to choose the AF-area mode. |
|
t |
[] |
Press the control and rotate the main command dial to choose the number of shots and the sub-command dial to select the bracketing increment or Active D-Lighting amount. |
|
$ |
[] |
Press the control and rotate the main command dial to choose the mode and the sub-command dial to choose the number of shots. |
|
2 |
[] |
Press the control and rotate the main command dial to choose the mode and the sub-command dial to adjust HDR strength. |
|
a |
[] |
|
|
v |
[] |
Make adjustments to shutter speed and aperture in increments of 1 EV, regardless of the option selected for Custom Setting b2 [].
|
|
w |
[] |
Press the control and rotate a command dial to choose a lens number saved using the [] item in the setup menu. |
|
X |
[] |
Autofocus can be over-ridden by rotating the lens control ring (autofocus with manual override). The control ring can be used for manual focus while the shutter-release button is pressed halfway. To refocus using autofocus, lift your finger from the shutter-release button and then press it halfway again. |
|
q |
[] |
Rotate the lens control ring to adjust aperture. |
|
t |
[] |
Rotate the lens Fn ring counterclockwise to widen the lens aperture. This option is enabled automatically when [] is selected for []. |
|
q |
[] |
Rotate the lens Fn ring clockwise to narrow the lens aperture. This option is enabled automatically when [] is selected for []. |
|
E |
[] |
|
|
i |
[] |
Rotate the lens Fn ring clockwise for increased exposure compensation. This option is enabled automatically when [] is selected for []. |
|
h |
[] |
Rotate the lens Fn ring counterclockwise to reduce exposure compensation. This option is enabled automatically when [] is selected for []. |
|
9 |
[] |
Rotate the lens control ring to adjust ISO sensitivity. |
|
B |
[] |
Rotate the lens Fn ring clockwise to increase ISO sensitivity. This option is enabled automatically when [] is selected for []. |
|
C |
[] |
Rotate the lens Fn ring counterclockwise to decrease ISO sensitivity. This option is enabled automatically when [] is selected for []. |
|
[] |
The control has no effect. |
|
Command Dials
The following roles can be assigned to the command dials. To view options, highlight items and press 2.
|
Role |
Description |
|---|---|
|
[] |
Reverse the roles of the main and sub-command dials in selected modes. Press 4 or 2 to highlight a mode and 1 or 3 to switch roles. |
|
[] |
Switch the roles played by rotating the main and sub-command dials while the focus-mode button is pressed. |
|
[] |
Choose the role played by the sub-command dial in the zoom display.
|
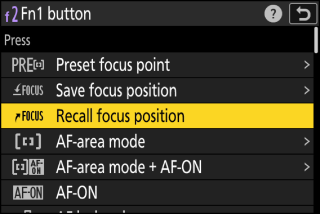
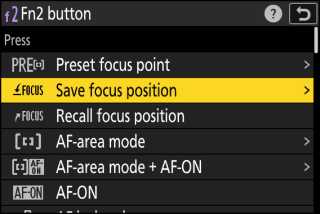
Saving and Recalling Focus Positions
You can save the current focus position by pressing and holding a custom control to which you have assigned []. The saved focus position can be instantly restored by pressing a custom control assigned [] (“memory recall”). You may find this useful if you frequently return to subjects at a fixed focus distance.
-
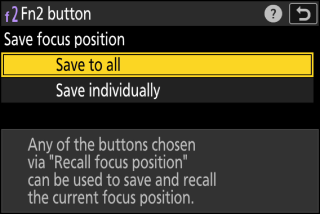
[] can be assigned to multiple controls. Focus positions saved by selecting [] for [] can be recalled using any of the assigned controls. Those saved by selecting [] for [] can instead be recalled only via a specific control.
-
Focus positions can be saved in any focus mode.
-
The stored distance is however reset when the lens is detached.
-
Focus positions cannot be saved while shooting information is displayed.
-
The focus position selected when a stored value is recalled may differ from the saved position due to changes in ambient temperature.
-
Changes to zoom after a focus position is saved tend to alter the position selected when the value is recalled.
“Save to All”
-
Assign [] to a control.
Repeat this step for each of the controls you intend to use for memory recall.
-
Select another control in the custom control list and, when prompted to choose a role, highlight [] and press 2.
Save options will be displayed.
-
Highlight [] and press J.
-
Focus on the desired subject in the shooting display and press and hold the control to which [] is assigned.
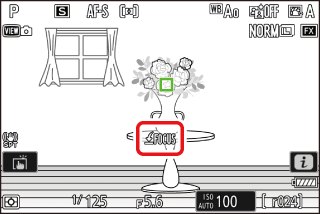
A F icon will appear in the shooting display if the operation is successful.
-
Press any of the controls to which [] was assigned in Step 1.
-
The saved focus position will be restored.
-
Although [] can be assigned to multiple controls, the same focus position will be restored regardless of the control used.
-
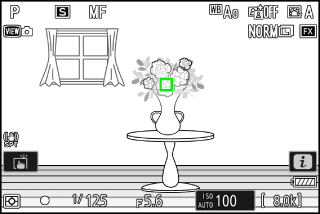
Holding a control to which [] is assigned activates manual focus (MF), and the camera will not refocus if the shutter-release button is pressed halfway while the control is pressed.
-
“Save Individually”
-
Assign [] to multiple controls.
-
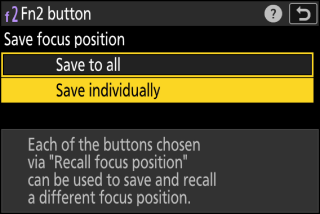
Select another control in the custom control list and, when prompted to choose a role, highlight [] and press 2.
Save options will be displayed.
-
Highlight [] and press J.
-
Focus on the desired subject in the shooting display and press and hold the control to which [] is assigned.
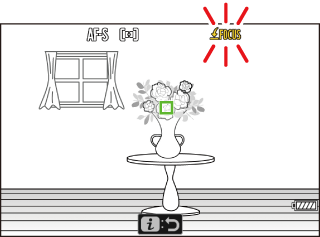
A F icon will flash in the shooting display.
-
Press the button you intend to use for recall of the focus position saved in Step 4.
-
Of the controls to which [] was assigned in Step 1, press the control you intend to use for recall of the focus position saved in Step 4.
-
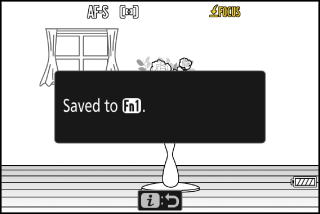
A message will appear in the shooting display if the operation is successful.
-
Repeat Steps 4 to 5 to save additional focus positions to the other controls to which [] is assigned.
-
-
Press the control for the desired focus position.
-
The focus position saved to the control in question will be restored.
-
Holding a control to which [] is assigned activates manual focus (MF), and the camera will not refocus if the shutter-release button is pressed halfway while the control is pressed.
-
High-Frequency Flicker Reduction
Flicker may cause banding in pictures taken under high-frequency LED lighting or in shots that include monitors with high-frequency LED displays. Enabling high-frequency flicker reduction allows shutter speed to be adjusted in smaller increments, which helps in identifying speeds that keep flicker to a minimum.
|
|
|
|


-
High-frequency flicker reduction is available during still photography in modes S and M at shutter speeds between 1/8000 and 1/30 s.
-
Pressing the control assigned [] enables shutter-speed fine-tuning, reducing the size of the increments used for shutter-speed selection. Normal shutter-speed selection can be restored by pressing the control a second time.
-
After choosing a shutter speed suited to your subject, enable high-frequency flicker reduction and fine-tune shutter speed while viewing your subject in the shooting display until you find a value that minimizes flicker and banding. The effect can be more readily ascertained by zooming in on your subject using display zoom.
-
When high-frequency flicker reduction is enabled, the shutter speed display shows only the denominator, with a digit added after the decimal point.
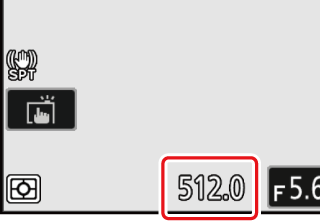
-
The precise shutter speed is shown. For example, the shutter speed when 1/500 s is selected is precisely 1/512 s, which the display shows as “512.0”, the denominator.
-
Turning high-frequency flicker reduction off restores the shutter speed display to the closest conventional value.
-
The effects of flicker in the shooting display may differ from those seen in photographs. We recommend that you take test shots to identify the shutter speed that minimizes flicker and banding.
-
Exposure maintenance is disabled while high-frequency flicker reduction is in effect, regardless of the settings chosen for Custom Setting b7 [].
Selecting [] for Custom Setting f2 [] > [] or [] while high-frequency flicker reduction is in effect saves the shutter speed currently selected via fine-tuning. This allows you to, for example, identify and save the shutter speed that minimizes striping in a high-frequency LED display and then instantly recall the stored value using the selected button only when the LED display is in the frame.