Choose the items listed in the i menu displayed when the i button is pressed in photo mode.
-
Highlight a position in the i menu, press J, and select the desired item.
-
The following items can be assigned to the i menu.
|
Option |
0 |
|
|---|---|---|
|
n |
[] |
|
|
j |
[] |
|
|
J |
[] |
|
|
8 |
[] |
|
|
o |
[] |
|
|
N |
[] |
|
|
E |
[] |
|
|
9 |
[] |
|
|
m |
[] |
|
|
h |
[] |
|
|
p |
[] |
|
|
y |
[] |
|
|
q |
[] |
|
|
r |
[] |
|
|
w |
[] |
|
|
c |
[] |
|
|
Y |
[] |
|
|
q |
[] |
|
|
m |
[] |
|
|
r |
[] |
|
|
s |
[] |
|
|
t |
[] |
|
|
s |
[] |
|
|
7 |
[] |
|
|
u |
[] |
|
|
t |
[] |
|
|
$ |
[] |
|
|
2 |
[] |
|
|
7 |
[] |
|
|
8 |
[] |
|
|
9 |
[] |
|
|
F |
[] |
|
|
L |
[] |
|
|
Y |
[] |
|
|
w |
[] |
|
|
m |
[] |
|
|
z |
[] |
|
|
W |
[] |
|
|
3 |
[] |
|
|
u |
[] |
|
|
v |
[] |
|
View Memory Card Info
View the slot currently selected as the destination for new pictures and the options used to record pictures when two memory cards are inserted. This option can be used to view but not to change the option selected.
-
The options used to record pictures when two memory cards are inserted can be selected using [] in the photo shooting menu.
Split-Screen Display Zoom
If [] is assigned to the i menu, you can select [] to simultaneously zoom in on two areas that are aligned horizontally but are in
different parts of the frame (split-screen display zoom). The locations of the areas
are indicated by the two frames (r) in the navigation window in the bottom right corner of the display.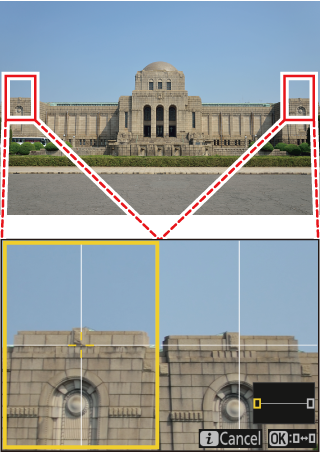
-
Zooming in simultaneously on two widely-separated but horizontally-aligned areas of the frame makes it easier to level pictures of buildings or other wide objects.
-
Use the X and W (Q) buttons to zoom in and out.
-
Press 4 or 2 to scroll the selected area left or right. Use the J button to switch between the two areas.
-
Press 1 or 3 to scroll both areas up or down simultaneously.
-
To focus on the subject at the center of the selected area, press the shutter-release button halfway.
-
To exit split-screen display zoom, press the i button.